Audi Q3: Overview - Center Console
Overview - Center Console, Basic Equipment Level
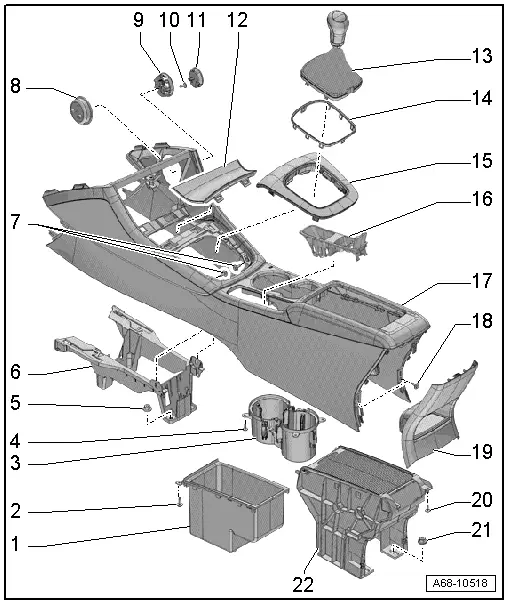
1 - Storage Compartment
Vehicles with:
- With External Audio Source Connection -R199-
- Removing and installing. Refer to → Chapter "Front Center Console Storage Compartment, Removing and Installing".
- Insert in the masking panel compartment
2 - Bolt
- 1.4 Nm
- Quantity: 2
3 - Cupholder
- Removing and installing. Refer to → Chapter "Cupholder, Removing and Installing".
4 - Bolts
- 1.4 Nm
- Quantity: 6
5 - Nut
- Quantity: 4
- 8 Nm
6 - Bracket
- For the center console
- Removing and installing. Refer to → Chapter "Center Console Bracket, Removing and Installing".
7 - Bolt
- 3 Nm
- Quantity: 4
8 - Counterholder
- For the coat hooks
- Equipment levels
- Removing and installing. Refer to → Chapter "Coat Hook Mount, Removing and Installing".
9 - Mount
- For the coat hooks
- Equipment levels
- Removing and installing. Refer to → Chapter "Coat Hook Mount, Removing and Installing".
- Making an additional cut for the new center console. Refer to → Chapter "Making an Additional Cut for the New Center Console Coat Hook".
10 - Bolt
- 1.4 Nm
- Quantity: 2
11 - Coat Hooks
- Equipment levels
- Removing and installing. Refer to → Chapter "Coat Hooks, Removing and Installing".
12 - Front Storage Compartment
- Removing and installing. Refer to → Chapter "Front Storage Compartment, Removing and Installing".
13 - Gearshift Lever or Selector Lever
- Removing and Installing. Refer to → Rep. Gr.34; Overview - Selector Mechanism.
14 - Decorative Frame
- For the center console insert
- Removing and installing. Refer to → Chapter "Center Console Decorative Trim, Removing and Installing".
15 - Insert
- For the center console
- Removing and installing. Refer to → Chapter "Center Console Insert, Removing and Installing".
- Replace damaged or deformed clips
- Press the center console insert in until it audibly locks into place.
16 - Mount
- For the button and socket
- Removing and installing. Refer to → Chapter "Button and Socket Mount, Removing and Installing".
- Engage in the front of the center console and press on it until it engages audibly.
17 - Center Console
- Removing and installing. Refer to → Chapter "Center Console, Removing and Installing".
- Versions with coat hook: making an additional cut for the new center console coat hook. Refer to → Chapter "Making an Additional Cut for the New Center Console Coat Hook".
18 - Bolt
- 3 Nm
- Quantity: 2
19 - Rear Cover
- For the center console
- Removing and installing. Refer to → Chapter "Center Console Rear Trim, Removing and Installing".
20 - Bolt
- 1.4 Nm
- Quantity: 2
21 - Nut
- 3.5 Nm
- Quantity: 2
22 - Masking Panel Compartment
- For the storage compartment
- Removing and installing. Refer to → Chapter "Storage Compartment Masking Panel in Center Console, Removing and Installing".
Overview - Center Console, Equipment Levels with Center Armrest
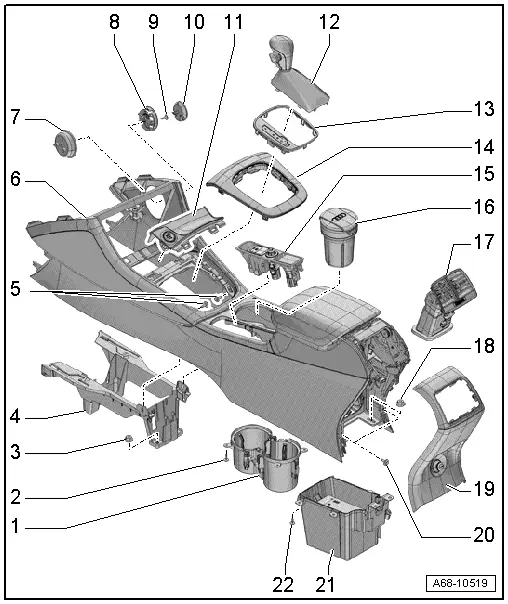
1 - Cupholder
- Removing and installing. Refer to → Chapter "Cupholder, Removing and Installing".
2 - Bolt
- 1.4 Nm
- Quantity: 6
3 - Nut
- 8 Nm
- Quantity: 4
4 - Bracket
- For the center console
- Removing and installing. Refer to → Chapter "Center Console Bracket, Removing and Installing".
5 - Bolts
- 3 Nm
- Quantity: 4
6 - Center Console
- Removing and installing. Refer to → Chapter "Center Console, Removing and Installing".
- Versions with coat hook: making an additional cut for the new center console coat hook. Refer to → Chapter "Making an Additional Cut for the New Center Console Coat Hook".
7 - Counterholder
- For the coat hooks
- Equipment levels
- Removing and installing. Refer to → Chapter "Coat Hook Mount, Removing and Installing".
8 - Mount
- for the coat hooks
- Equipment levels
- Removing and installing. Refer to → Chapter "Coat Hook Mount, Removing and Installing".
- Making an additional cut for the new center console. Refer to → Chapter "Making an Additional Cut for the New Center Console Coat Hook".
9 - Bolt
- 1.4 Nm
- Quantity: 2
10 - Coat Hooks
- Equipment levels
- Removing and installing. Refer to → Chapter "Coat Hooks, Removing and Installing".
11 - Front Storage Compartment
- With Access/Start Authorization Button -E408-
- Removing and installing. Refer to → Chapter "Front Storage Compartment, Removing and Installing".
12 - Gearshift Lever or Selector Lever
- Removing and Installing. Refer to → Rep. Gr.34; Overview - Selector Mechanism.
13 - Decorative Frame
- For the center console insert
- With Selector Lever Transmission Range Position Display Unit -Y26-
- Removing and Installing. Refer to → Electrical Equipment; Rep. Gr.96; Lamps; Selector Lever Transmission Range Position Display Unit Y26 Removing and Installing.
14 - Insert
- For the center console
- Removing and installing. Refer to → Chapter "Center Console Insert, Removing and Installing".
- Replace damaged or deformed clips
- Press on until it engages audibly
15 - Mount
- For the button and socket
- Removing and installing. Refer to → Chapter "Button and Socket Mount, Removing and Installing".
- Engage in the front of the center console and press on it until it engages audibly.
17 - Rear Vent
- Removing and installing. Refer to → Chapter "Rear Vents, Removing and Installing".
- Replace damaged or deformed clips
- Press into the installation opening as far as the stop.
18 - Nut
- 10 Nm
- Quantity: 4
19 - Rear Cover
- For the center console
- With socket
- With Central Locking Button -E600-
- Removing and installing. Refer to → Chapter "Center Console Rear Trim, Removing and Installing".
20 - Bolt
- 3 Nm
- Quantity: 4
21 - Storage Compartment
Vehicles with:
- With External Audio Source Connection -R199-
- With Telephone Baseplate -R126-
- Removing and installing. Refer to → Chapter "Front Center Console Storage Compartment, Removing and Installing".
22 - Bolt
- 1.4 Nm
- Quantity: 4
Overview - Center Console, Footwell Trim Panel
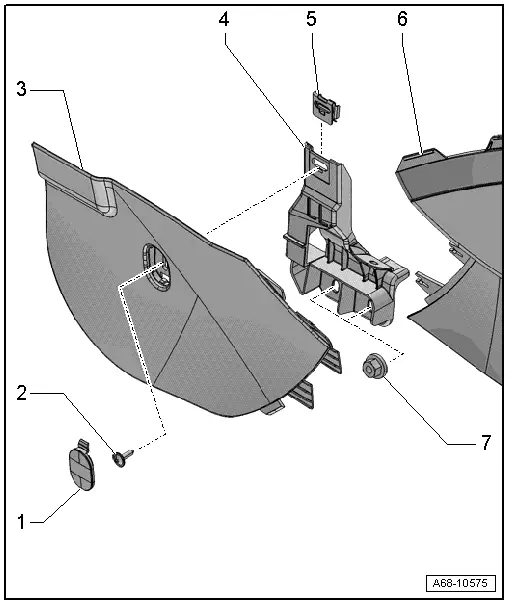
1 - Cap
- Quantity: 2
- Push in the footwell trim panel
2 - Bolt
- 3 Nm
- Quantity: 2
3 - Footwell Trim Panel
- Quantity: 2
- Removing and installing. Refer to → Chapter "Front Footwell Center Console Trim Panel, Removing and Installing".
- Engage in the center console
4 - Bracket
- For the footwell trim panel
- Quantity: 2
5 - Metal Nut
- Quantity: 2
- Insert in the bracket
6 - Center Console
7 - Nut
- 3.5 Nm
- Quantity: 4
READ NEXT:
 Center Console Rear Trim, Removing and Installing
Special tools and workshop equipment
required
Wedge Set -T10383-
Removing
- Move the front seats all the way forward.
Vehicles with a Center Armrest:
- Vehicles with vents: remov
Front Center Console Storage Compartment, Removing and Installing
Front Storage Compartment, Removing and Installing
Removing
- Remove the center console insert. Refer to
→ Chapter "Center Console Insert, Removing and Installing".
- Release the
Center Console, Removing and Installing
Center Console, Removing and Installing
Removing
- Remove the center console insert. Refer to
→ Chapter "Center Console Insert, Removing and Installing".
- Versions with Access/StSEE MORE:
Destination details
Applies to: vehicles with navigation system
Fig. 130 Details
After you have selected a destination, the details
will be displayed. Route guidance is will not be
active yet.
The functions depend on the vehicle equipment
and the selected destination.
Map preview: to zoom in on the map preview,
pr
Wheel bolts and rims
Wheel bolts
Wheel bolts must be clean and loosen/tighten
easily.
Rims
Rims with a bolted rim ring or with bolted wheel
covers consist of multiple pieces. These components
were bolted together using special bolts and a special procedure. You must not
repair or
disassemble them.
WARNING
Wheel bolts t