Audi Q3: Rear Luggage Compartment Floor Handle, Removing and Installing
Special tools and workshop equipment required
- Pry Lever -80-200-
Removing
- Remove the luggage compartment floor panel.
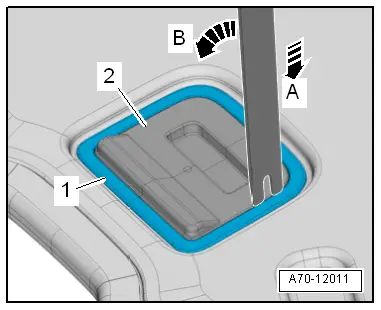
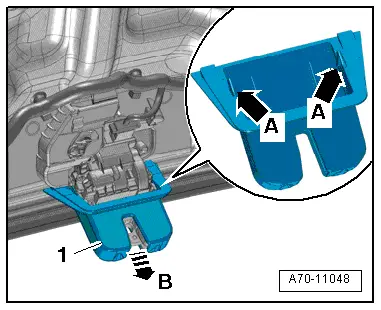
- Release the mounting bracket -1- from the underside of the luggage compartment floor.
- To do this position the Pry Lever -80 - 200--arrow A-, and release the frame -arrow B-.
- Release the mounting bracket, and remove the luggage compartment floor panel handle -2-.
Installing
Install in reverse order of removal. Note the following:
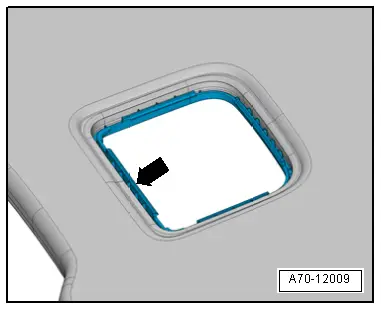
- Position the mounting bracket -arrow- from below on the cut-out in the luggage compartment floor and hold.
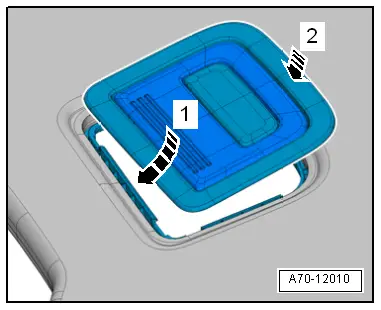
- Push the luggage compartment handle opposite of direction of travel in the mounting bracket -arrow 1- and lock downward -arrow 2-.
Installation notes, for example tightening specifications, replacing components. Refer to → Chapter "Overview - Luggage Compartment Floor".
Emergency Triangle Cover, Removing and Installing
Removing
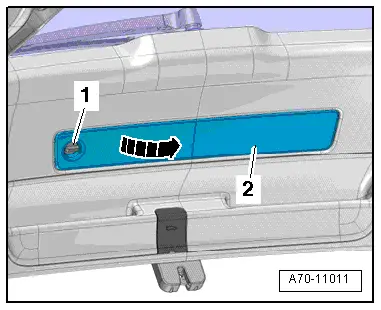
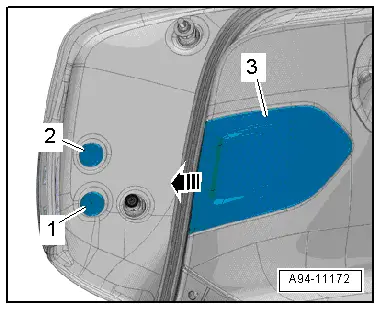
- Turn the quick release -1- 90Âş counter-clockwise and move the emergency triangle cover -2--arrow-.
- Disengage the cover from the lower rear lid trim panel and remove it.
Installing
Install in reverse order of removal.
Installation notes, for example tightening specifications, replacing components. Refer to → Chapter "Overview - Lower Rear Lid Trim Panel".
Tail Lamp Cover, Removing and Installing
Removing
- Unclip the tail lamp cover -3- from the lower rear lid trim panel in the direction of the -arrow-.
 Note
Note
Ignore -items 1 and 2-.
Installing
Install in reverse order of removal.
Installation notes, for example tightening specifications, replacing components. Refer to → Chapter "Overview - Lower Rear Lid Trim Panel".
Rear Lid Lock Trim Panel, Removing and Installing
Removing
- Remove the lower rear lid trim panel. Refer to → Chapter "Lower Rear Lid Trim Panel, Removing and Installing".
- Release the tabs -arrows A- with a screwdriver and remove the rear lid lock trim -1- from the rear lid lock -arrow B-.
Installing
Install in reverse order of removal.
Installation notes, for example tightening specifications, replacing components. Refer to → Chapter "Overview - Lower Rear Lid Trim Panel".
Lock Carrier Trim Panel, Removing and Installing
Special tools and workshop equipment required
- Pry Lever -80-200-
- Omega Clip Tool -T40280-
Removing
- Remove the luggage compartment liner.
- Remove the vehicle tool kit mounting box.
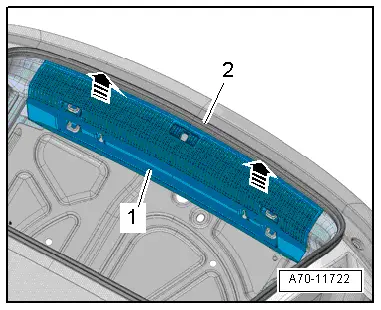
- Remove the rear lid seal -2- near the lock carrier trim panel.
- Unclip the lock carrier trim panel -1- vertically upward using the Pry Lever -80 - 200--arrows-.
- Carefully remove the lock carrier trim panel upward and disconnect the connector for the Rear Lid -Closed- Sensor 1 -G525-/Rear Lid -Closed- Sensor 2 -G526-.
 Note
Note
A lot of force is be needed to remove the lock carrier trim panel from the rear lid end piece.
Installing
Install in reverse order of removal. Note the following:
- The lock carrier trim panel -1- must engage in the eyes, pins and luggage compartment side trim panel.
Installation notes, for example tightening specifications, replacing components. Refer to → Chapter "Overview - Lock Carrier Trim".
READ NEXT:
 Roof Trim Panels
Component Location Overview - Roof Trim Panel
1 - Roof Grab Handle
Overview. Refer to
→ Chapter "Overview - Sun Visors".
2 - Sun Visor
Overview. Refer to
â
Overview - Seat Versions
Component Location Overview - Seat Versions
1 - Front Passenger Seat
Standard Seat/Sport Seat (Manual)
Vehicles with:
Seat/backrest heating
Lumbar Support
Standard seat drawer
SEE MORE:
Interior Door Mechanism, Removing and Installing
Removing
- Remove the rear door trim panel. Refer to
→ Chapter "Rear Door Trim Panel, Removing and Installing".
- Remove insulation mat.
- Disconnect and free up the connectors and wire.
- Remove the bolts -1- and
-2- from the rear of the door trim.
- Remove th
Instrument Panel Side Cover, Removing and Installing
Special tools and workshop equipment
required
Trim Removal Wedge -3409-
Removing
- Pry off the cover -1- for the
instrument panel side cover using the Trim Removal Wedge -3409--arrow-.
- Remove the cover rearward from the A-pillar gap cover.
Installing
Install in reverse ord