Audi Q3: Center Console Rear Trim, Removing and Installing
Special tools and workshop equipment required
- Wedge Set -T10383-
Removing
- Move the front seats all the way forward.
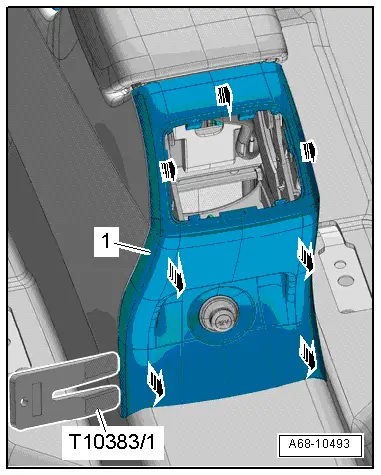
Vehicles with a Center Armrest:
- Vehicles with vents: remove the rear vent. Refer to → Chapter "Rear Vents, Removing and Installing".
- Equipment level with storage compartment: remove the rear storage compartment. Refer to → Chapter "Center Console Rear Storage Compartment, Removing and Installing".
- Unclip the cover -1- at the sides and above using the wedge -T10383/1--arrows-.
- Remove the cover toward the rear from the center console.
- Disconnect the connectors.
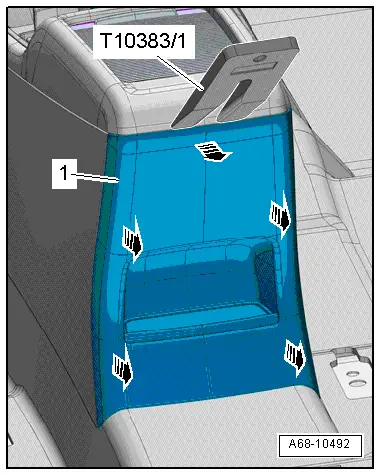
Vehicles without a Center Armrest:
- Unclip the cover -1- above and at the sides carefully with the Wedge -T10383/1--arrows-.
- Remove the cover toward the rear from the center console.
- Disconnect the connector if equipped.
Installing
Install in reverse order of removal.
Installation notes, for example tightening specifications, replacing components. Refer to → Chapter "Overview - Center Console".
Center Console Insert, Removing and Installing
Special tools and workshop equipment required
- Trim Removal Wedge -3409-
Removing
- Versions with a selector lever: move the selector lever into "D/S".
- Turn off the ignition.
- Carefully pry out the selector lever/shift lever boot at the side using a Trim Removal Wedge -3409- or small screwdriver -arrows- and fold it upward.
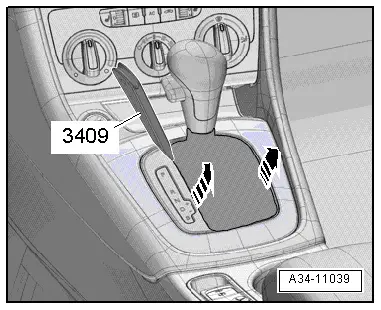
- To prevent damage to the surface, tape of the center console trim around the center console with adhesive tape.
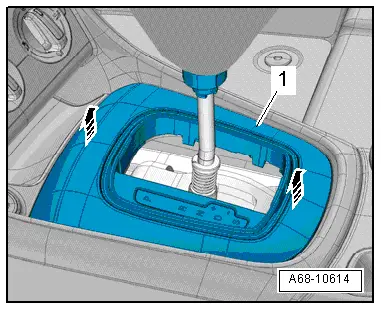
- Reach with the hand under the center console insert -1- and carefully remove it upward from the center console -arrows-.
- Disconnect the connectors and carefully remove the center console insert over the selector lever/gearshift lever.
Installing
Install in reverse order of removal.
Installation notes, for example tightening specifications, replacing components. Refer to → Chapter "Overview - Center Console".
READ NEXT:
 Front Center Console Storage Compartment, Removing and Installing
Front Storage Compartment, Removing and Installing
Removing
- Remove the center console insert. Refer to
→ Chapter "Center Console Insert, Removing and Installing".
- Release the
Center Console, Removing and Installing
Center Console, Removing and Installing
Removing
- Remove the center console insert. Refer to
→ Chapter "Center Console Insert, Removing and Installing".
- Versions with Access/St
Front Center Armrest
Overview - Front Center Armrest
1 - Front Center Armrest
Removing and installing. Refer to
→ Chapter "Front Center Armrest, Removing and Installing".
2 - Lower CSEE MORE:
Additional functions
Favorites
Applies to: vehicles with navigation system
In the favorites, you can call up frequently-used
destinations as well as your home/business address.
Accessing favorites
Applies to: MMI: Select on the home screen:
NAVIGATION > () > Favorites.
If you use myAudi navigation, your favori
Battery Charger -VAS5900-
WARNING
Risk of injury. Follow all warning messages and
safety precautions. Refer to
→ Chapter "Warnings and Safety Precautions".
WARNING
Do not check or charge a Battery -A- when the visual
indicator has "no color or is
bright yellow". Jump starting must not be