Audi Q3: Center Console, Removing and Installing
Center Console, Removing and Installing
Removing
- Remove the center console insert. Refer to → Chapter "Center Console Insert, Removing and Installing".
- Versions with Access/Start Authorization Button -E408-: Remove the front storage compartment. Refer to → Chapter "Front Storage Compartment, Removing and Installing".
- Remove the button and connector mount. Refer to → Chapter "Button and Socket Mount, Removing and Installing".
- Remove the center console rear cover. Refer to → Chapter "Center Console Rear Trim, Removing and Installing".
- Vehicles with a rear vent: Remove the rear vent air duct. Refer to → Heating, Ventilation, and Air Conditioning; Rep. Gr.87; Air Ducts; Air Distribution Channels, Removing and Installing.
- Versions with keyless access authorization system: Refer to Access/Start System Antenna 1 in Vehicle Interior -R138-. Refer to → Electrical Equipment; Rep. Gr.94; Keyless Access Authorization System; Access/Start System Antenna 1 in Vehicle InteriorR138 Removing and Installing.
- Versions with Telephone Baseplate -R126-: Disconnect the connector and free up the wire.
- Versions with External Audio Source Connection -R199-: Remove the External Audio Source Connection -R199-. Refer to → Communication; Rep. Gr.91; External Multimedia Device Source Connections External Audio Source ConnectionR199 Removing and Installing.
- Remove the A/C Control Module -J301-/Climatronic Control Module - J255-. Refer to → Heating, Ventilation, and Air Conditioning; Rep. Gr.87; Display and Control Unit; Removing and Installing.
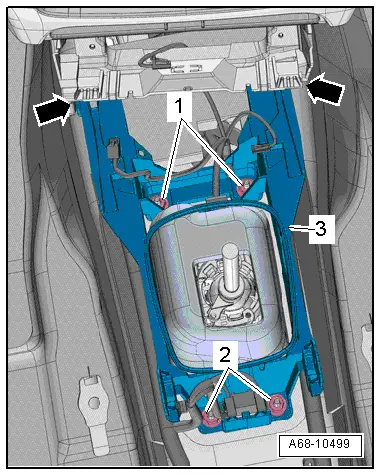
- Versions with A/C system: remove the bolts -2-.
- Release the catches -1- and remove the A/C control module frame -3-.
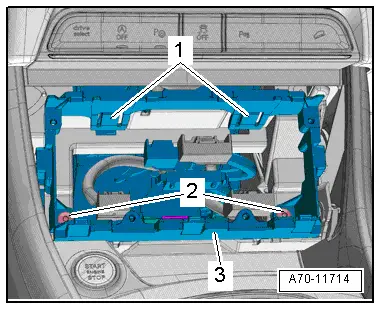
- Remove the front bolts -1- for the center console.
- Remove the bolts -1- in the center for the center console.
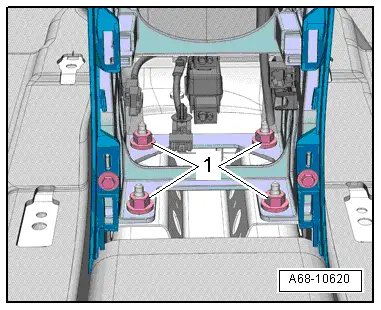
- Remove the nuts -1- for the center armrest or the masking panel compartment.
 Note
Note
Versions with masking panel compartment: remove the two nuts.
- Lift the center console and remove it back out of the instrument panel and over the selector lever/shift lever.
Installing
Install in reverse order of removal. Note the following:
- Set the center console in place and guide the electrical connectors through the opening in the center console.
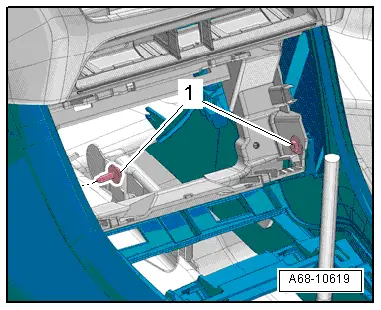
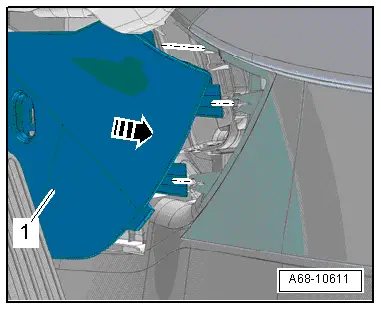
- Engage the front center console in the footwell trim panel -1--arrow-.
Installation notes, for example tightening specifications, replacing components. Refer to → Chapter "Overview - Center Console".
Rear Vents, Removing and Installing
Special tools and workshop equipment required
- Hook Tool -T40207-
Removing
- Move the front seats all the way forward.
 Note
Note
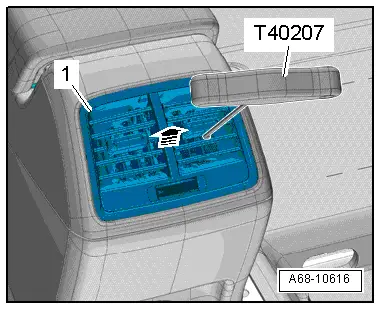
The vent has a hole on both sides for attaching the hook Hook Tool -T40207-.
- Carefully insert the Hook Tool -T40207- between the slats and hook it into the side of the vent.
- Alternating between the sides, carefully remove the vent -1- from the installation opening -arrow-.
- Disconnect the connector.
Installing
Install in reverse order of removal.
Installation notes, for example tightening specifications, replacing components. Refer to → Chapter "Overview - Center Console".
Button and Socket Mount, Removing and Installing
Special tools and workshop equipment required
- Wedge Set -T10383-
Removing
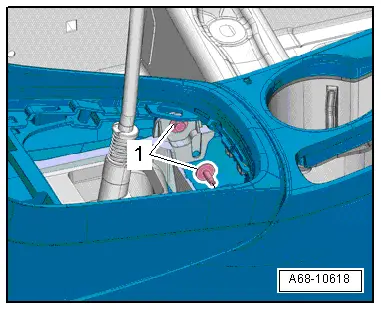
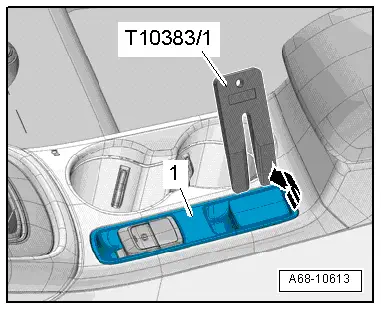
- Unclip the rear mount -1- with the Wedge -T10383/1- from the center console.
- Pivot the mount upward -arrow- and disengage the front section from the center console.
- Disconnect the connector for the button and connector.
Installing
Install in reverse order of removal.
Installation notes, for example tightening specifications, replacing components. Refer to → Chapter "Overview - Center Console".
Coat Hooks, Removing and Installing
Removing
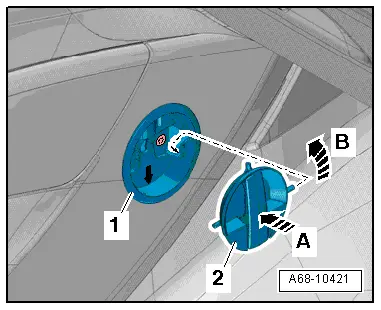
- Push the coat hook -2- into the mount -1--arrow A-.
- Turn the coat hook counter-clockwise -arrow B- and remove.
Installing
Install in reverse order of removal.
Installation notes, for example tightening specifications, replacing components. Refer to → Chapter "Overview - Center Console".
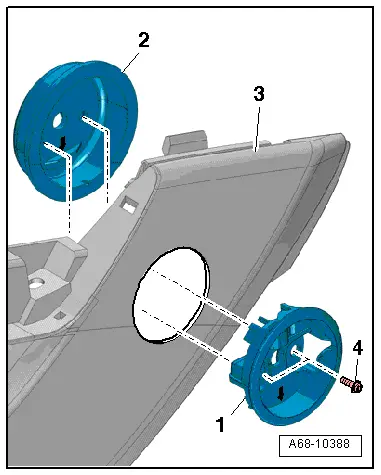
Coat Hook Mount, Removing and Installing
Removing
- Remove the coat hook. Refer to → Chapter "Coat Hooks, Removing and Installing".
- Remove the A/C Control Module -J301-/Climatronic Control Module - J255-. Refer to → Heating, Ventilation, and Air Conditioning; Rep. Gr.87; Display and Control Unit; Removing and Installing.
- Remove the screws -4- and remove the coat hook mount -1-.
- Remove the counterholder -2- from the rear side of the center console -3-.
Installing
Install in reverse order of removal. Note the following:
- Align the mount and coat hook counterholder in the center console.
- The arrow points downward.
Installation notes, for example tightening specifications, replacing components. Refer to → Chapter "Overview - Center Console".
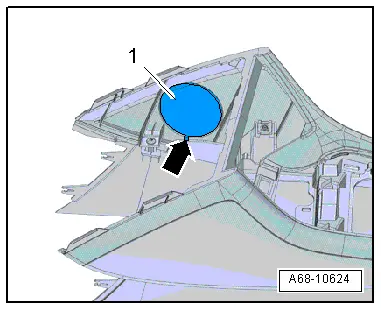
Making an Additional Cut for the New Center Console Coat Hook
 Note
Note
- As an original part the center console is delivered without a cut out for the coat hook.
- For the versions with a coat hook the cut out must be made in the center console as described.
Procedure
- On the inner impression on the center console -marked surface 1-, punch out a 54 mm diameter hole for the coat hook mount and shown in the illustration.
- Add a recess -arrow- as anti-twist mechanism for the coat hook mount in the center console as shown in the illustration.
- Install the mount for the coat hook. Refer to → Chapter "Coat Hook Mount, Removing and Installing".
- Install the coat hook. Refer to → Chapter "Coat Hooks, Removing and Installing".
- Install center console. Refer to → Chapter "Center Console, Removing and Installing".
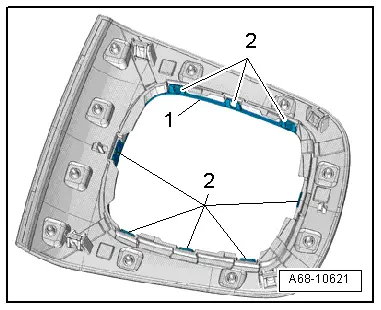
Center Console Decorative Trim, Removing and Installing
Removing
- Remove the center console insert. Refer to → Chapter "Center Console Insert, Removing and Installing".
- Carefully release the decorative frame -1- from the catches -2- and remove upward.
 Note
Note
Proceed very carefully when removing and installing because it is relatively easy to damage the catches.
Installing
Install in reverse order of removal.
Installation notes, for example tightening specifications, replacing components. Refer to → Chapter "Overview - Center Console".
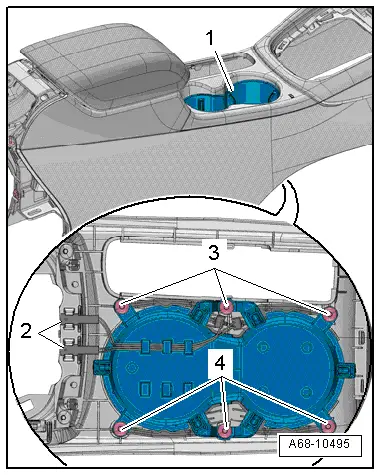
Cupholder, Removing and Installing
Removing
- Remove the center console. Refer to → Chapter "Center Console, Removing and Installing".
- Versions with Cupholder Illumination Bulb -L121-: free up the connector -2-.
- Remove the bolts -3-, -4- and then remove the cupholder -1- downward.
Installing
Install in reverse order of removal.
Installation notes, for example tightening specifications, replacing components. Refer to → Chapter "Overview - Center Console".
Center Console Rear Storage Compartment, Removing and Installing
Special tools and workshop equipment required
- Wedge Set -T10383-
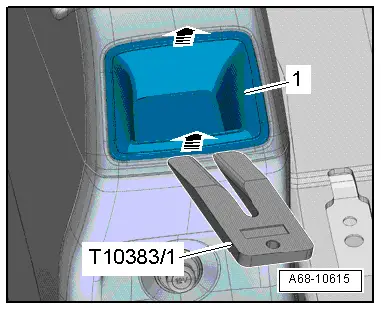
Removing
- Move the front seats all the way forward.
- Push the Wedge -T10383/1- in the gap between the storage compartment and the center console.
- Disengage the storage compartment -1- at the top and bottom -arrows- and remove.
Installing
Install in reverse order of removal.
Installation notes, for example tightening specifications, replacing components. Refer to → Chapter "Overview - Center Console".
Center Console Bracket, Removing and Installing
Removing
- Remove the center console. Refer to → Chapter "Center Console, Removing and Installing".
- Disconnect and free up the connectors.
- Versions with a heated front seat and manual climate control system: Remove the Front Seat Heating Control Module -J774-. Refer to → Chapter "Front Seat Heating Control Module -J774-, Removing and Installing".
- Remove the nuts -1- and -2-.
- Disengage the pins -arrows- from the guide on the instrument panel and remove the bracket -3-.
Installing
Install in reverse order of removal.
Installation notes, for example tightening specifications, replacing components. Refer to → Chapter "Overview - Center Console".
READ NEXT:
 Front Center Armrest
Overview - Front Center Armrest
1 - Front Center Armrest
Removing and installing. Refer to
→ Chapter "Front Center Armrest, Removing and Installing".
2 - Lower C
Overview - Interior Rearview Mirror
Overview - Interior Rearview Mirror, Version 1
1 - Front Cover
For the mirror base
Removing and installing. Refer to
→ Chapter "Interior Rearview Mirror, Removing and Insta
Interior Rearview Mirror, Removing and Installing
Removing
- Turn interior rearview mirror at the mirror base
-1- counterclockwise
-arrow- as far as the stop and
remove from the retaining plate.
Interior Rearview Mirror without Optional SEE MORE:
Front Backrest, Removing and Installing
Backrest Cover, Removing and Installing
Removing
WARNING
Danger of being injured by burrs on the backrest
cover.
Wear protective gloves.
- Reach behind the backrest cover -1-
and pull the cover off the backrest frame to the right as
illustrated.
Note
If this is d
Battery, Charging
Preparing for Charging, Engine Compartment Battery
Procedure
WARNING
Risk of explosion on discharged battery with "Visual
indicator".
If the "Visual indicator" has no color or is light
yellow, the battery may not be tested or charged. Jump
starting must not be used! There is a ri