Audi Q3: Overview - Hood
Overview - Hood
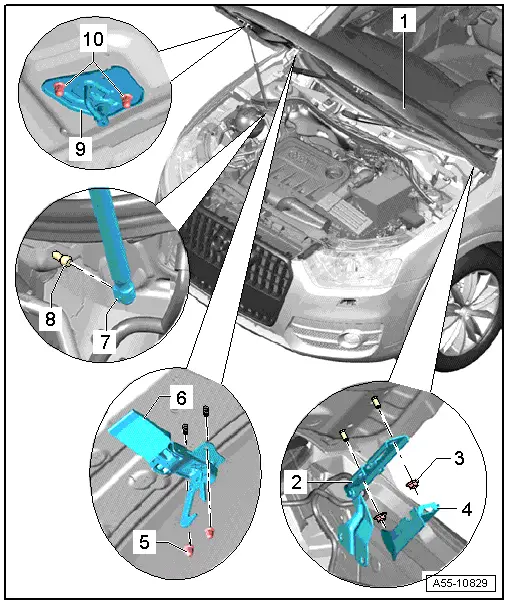
1 - Hood
- A second technician is needed to support and hold the hood during removal and installation.
- Removing:
- Unclip and remove the cover -4-.
- Engage the gas-filled strut on the hood. Refer to → Chapter "Gas-Filled Strut, Removing and Installing".
- Remove the nuts -3- from the upper hood hinge.
- Remove the hood.
- Install in reverse order of removal.
- Adjusting:
- Center the hood between the fenders.
- Adjust the height of the hood over the lower part of the lid lock.
- Adjust the gap between the hood and the fenders using the stop buffers.
2 - Lid Hinge
- Removing and installing. Refer to → Chapter "Hinges, Removing and Installing".
3 - Nut
- 25 Nm
4 - Cover
5 - Nut
- 8 Nm
6 - Hook
- Removing and installing. Refer to → Chapter "Center Catch, Removing and Installing".
7 - Gas-Filled Strut
- Removing and installing. Refer to → Chapter "Gas-Filled Strut, Removing and Installing".
- Install with tube end of strut at body.
8 - Ball Pin
- 21 Nm
9 - Catch
- Removing and installing. Refer to → Chapter "Catch, Removing and Installing".
10 - Nut
- 8 Nm
Overview - Gas-Filled Strut
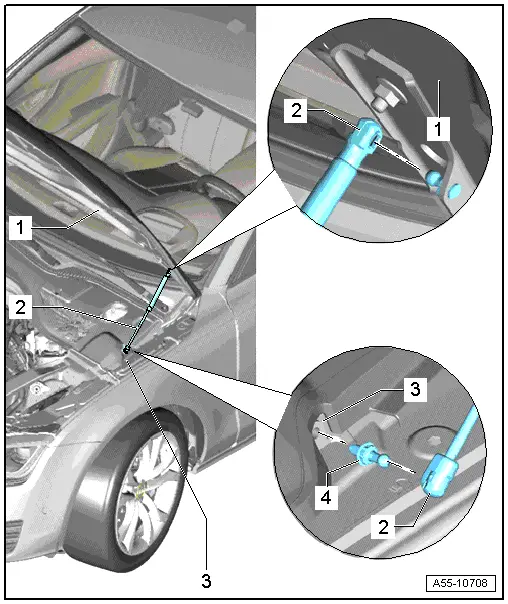
1 - Hood
2 - Gas-Filled Strut
- Removing and installing. Refer to → Chapter "Gas-Filled Strut, Removing and Installing".
3 - Ball Pin
- 21 Nm
4 - Ball Pin
- 21 Nm
Overview - Rear Lid Latch
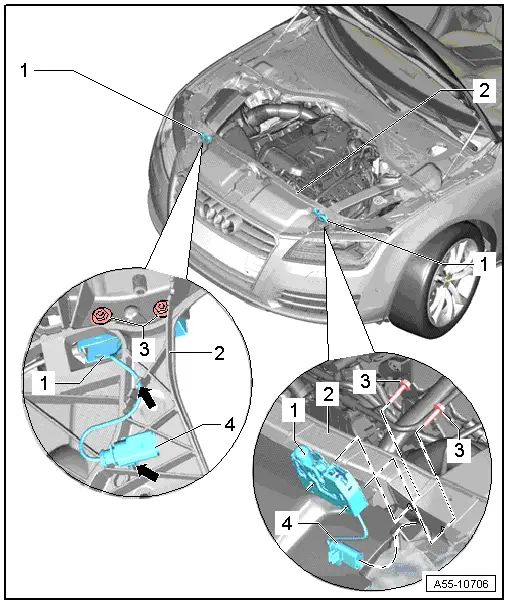
1 - Hood Latch
- Removing and installing. Refer to → Chapter "Hood Latch, Removing and Installing".
2 - Lock Carrier
3 - Bolt
- 11 Nm
4 - Hood Latch Electric Wire
READ NEXT:
 Overview - Release Cable
Overview - Latch Release Cable
1 - Right Hood Latch
Removing and installing. Refer to
→ Chapter "Hood Latch, Removing and Installing".
2 - Hood Latch Cable
R
Hood, Adjusting
Special tools and workshop equipment
required
Gauge - Gap Adjustment -3371-
Gap Dimensions for Hood
Note
All dimensions are in mm with a +- 0.5 mm tolerance.
Dimension -A- =
Release Cable, Removing and Installing
Release Cable Coupling
- Remove clips -1- and lift the release
cables -8- and -9-
on both sides toward the hood latches.
- To remove the coupling -2-, release the
retainers -arrowsSEE MORE:
Introduction
Applies to: vehicles with telephone
You can operate various telephone functions easily
through the MMI in your vehicle.
Depending on the country and the vehicle equipment,
the following options may be available:
Connecting a cell phone with Bluetooth
Using two telephones
Using the Audi phone bo
Relay and Fuse Carriers Behind Instrument Panel on Driver Side, Removing and
Installing
Relay Carrier on Vehicle Electrical System Control Module, Removing and
Installing
Removing
- Remove the driver side instrument panel cover. Refer to
→ Body Interior; Rep. Gr.68; Storage Compartments/Covers; Driver
Side Instrument Panel Cover, Removing and Installing.
-
© 2019-2026 Copyright www.auq3.net | 0.0096
