Audi Q3: Hood, Adjusting
Special tools and workshop equipment required
- Gauge - Gap Adjustment -3371-
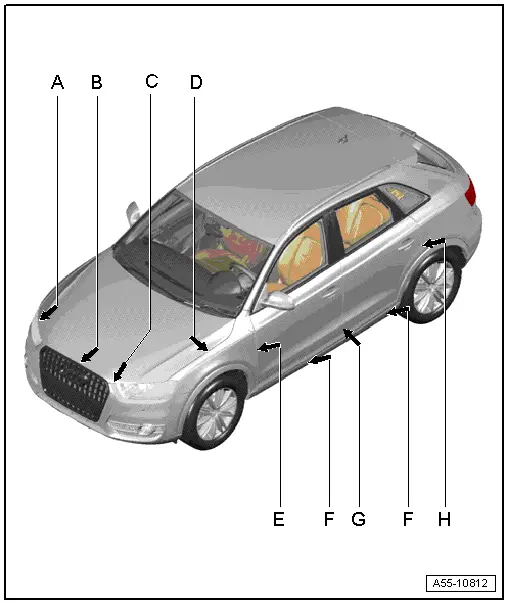
Gap Dimensions for Hood
 Note
Note
All dimensions are in mm with a +- 0.5 mm tolerance.
- Dimension -A- = 4.5 mm
- Dimension -B- = 4.5 mm
- Dimension -C- = 4.5 mm
- Dimension -D- = 3.0 mm centered
Height Adjustment Stop Buffer
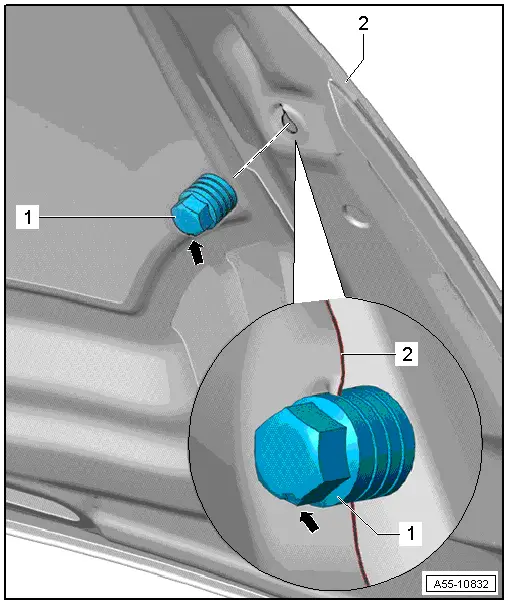
1 - Adjusting Buffer
 Note
Note
The adjusting buffers are used to adjust the height of the lid.
- The adjusting buffer must lightly contact the lock carrier when the hood is closed.
2 - Hood
Hood Impact Guard, Replacing
 Note
Note
The impact guard is also equipped with double-sided adhesive tape.
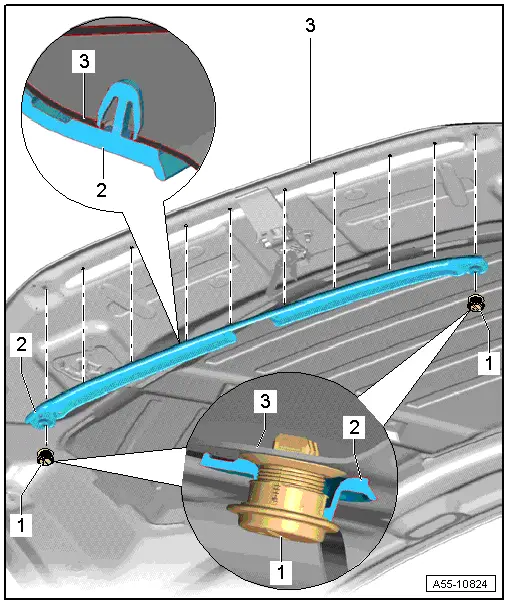
1 - Clip
2 - Impact Guard
- To remove, remove the clip from the hood and then remove the impact guard.
- When installing push from the outside toward the inside with the clips.
3 - Hood
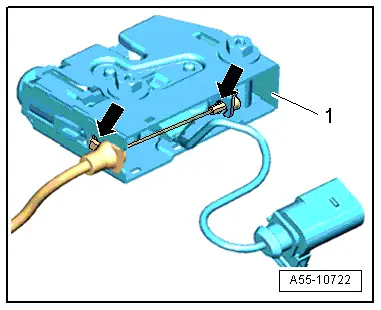
Hood Latch, Removing and Installing
Removing
- Remove the lock carrier cover. Refer to → Chapter "Lock Carrier Cover, Removing and Installing, Vehicles through MY 2014".
- Left: Remove the washer fluid reservoir filler neck. Refer to → Electrical Equipment; Rep. Gr.92; Overview - Windshield Washer System.
- Disconnect the connector -4- from the anti-theft alarm system.
- Disconnect the connector from the lock carrier.
- Remove bolts -3-.
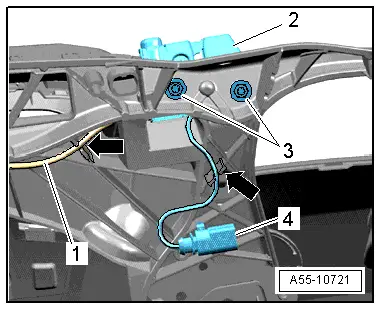
- Disconnect the hook from the cable -left arrow- and remove it with the guide downward from the hood latch -1-.
- Disconnect the release cable from the release lever -right arrow-.
Installing
Install in reverse order of removal. Note the following:
 Note
Note
Move the hood latch in the oblong holes in the lock carrier to adjust the height of the hood.
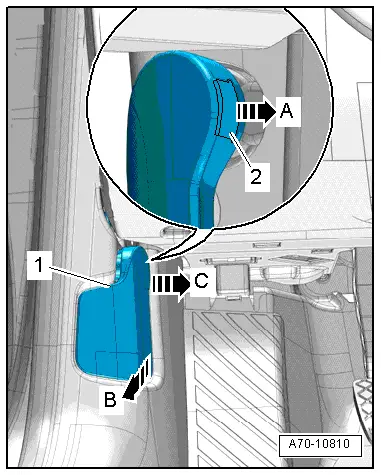
Hood Release Lever, Removing and Installing
Removing
- Pull the securing clip -2- out of the operating lever -1- slightly -arrow A- using a small screwdriver.
- Pull the operating lever back -arrow B- to release the hood and hold it in this position.
 Caution
If the operating lever is pulled out crooked, the mount could be damaged.
- At the same time, pull the operating lever level with the center of the vehicle and out of the mount -arrow C-.
Installing
Install in reverse order of removal.
READ NEXT:
 Release Cable, Removing and Installing
Release Cable Coupling
- Remove clips -1- and lift the release
cables -8- and -9-
on both sides toward the hood latches.
- To remove the coupling -2-, release the
retainers -arrows
Hinges, Removing and Installing
1 - Hood Hinge
Removing
Before removing a hood hinge, support the hood or secure it against
falling.
Remove the gas-filled strut. Refer to
→ Chapter "Gas-Filled Strut,
Overview - Rear Lid
Overview - Rear Lid
1 - Rear Lid
Removing and installing. Refer to
→ Chapter "Rear Lid, Removing and Installing".
Rear Lid Seal, Removing and Installing. Refer to
→&nbsSEE MORE:
Traffic incidents
Introduction
Applies to: vehicles with navigation system and online traffic
information
Fig. 135 Traffic information overview
Open traffic information
Requirement: the map must be displayed.
Press on the traffic jam symbol in the side
menu on the map fig. 131.
Display traffic report details
Component Location Overview - Instrument Panel
1 - Center Console
Overview. Refer to
→ Chapter "Overview - Center Console".
2 - Driver Side Instrument Panel Cover
Overview. Refer to
→ Chapter "Overview - Driver Side Instrument Panel Cover".
3 - Trim Panel
For the steering column