Audi Q3: Overview - Release Cable
Overview - Latch Release Cable
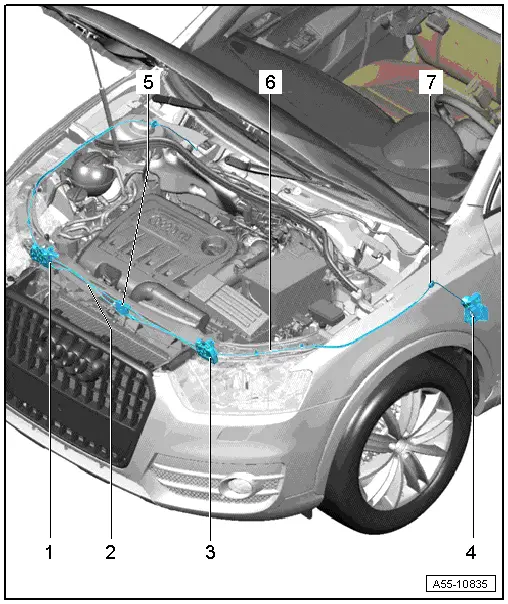
1 - Right Hood Latch
- Removing and installing. Refer to → Chapter "Hood Latch, Removing and Installing".
2 - Hood Latch Cable
- Removing and installing. Refer to → Chapter "Release Cable, Removing and Installing".
3 - Left Hood Latch
- Removing and installing. Refer to → Chapter "Hood Latch, Removing and Installing".
4 - Operating Lever
- Disengage release cable.
5 - Cable Coupling
- Disengage the release cable inside the passenger compartment before removing the lock carrier and when removing the operating lever.
6 - Hood Release Lever Cable
- Release cable to the operating lever in the vehicle interior.
7 - Grommet
- Make sure it fits correctly when installing it. The grommet must be pushed all the way into the bulkhead.
Overview - Operating Lever, Cover
Hood Release Lever Cover
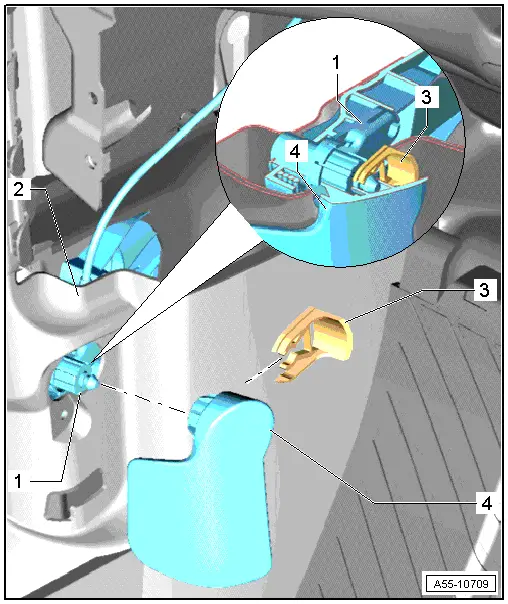
1 - Operating Lever
- For lid latch
- Removing and installing.
2 - Front Sill Panel Strip
- Removing and Installing. Refer to → Body Interior; Rep. Gr.70; Passenger Compartment Trim; Sill Panel Strip, Removing and Installing.
3 - Clip
- Press in completely, it must engage.
4 - Hood Release Lever Cover
- Removing and installing. Refer to → Chapter "Hood Release Lever, Removing and Installing".
Operating Lever
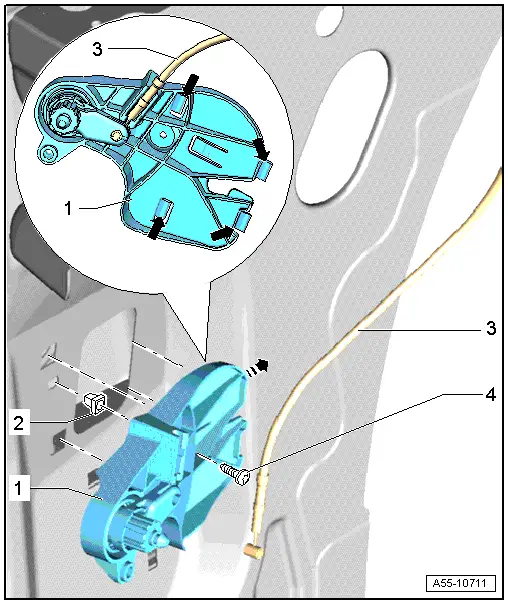
1 - Hood Release Lever Bracket
- The hood release lever cover is removed.
- The front sill panel strip is removed. Refer to → Body Interior; Rep. Gr.70; Passenger Compartment Trim; Sill Panel Strip, Removing and Installing.
- Remove the screws -3- and disengage the cable -1-.
2 - Clip
3 - Release Cable
4 - Bolts
- 2 Nm
READ NEXT:
 Hood, Adjusting
Special tools and workshop equipment
required
Gauge - Gap Adjustment -3371-
Gap Dimensions for Hood
Note
All dimensions are in mm with a +- 0.5 mm tolerance.
Dimension -A- =
Release Cable, Removing and Installing
Release Cable Coupling
- Remove clips -1- and lift the release
cables -8- and -9-
on both sides toward the hood latches.
- To remove the coupling -2-, release the
retainers -arrows
Hinges, Removing and Installing
1 - Hood Hinge
Removing
Before removing a hood hinge, support the hood or secure it against
falling.
Remove the gas-filled strut. Refer to
→ Chapter "Gas-Filled Strut,SEE MORE:
Unlocking and locking the vehicle
Fig. 26 Door handle: sensor for locking the vehicle
Depending on the vehicle equipment, you may
have various options for unlocking and locking
your vehicle. The settings in the MMI specify
which doors will unlock.
Unlocking or locking using the vehicle key
buttons
To unlock the vehicle, press the
Transmitted information
Data collection
Applies to: vehicles with data collection
Depending on the country, Audi may collect data
for the following purposes, for example: offer
and product optimization, public safety, provision
of Audi connect remote vehicle services, and
adaptation to customer expectations. For example,
v
© 2019-2026 Copyright www.auq3.net | 0.0114
