
Audi Q3: Overview - Generator, Valeo through MY 2000
Electrical Equipment General Information / Electrical System / Audi Q3 (8U) 2011-2018 Service Manual / Overview - Generator, Valeo through MY 2000
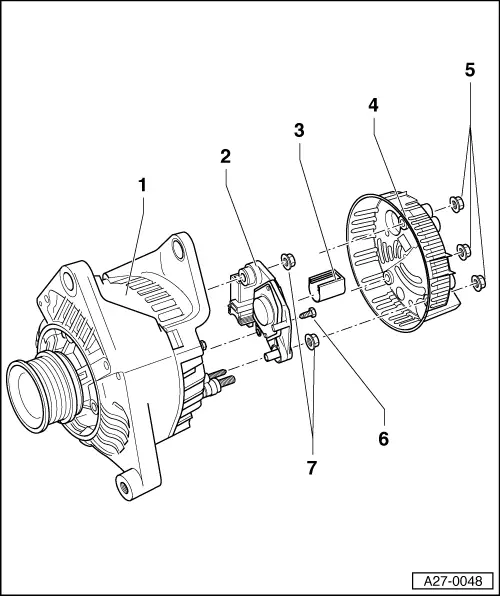
1 - Generator
2 - Voltage Regulator
- Removing:
- Remove the nuts -5- and the cover -4-.
- Remove the bolt -6- and the nuts -7- and remove the voltage regulator.
- Carbon brushes wear limit: 5 mm
3 - Protective Cap
4 - Cover
5 - Nut
- 2 Nm
6 - Bolt
- 2 Nm
7 - Nut
- 3.5 Nm
- Quantity: 2
Overview - Valeo Generator from 2001
 Note
Note
The generators were implemented as a running change.
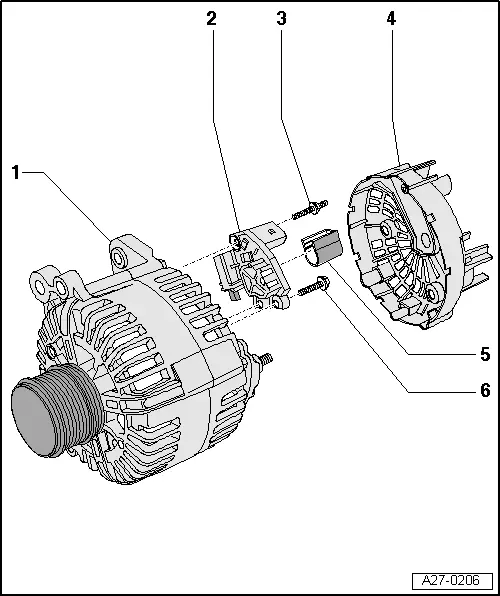
1 - Generator
2 - Voltage Regulator
- Removing and installing: to 2007. Refer to → Chapter "Voltage Regulator, Valeo Generator from 2001, Removing and Installing", after 2007 → Chapter "Voltage Regulator, Removing and Installing, Valeo Generator from 2007"
- Check the carbon brushes: to 2007. Refer to → Chapter "Carbon Brushes, Valeo Generator from 2001, Checking", after 2007 → Chapter "Carbon Brushes, Checking, Valeo Generator from 2007"
3 - Bolt
- 2 Nm
4 - Cover
5 - Protective Cap
6 - Bolt
- 2 Nm
READ NEXT:
 Voltage Regulator, Valeo Generator from 2001, Removing and Installing
Removing
- Remove the generator. Refer to
→ Electrical Equipment; Rep. Gr.27; Generator; Generator,
Removing and Installing.
- Press the cover on the rear side of the
Ribbed Belt Pulley without Freewheel, Removing and Installing
Special tools and workshop equipment
required
Generator Belt Socket -3310-
Inner hex socket 8 mm or TORX
T50
Removing
- Remove the generator if necessary. Refer to
→ Electri
Windshield Wiper/Washer System
Washer Fluid Hoses
Washer Fluid Line Hose Connections, Disconnecting and Connecting
Various hose couplings are used to connect the hoses to the
washer fluid pumps and spray jets or as coupling poiSEE MORE:
Uniform tire quality grading
Tread wear
Traction AAA BC
Temperature ABC
Quality grades can be found where applicable on
the tire side wall between tread shoulder and
maximum section width fig. 154.
For example: Tread wear 200, Traction AA, Temperature
A.
All passenger car tires must conform to Federal
Safety Requirement
Drive Axle, Removing and Installing
Removing
- Measure dimension from center of wheel to lower edge of
wheel housing. Refer to
→ Chapter "Wheel Bearing in Curb Weight, Lifting Vehicles with
Coil Spring".
- Loosen the drive axle threaded connection. Refer to
→ Chapter "Drive Axle Threaded Connection, Lo
© 2019-2026 Copyright www.auq3.net | 0.0109
