Audi Q3: Lock Carrier Cover, Removing and Installing, Vehicles through MY 2014
Removing
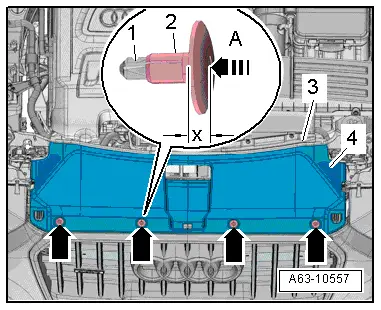
- To remove the expanding clips -arrows-, push the clamping pin -1- carefully to dimension -x- until it clicks into the expanding clip -arrow A-.
- Dimension -x- = 5 mm
- Pull out unlocked expanding clip -2- with the clamping pin.
- Remove the lock carrier cover -4- from the groove in the lock carrier -3-.
Installing
Install in reverse order of removal. Note the following:
- Install the expanding clip and push in the clamping pin until it engages audibly.

Lock Carrier Cover, Removing and Installing, Vehicles from MY 2015
Removing
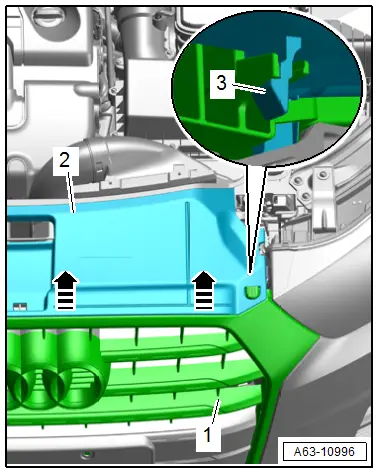
- Remove the lock carrier cover -2- from the radiator grille -1- and remove the lock carrier cover upward -arrows-.
- The retaining tabs -3- are released while doing this.
- Remove the lock carrier cover from the groove in the lock carrier.
Installing
Install in reverse order of removal. Note the following:
- Slide the lock carrier cover into the groove in the lock carrier cover and then push it onto the radiator grille and bumper cover.

Front Bumper Cover End Plate, Removing and Installing
Removing
- Remove the noise insulation. Refer to → Chapter "Noise Insulation, Removing and Installing".
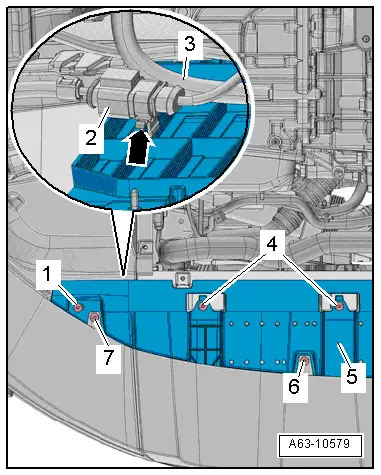
- Remove the bolts -1, 4, 6, and 7-.
- Push the end panel -5- slightly downward and remove the connector -2- from the bracket -arrow-.
- If installed, free up the water line -3- for cleaning the headlamps.
- Audi Q3 from MY 2015: Disconnect the connector from the Outside Air Temperature Sensor -G17- and free up the wiring harness.
- Pull the front bumper cover end plate back.
Installing
Install in reverse order of removal. Note the following:
- Install the noise insulation. Refer to → Chapter "Noise Insulation, Removing and Installing".


