Audi Q3: Left/Right Headlamp Beam Adjustment Motor -V48-/-V49-, Removing and Installing
Left/Right Headlamp Beam Adjustment Motor -V48-/-V49-, Removing and Installing, Halogen Headlamps
Removing
- Remove the headlamp housing. Refer to → Chapter "Headlamp, Removing and Installing, Halogen Headlamps".
- If equipped, remove the bolts -1 and 3-.
- Open the tabs in direction of -arrows- and remove the housing cover -2-.
- Remove the bolts -1 and 4-.
- Remove the headlamp beam adjustment motor -3- by pushing the ball end of the positioning stem upward and out of the ball end mount by swiveling the adjustment motor.
- Remove the adjustment motor.
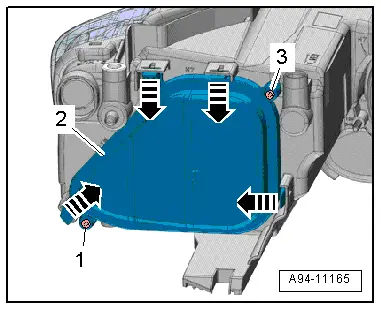
- Disconnect the connector -2-.
Installing
Install in reverse order of removal. Note the following:
- Connect the connector when guiding in.
- First insert the adjusting axle ball head into the reflector ball head mount from below by pulling the reflector back.
- Tighten the bolts.
- Install the headlamp housing. Refer to → Chapter "Headlamp, Removing and Installing, Halogen Headlamps".

Left/Right Headlamp Beam Adjustment Motor -V48-/-V49-, Removing and Installing, HID Headlamps, Version 1, through MY 2014
Removing
- Remove the headlamp housing. Refer to → Chapter "Headlamp, Removing and Installing, HID and LED Headlamps".
- If equipped, remove the bolts -1 and 3-.
- Open the tabs in direction of -arrows- and remove the housing cover -2-.
- Remove the bolts -2 and 4-.
- Push the ball end of the positioning stem upward in direction of -arrow A- and out of the ball end mount by swiveling the adjustment motor while at the same time pushing the reflector -3- forward in direction of -arrow B- to remove the headlamp beam adjustment motor -5-.
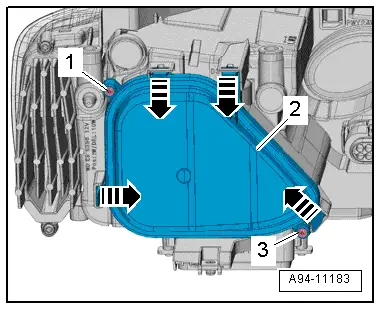
- Disconnect the connector -1-.
Installing
Install in reverse order of removal. Note the following:
- Connect the connector when guiding in.
- First insert the adjusting axle ball head into the reflector ball head mount from below by pulling the reflector back.
- Tighten the bolts.
- Install the headlamp housing. Refer to → Chapter "Headlamp, Removing and Installing, HID and LED Headlamps".
- Adjust the headlamp. Refer to → Chapter "Headlamp, Adjusting".
Left/Right Headlamp Beam Adjustment Motor -V48-/-V49-, Removing and Installing, HID Headlamps, Version 2, through MY 2014
Removing
- Remove the headlamp housing. Refer to → Chapter "Headlamp, Removing and Installing, HID and LED Headlamps".
- If equipped, remove the bolts -1 and 3-.
- Open the tabs in direction of -arrows- and remove the housing cover -2-.
- Remove the bolts -2 and 4-.
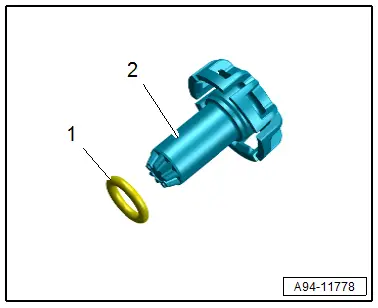
- Remove the headlamp beam adjustment motor -3- by pushing the ball end of the positioning stem to the side -arrow- and out of the ball end mount by swiveling the adjustment motor.

- Disconnect the connector -1-.
Installing
Install in reverse order of removal. Note the following:
- Connect the connector when guiding in.
- Insert the adjusting axle ball head into the reflector ball socket to the side while pulling the reflector back.
- Tighten the bolts.
- Install the headlamp housing. Refer to → Chapter "Headlamp, Removing and Installing, HID and LED Headlamps".
- Adjust the headlamp. Refer to → Chapter "Headlamp, Adjusting".

Left/Right Headlamp Beam Adjustment Motor -V48-/-V49-, Removing and Installing, HID Headlamps and LED Headlamps, from MY 2015
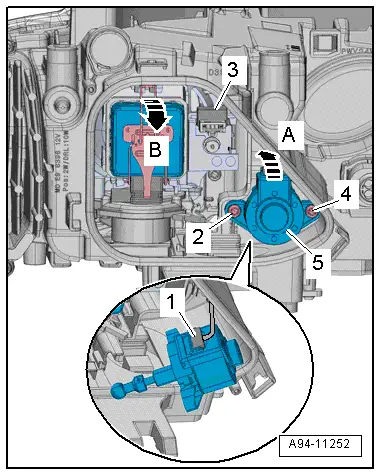
Removing
- Remove the headlamp housing. Refer to → Chapter "Headlamp, Removing and Installing, HID and LED Headlamps".
- Remove the bolts -arrows-.
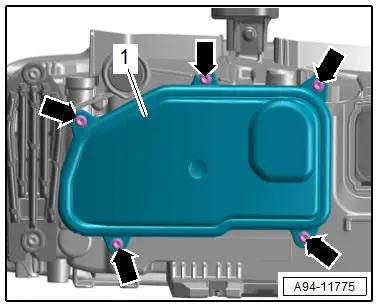
- Remove the housing cover -1- from the headlamp housing.

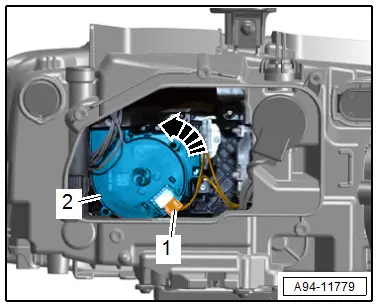
- Pry out the height adjusting screw -3--arrow A-.
- Turn the adjustment motor -2- counter-clockwise -arrow B- and tilt it downward. This disengages the ball head upward from the ball head mount.
- Disconnect the connector -1-.
Installing
Install in reverse order of removal, while paying attention to the following:
- Check the seal -1- on the height adjusting screw -2- for damage.
- Close the housing cover and tighten the bolts.
- Adjust the headlamp. Refer to → Chapter "Headlamp, Adjusting".
Headlamp Fan, Removing and Installing
Left/Right Headlamp Fan -V407-/-V408-, Removing and Installing
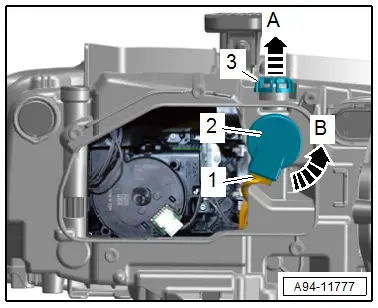
Removing
- Remove the headlamp housing. Refer to → Chapter "Headlamp, Removing and Installing, HID and LED Headlamps".
- Remove the bolts -arrows-.
- Remove the housing cover -1- from the headlamp housing.
- Turn the fan -2- counter-clockwise -arrow- and remove.
- Press the release button and disconnect the connector -1-.
Installing
Install in reverse order of removal, while paying attention to the following:
- Close the housing cover and tighten the bolts.
Headlamp Housing Repair Set, Installing
 Note
Note
- Headlamp mounting tabs that have broken off can be replaced by installing the repair set. Completely replacing the headlamp is not necessary.
- There are different repair kits for left and right headlamps. Refer to Parts Catalog.
Procedure
- Remove the headlamp with the broken tabs. Refer to → Chapter "Headlamp, Removing and Installing, Halogen Headlamps".
- Remove the rest of the broken tab on the headlamp housing.
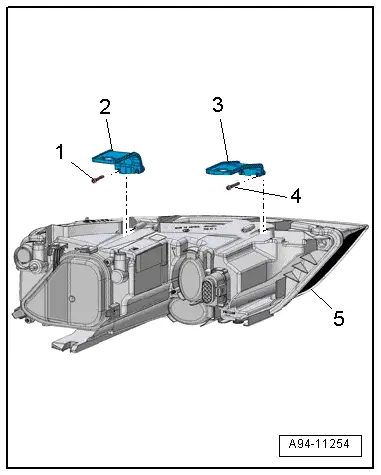
- Install the repair kit mounting tabs -2 and 3- on the headlamp housing -5- and secure the tab with the bolts -1 and 4-.
READ NEXT:
 Fog Lamp
Overview - Fog Lamps
1 - Air Intake Grille
2 - Fog Lamp
Removing and installing. Refer to
→ Chapter "Fog Lamp, Removing and Installing".
3 - Bolt
Side Marker Lamp
Overview - Side Marker Lamp
1 - Front Bumper Cover
2 - Rear Side Marker Lamp Bulb
The entire body tail lamp must be replaced if an LED is faulty
Left Rear Side Marker Lam
Exterior Rearview Mirror Lamps
Overview - Exterior Rearview Mirror Lamps
1 - Mirror Glass
2 - Mirror Adjusting Unit Mount
3 - Exterior Rearview Mirror Housing
4 - Exterior Rearview MirrSEE MORE:
Battery
Battery general information
Because of the complex power supply, all work
on batteries such as disconnecting, replacing,
etc., should only be performed by an authorized
Audi dealer or authorized Audi Service Facility.
Multiple batteries with different technologies
may be installed in your vehicle:
Privacy notice
You can find information about responsibility for
data protection in the MMI.
Applies to: MMI: Select on the home screen: SETTINGS
> General > Legal notes > About Audi
connect.
Image recording
Surrounding area monitoring
Applies to: vehicles with surrounding area monitoring
Some vehicle fu