Audi Q3: Instrument Panel Side Cover, Removing and Installing
Special tools and workshop equipment required
- Trim Removal Wedge -3409-
Removing
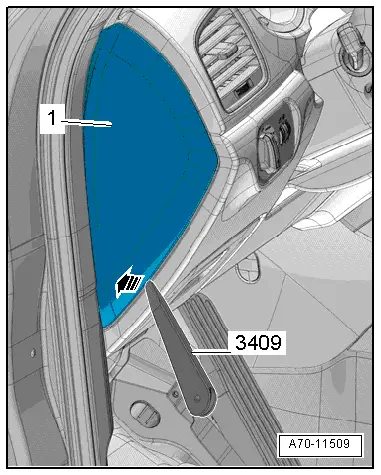
- Pry off the cover -1- for the instrument panel side cover using the Trim Removal Wedge -3409--arrow-.
- Remove the cover rearward from the A-pillar gap cover.
Installing
Install in reverse order of removal.
Installation notes, for example tightening specifications, replacing components. Refer to → Chapter "Overview - Instrument Panel".
Instrument Panel Decorative Trim, Removing and Installing
Special tools and workshop equipment required
- Trim Removal Wedge -3409-
- Wedge Set -T10383-
Removing
- Remove the glove compartment. Refer to → Chapter "Glove Compartment, Removing and Installing".
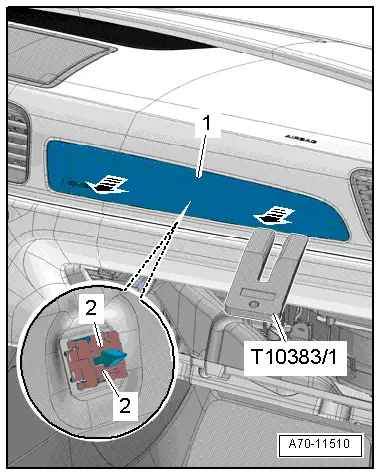
- Remove the trim panel -1- from the instrument panel using a Wedge -T10383/1--arrows-.
- Use the Trim Removal Wedge -3409- to release the catch on the clips -2-.
- Removing the trim for the instrument panel.
Installing
Install in reverse order of removal.
Installation notes, for example tightening specifications, replacing components. Refer to → Chapter "Overview - Instrument Panel".
Speaker Trim, Removing and Installing
Speaker Trim, Removing and Installing
Special tools and workshop equipment required
- Wedge Set -T10383-
Removing
 Note
Note
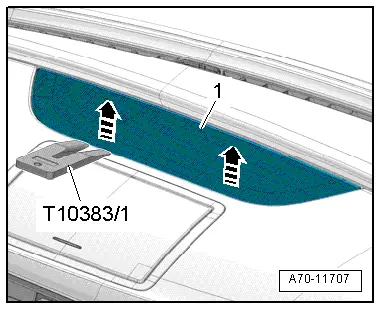
Proceed very carefully when removing and installing because it is relatively easy to damage the speaker trim.
- Carefully detach the speaker trim -1- from the rear pins in the direction of travel using a Wedge -T10383/1--arrows-.
- Fold the speaker trim upward and remove it toward the rear.
Installing
Install in reverse order of removal.
Installation notes, for example tightening specifications, replacing components. Refer to → Chapter "Overview - Instrument Panel".
Speaker Trim Mount, Removing and Installing
Special tools and workshop equipment required
- Trim Removal Wedge -3409-
- Wedge Set -T10383-
Removing
- Remove the speaker trim from the instrument panel. Refer to → Chapter "Speaker Trim, Removing and Installing".
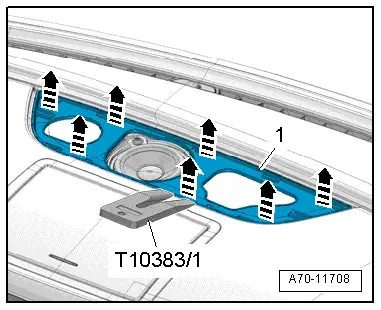
- Unclip and remove the -1- instrument panel speaker trim with the Wedge -T10383/1- and the Trim Removal Wedge -3409--arrows- and remove.
Installing
Install in reverse order of removal.
Installation notes, for example tightening specifications, replacing components. Refer to → Chapter "Overview - Instrument Panel".
READ NEXT:
 Instrument Panel, Removing and Installing
Instrument Panel Storage Compartment, Removing and Installing
Special tools and workshop equipment
required
Trim Removal Wedge -3409-
Removing
- Remove the center instrument panel vent
Instrument Panel Vent, Removing and Installing
Side Instrument Panel Vent, Removing and Installing
Special tools and workshop equipment
required
Hook Tool -T40207-
Removing
Note
The vent has a hole on inside for attaching the
Instrument Panel Central Tube
Overview - Instrument Panel Central Tube
1 - Bolt
20 Nm
2 - Nut
23 Nm
Quantity: 2
Always replace if removed
3 - Threaded Pin
20 NmSEE MORE:
Jump starting
Preparation
You should only perform the steps that follow if
you have the necessary tools and technical expertise.
If the engine does not start because the vehicle
battery is drained, you can jump start your vehicle
using another vehicle. Jump start cables are
needed to do this.
Both vehicle batteri
Door Lock, Removing and Installing
Door Lock, Removing and Installing
Caution
There is a risk of malfunctions.
The door lock must be removed and installed together
with the bracket to prevent over-bending the cable when
disengaging and engaging it.
The cable must be disconnected from/attached to the
lever on the d