Audi Q3: Door Inner Cover, Removing and Installing
Special tools and workshop equipment required
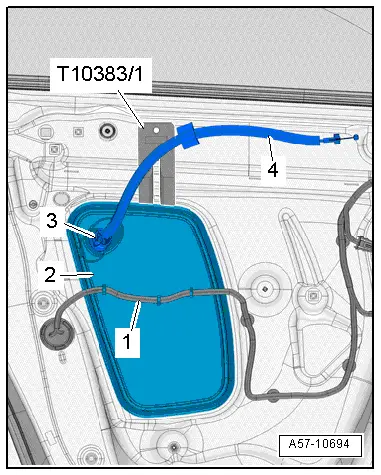
- Wedge Set -T10383-
Removing
- Remove the door trim panel. Refer to → Body Interior; Rep. Gr.70; Front Door Panels; Front Door Panel, Removing and Installing.
- Free up the wiring harness -1-.
- Lift the inner door trim -2- with the Wedge Set -T10383/1- from the inner door panel.
- Disengage the grommet -3- for the cable -4- for the interior door mechanism from the inner door trim.
Installing
Install in reverse order of removal. Note the following:
- Push in the interior door trim until it engages audibly.
- Interior door trim must be installed flush.
- Install the door trim panel. Refer to → Body Interior; Rep. Gr.70; Front Door Trim Panels; Front Door Trim Panel, Removing and Installing.
Bracket, Removing and Installing
 Caution
There is a risk of malfunctions.
The door lock must be removed and installed together with the bracket to prevent over-bending the cable when disengaging and engaging it.
The cable must be disconnected from/attached to the lever on the door lock outside of the door.
Special tools and workshop equipment required
- Pry Lever -80 - 200-
Removing
- Remove the lock cylinder guide. Refer to → Chapter "Lock Cylinder Guide, Removing and Installing".
- Disconnect the connector from the door lock.
- Remove the door handle. Refer to → Chapter "Door Handle, Removing and Installing".
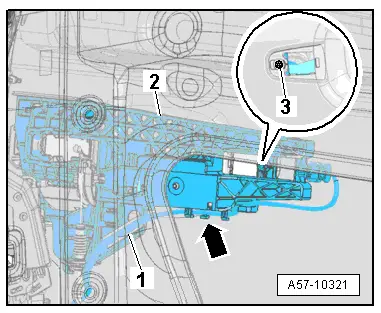
- If equipped disengage the exterior door handle touch sensor wire from the bracket -arrow-.
- Free up the electric wire spiral clip -1- using the Pry Lever -80 - 200-.
 Note
Note
Use a soapy solution if necessary make removal easier.
- Remove the bolt -3- and the mounting bracket -2-.
- Push the bracket and door lock downward and remove them from the vehicle.
- Disengage the operating cable from the operating lever on the door lock.
Installing
Install in reverse order of removal. Note the following:
- The bracket and the door lock are still removed.
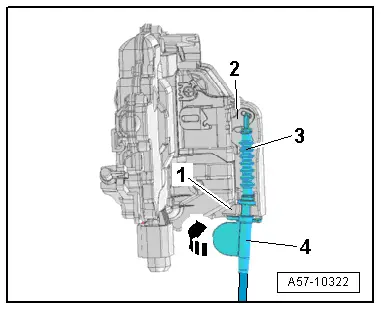
- Engage the operating cable -3- in the door lock operating lever -2-.
- Insert the operating cable in the cable bracket -1- and rotate the lever -4- 90º -arrow-.
- The lever must engage audibly with the locking tab on the cable bracket.
- Install the bracket and the door lock together in the door. Refer to → Chapter "Door Lock, Removing and Installing".
 Note
Note
- For vehicles with a convenience key the wiring harness for the exterior door handle touch sensor is placed on the bracket so that it points to the outer door panel.
- With the wiring harness is not laid correctly, noise can occur when opening and closing the door window, because the door window grazes the wiring harness.
READ NEXT:
 Door Handle, Removing and Installing
Lock Cylinder, Removing and Installing
Removing
- Remove the sealing plugs.
- Remove the clamping screw -3-
until it stops using a screwdriver -4-.
- Press the lock cylinder ret
Door Lock, Removing and Installing
Door Lock, Removing and Installing
Caution
There is a risk of malfunctions.
The door lock must be removed and installed together
with the bracket to prevent over-bending the cable when
Central Locking
Component Location Overview - Central Locking
1 - Hood Contact Switch 2 -F329-
Inside the rear lid lock
Removing and installing. Refer to
→ Chapter "Engine Hood Contact SwiSEE MORE:
Audi drive select
Introduction
Applies to: vehicles with Audi drive select
Drive select makes it possible to experience different
types of vehicle characteristics in one vehicle.
With different driving modes, the driver can
switch the setting, for example from sporty to
comfortable. This allows you to adjust the set
Adjusting Audi pre sense
Applies to: vehicles with Audi pre sense
You can switch Audi pre sense and the associated
systems on or off, or adjust them individually.
The settings depend on the vehicle equipment.
Applies to MMI: Select on the home screen: VEHICLE
> Driver assistance > Audi pre sense.
Setting the prew