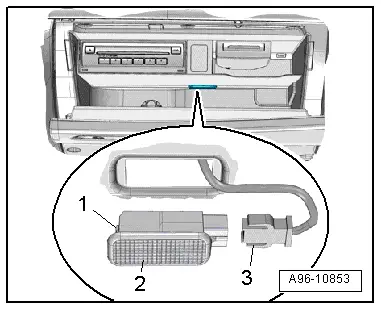
Audi Q3: Glove Compartment Lamp -W6-, Removing and Installing
Removing
- Turn the light switch to position "0".
- Press in the tab -1- using a flat-head screwdriver and pry out the glove compartment lamp -2-.
- Disconnect the connector -3-.
Installing
Install in reverse order of removal. Note the following:
- Connect the connectors.
- Insert the glove compartment lamp into opening and engage on the opposite side.
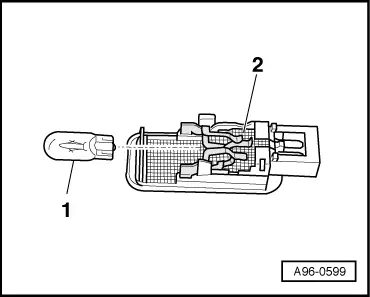
Glove Compartment Lamp -W6- Bulb, Replacing
Removing
- Remove the glove compartment lamp. Refer to → Chapter "Glove Compartment Lamp -W6-, Removing and Installing".
- Remove the bulb -1- from the bulb socket on the back of the glove compartment lamp -2-.
Installing
Install in reverse order of removal.
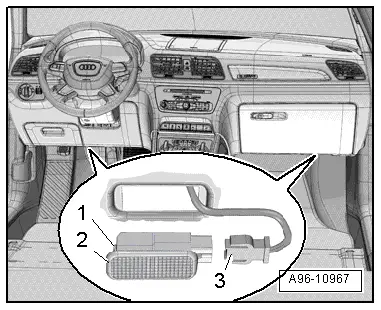
Left/Right Footwell Lamp -W9- / -W10-, Removing and Installing
Removing
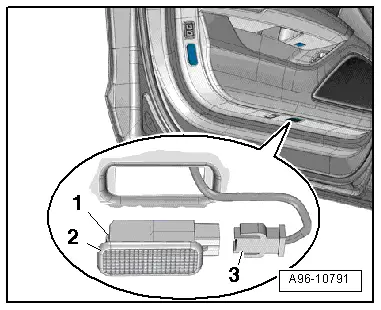
- Using a flat-head screwdriver, press in the retaining tab -1- and pry out the footwell lamp -2-.
- Disconnect the connector -3-.
Installing
Install in reverse order of removal. Note the following:
 Note
Note
The entire footwell lamp must be replaced if an LED is faulty.
- Insert the footwell lamp into the opening and engage on the opposite side.
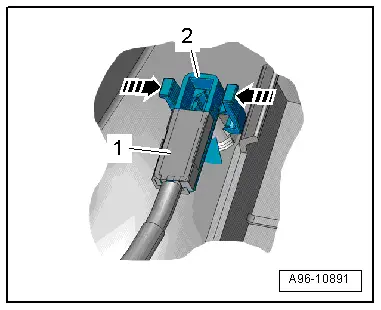
Central Locking -SAFE- Indicator Lamp -K133-, Removing and Installing
Removing
- Remove the front door trim panel. Refer to → Body Interior; Rep. Gr.70; Front Door Trim Panels; Front Door Trim Panel, Removing and Installing.
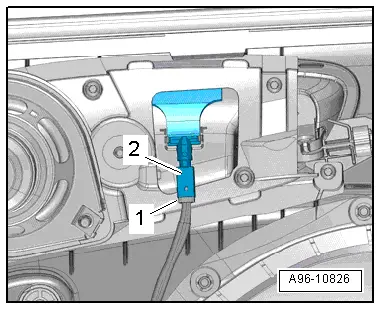
- Release the retaining clips in direction of -arrows-.
- Remove the central locking LED -1- down out of the door trim -2-.
Installing
Install in reverse order of removal. Note the following:
 Note
Note
The new Central Locking -SAFE- Indicator Lamp -K133- must be connected with the door trim wiring harness.
- Disconnect the wire and connect it with the new wire for the Central Locking -SAFE- Indicator Lamp -K133-. Refer to → Electrical Equipment General Information; Rep. Gr.97; Wiring Harness and Connector Repair.
- Install the front door trim panel. Refer to → Body Interior; Rep. Gr.70; Front Door Trim Panels; Front Door Trim Panel, Removing and Installing.
Driver and Front Passenger Door Opener Illumination Bulb -L108-/-L109-, Removing and Installing
Removing
- Remove the front door trim panel. Refer to → Body Interior; Rep. Gr.70; Front Door Trim Panels; Front Door Trim Panel, Removing and Installing.
- Disconnect the connector -1-.
- Turn the bulb socket -2- to the left and remove it at the door opener.
Installing
Install in reverse order of removal. Note the following:
- Install the front door trim panel. Refer to → Body Interior; Rep. Gr.70; Front Door Trim Panels; Front Door Trim Panel, Removing and Installing.
Left/Right Front Entry Lamp -W31-/-W32-, Removing and Installing
Removing
- Use flat screwdriver to press in the retaining tab -1- and lift out the entry lamp -2-.
- Disconnect the connector -3-.
Installing
Install in reverse order of removal. Note the following:
 Note
Note
The entire entry lamp must be replaced if an LED is faulty.
- Install the entry lamp into the opening and engage on the opposite side.
READ NEXT:
 Driver/Front Passenger Door Warning Lamp -W30-/-W36-, Removing and
Installing
Driver/Front Passenger Door Warning Lamp -W30-/-W36-, Removing and
Installing
Removing
- Press the tab -1- with a
flat-blade screwdriver and remove the door warning lamp
-2-.
- Disconnect the connector -3-.
- Carefully pry out the cover over the lamp in d
Speaker Ambient Lighting Bulb 1 and 2 -L211-/-L212-, Removing and Installing
Speaker Ambient Lighting Bulb 1 -L211-, Removing and Installing, Front
Door
Removing
- Remove the front door trim panel. Refer to
→ Body Interior; Rep. Gr.70; Front Door Tri
Left and Right Ambient Lighting Bulb for Rear Doors -L166-/-L167-, Removing
and Installing
Removing
- Remove the switch mount. Refer to
→ Body Interior; Rep. Gr.70; Rear Door Trim Panels; Rear Pull
Handle Removing and Installing.
Note
The entire lamp muSEE MORE:
Securing child safety seats belt
Observe the safety precautions. The
front passenger's seat is a dangerous location for
a child, even with an advanced airbag system. If
exceptional circumstances require the child safety
seat to be placed on the front passenger's
seat, then the front passenger's airbag must be
deactivated.
Securing
Online radio
General information
Applies to: vehicles with Audi connect Infotainment and online
radio
You can listen to various radio stations or podcasts
on the Internet using online radio.
Requirement: the MMI must be connected to the
Internet. A data plan must be available.
Accessing online radio through the