Audi Q3: Glass Panel, Removing and Installing
Panel 1 for the Panorama Roof, Removing
 Caution
Do not move or operate the already removed panel otherwise it may become damaged.
 Note
Note
If the screws for the panel mounting were completely removed, then they must be replaced.
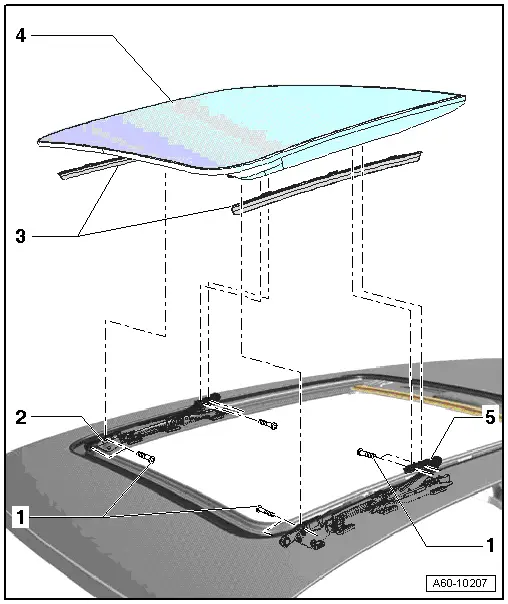
1 - Bolt
- 7 Nm
- Front and rear, quantity: 2 on each side.
2 - Slotted Guide Rail Mount
- No replacement part
3 - Panel Trim
- When removing the panel, pull it toward the rear out of the panel.
4 - Panel "1"
- Open the panel and remove the trim toward the rear.
- Remove the rear screws and move the panel slightly to the rear.
- Remove the front screws and remove the panel upward.
- Adjust the panel. Refer to → Chapter "Glass Panel, Adjusting".
Panel 2 for the Panorama Roof, Removing
 Note
Note
If the bolts for the panel mounting were completely removed, then they must be replaced.
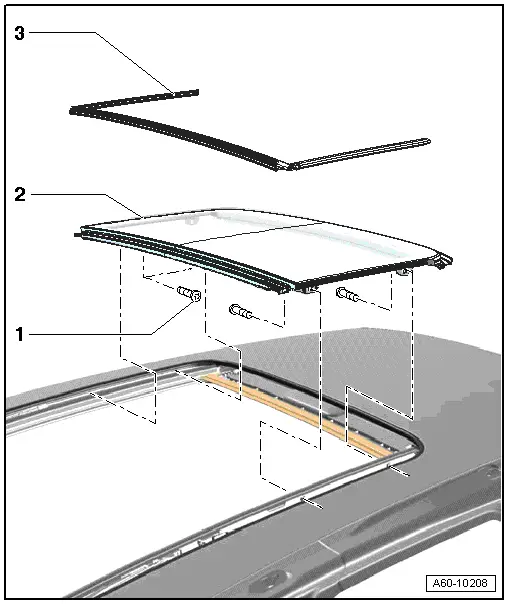
1 - Bolt
- 3 Nm
2 - Panel "2"
- Open the sunroof shade completely and remove the side noise seal. Refer to -Item 2-.
- Remove both front and rear screws and remove the panel.
3 - Panel Seal
- Panel "2" removed.
- Remove the left and right panel seals.
- Remove the front panel seal upward.
- When installing align at the front and center of the cover and push it into the guides. Refer to → Chapter "Sunroof Seals, Removing and Installing"
- Insert the ends of the seal onto the molding pins.
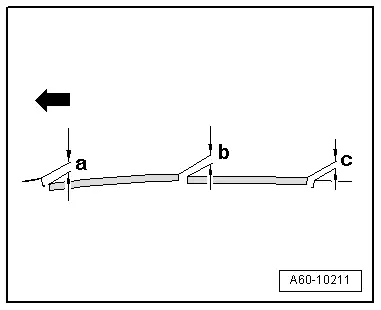
Glass Panel, Adjusting
- -arrow- = direction of travel forward
- Dimension -a- = 1.5 mm
- Dimension -b- = 1.0 mm
- Dimension -c- = 0.5 mm
- All dimensions +- 0.5 mm
Power Sunroof Control Module -J245-, Removing and Installing
- Remove the front interior lamp/reading lamp. Refer to → Rep. Gr.96; Controls; Front Interior Lamp/Reading Lamp Removing and Installing.
- Disconnect the connectors.
- Remove the three screws. Refer to -item 1- and remove the motor through the opening in the headliner.
- After installing, perform an adaptation. Refer to → Chapter "Sunroof Seals, Removing and Installing".
READ NEXT:
 Sunroof Seals, Removing and Installing
Installing the Panel Seal
Note
Spray the seal with soapy solution to make the installation
easier.
- Align the seal in the center to the panel and push it into
the both front guid
Water Drain Hoses
Overview - Water Drain Hoses
1 - Front Water Drain Hose
Removing and installing. Refer to
→ Chapter "Water Drain Hoses, Removing and Installing".
Cleaning, refer to
→&nSEE MORE:
Fuel
Types of gasoline
The correct gasoline grade is stated on the inside
of the fuel filler door.
The vehicle is equipped with a catalytic converter
and must only be driven with unleaded gasoline.
Audi recommends using TOP TIER Detergent Gasoline.
For additional information on TOP TIER Detergent
Gasol
Glove Compartment Handle, Removing and Installing
Special tools and workshop equipment
required
Locking Pin (3 pc.) -T40011-
Removing
Note
If glove compartment cover does not open, it can be opened
via the emergency release. Refer to
→ Chapter "Glove Compartment Lid Emergency Release, Operating".
- Press the glo