Audi Q3: Interior Door Mechanism, Removing and Installing
Removing
- Remove the rear door trim panel. Refer to → Chapter "Rear Door Trim Panel, Removing and Installing".
- Remove insulation mat.
- Disconnect and free up the connectors and wire.
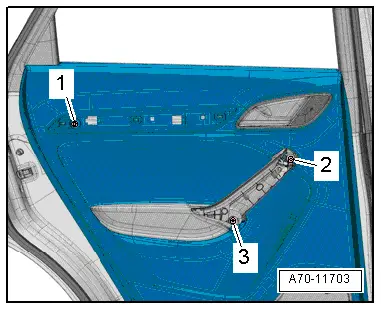
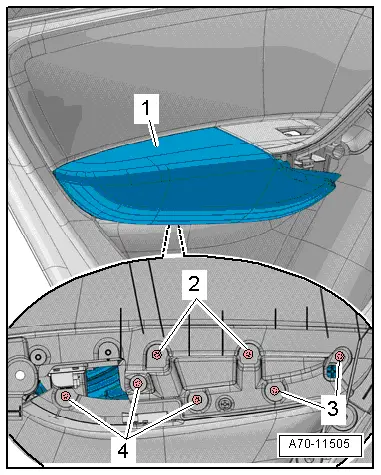
- Remove the bolts -1- and -2- from the rear of the door trim.
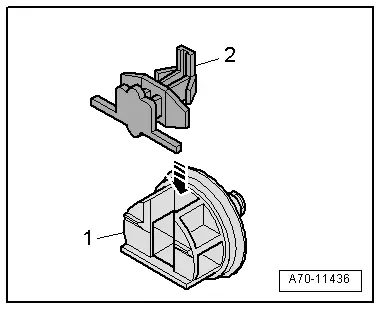
- Remove the interior door mechanism -3- from the door trim -arrow-, to do this release the catches -A-.
Installing
Install in reverse order of removal.
Installation notes, for example tightening specifications, replacing components. Refer to → Chapter "Overview - Rear Door Trim Panel".
Rear Door Trim Panel, Removing and Installing
Special tools and workshop equipment required
- Wedge Set -T10383-
Removing
- Switch the ignition off and remove the ignition key.
- Remove the trim panel. Refer to → Chapter "Trim Molding, Removing and Installing".
- Remove the pull handle grip recess. Refer to → Chapter "Pull Handle Grip Recess, Removing and Installing".
- Remove the bolts -1 to 3-.
 Note
Note
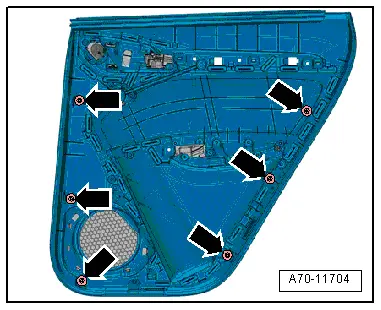
A two-part clip sits in the center of the door trim at the bottom. This clip must be released before the six "normal" one-piece clips are unclipped.
- At the impression down beside the entry light, press hard against the door trim with thumb -arrow 1-. The two-piece clip is released as a result -arrow 2-.
- Using the Wedge -T10383- unclip at lower rear in the radius beginning from the door by inserting the wedge between door trim and door in the area of the retaining clip.

- Position of the remaining clips -arrows-.
- Disengage the top of the door trim from the door in the window recess by pulling the door trim up.
- Versions with a treble speaker: disconnect the treble speaker connector.
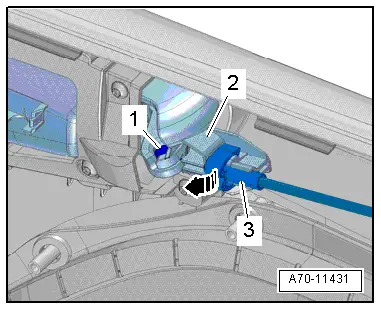
- Unclip the cable -3- carefully from the interior door mechanism -2-.
- Swivel the interior door mechanism cable -arrow-.
- Disengage the ends of the cable -1- from the inside door release mechanism.
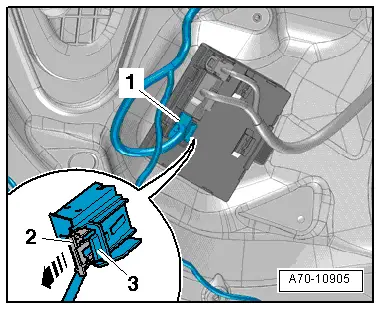
- Disconnect the electrical connector -1- on the door control module by removing securing clip -2--arrow- and pressing the release mechanism -3-.
- Remove the door trim.
Installing
- Replace the two-part clip by detaching the lower part -1- from the door from the rear side and removing the upper part -2- from the door trim panel.
- Assemble two-part clip -arrow- and insert in the door trim.
- Engage the ends of the cable -1- in the inside door release mechanism lever.
- Attach the interior door mechanism cable -3- to the interior door mechanism -2-.
- Connect the connectors on the door control module.

- Position the door trim on the window recess and press it down firmly.
- Carefully position the door trim panel clips -2- all around the door and press the door trim onto the door -1- until it engages audibly on the mounting points -arrows-.
Install in reverse order of removal.
Installation notes, for example tightening specifications, replacing components. Refer to → Chapter "Overview - Rear Door Trim Panel".
Rear Armrest, Removing and Installing
Removing
- Remove the rear door trim panel. Refer to → Chapter "Rear Door Trim Panel, Removing and Installing".
- Remove insulation mat.
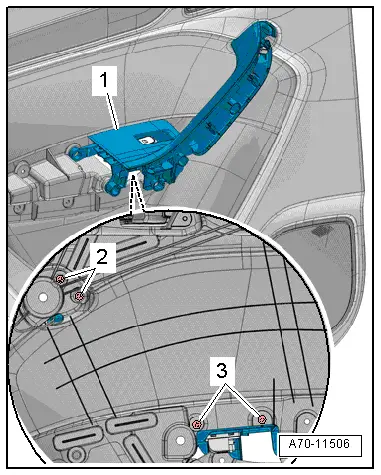
- Remove the bolts -2 through 4- on the rear of the door trim.
- Remove the armrest -1- from the door panel.
Installing
Install in reverse order of removal.
Installation notes, for example tightening specifications, replacing components. Refer to → Chapter "Overview - Rear Door Trim Panel".
Rear Pull Handle, Removing and Installing
Removing
- Remove the armrest. Refer to → Chapter "Rear Armrest, Removing and Installing".
- Disconnect the connectors.
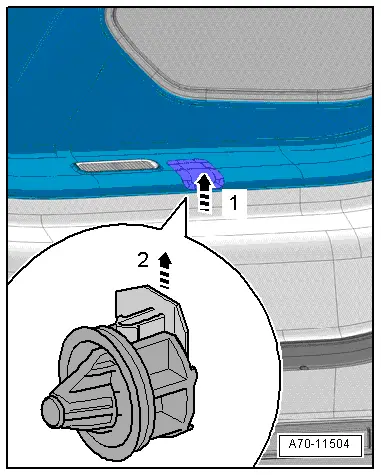
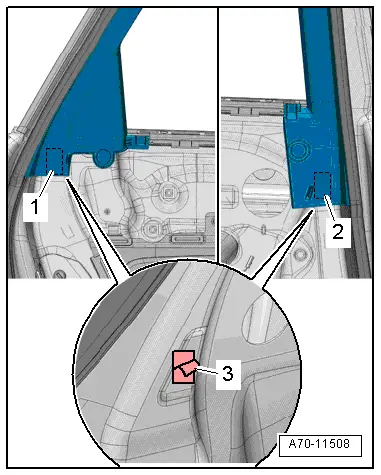
- Versions with ambient lighting: disconnect the connector for the left/right rear door ambient lighting bulb -L166-/-L167-.
- Remove the bolts -2- and -3- from the rear of the door trim.
- Remove the pull handle -1- from the door panel.
Installing
Install in reverse order of removal.
Installation notes, for example tightening specifications, replacing components. Refer to → Chapter "Overview - Rear Door Trim Panel".
Window Frame Trim Panel, Removing and Installing
Special tools and workshop equipment required
- Trim Removal Wedge -3409-
Removing
- Lower the door window.
- Remove the rear door trim panel. Refer to → Chapter "Rear Door Trim Panel, Removing and Installing".
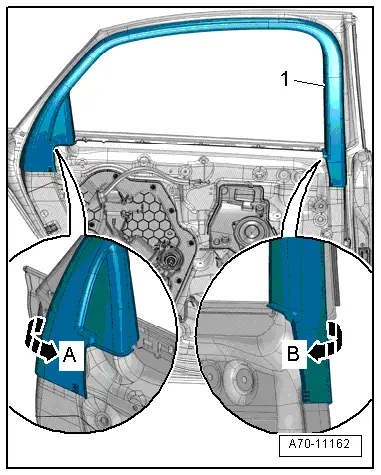
- Loosen the trim on the ends from the adhesive pads -1- and -2- from the door frame, using the Trim Removal Wedge -3409-.
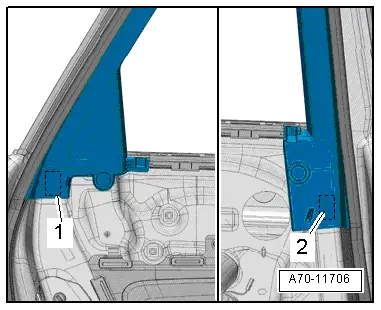
- Carefully pry off the window frame trim panel -1- starting at the lower rear and working along the length of the window guide to the upper front using the Trim Removal Wedge -3409--arrow A-.
- Then, carefully pry off the window frame trim at the lower front using the Trim Removal Wedge -3409- along the length of the window guide -arrow B-.
- Pull down the window frame trim from the window frame and remove.
Installing
- Insert window frame trim -2- in the window guide starting at the top of the B-pillar -1--arrow-.
- Install window frame trim along the entire length of the window guide.
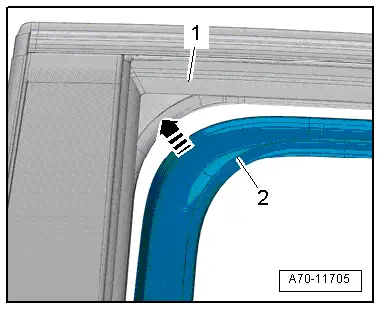
- Attach the adhesive pads -1- and -2- on the door frame and press on door frame.
- Remove the protective film -3- from the adhesive pads.
- Push on the trim panel in the area of the adhesive pads.
Install in reverse order of removal.
Installation notes, for example tightening specifications, replacing components. Refer to → Chapter "Overview - Rear Door Trim Panel".
READ NEXT:
 Component Location Overview - Instrument Panel
1 - Center Console
Overview. Refer to
→ Chapter "Overview - Center Console".
2 - Driver Side Instrument Panel Cover
Overview. Refer to
→ Chapter "Ove
Instrument Panel Side Cover, Removing and Installing
Special tools and workshop equipment
required
Trim Removal Wedge -3409-
Removing
- Pry off the cover -1- for the
instrument panel side cover using the Trim Removal Wedge -3409--arrow-
Instrument Panel, Removing and Installing
Instrument Panel Storage Compartment, Removing and Installing
Special tools and workshop equipment
required
Trim Removal Wedge -3409-
Removing
- Remove the center instrument panel ventSEE MORE:
Engine oil
If the engine oil level is too low
Fig. 147 Engine oil sticker
Engine oil viscosity
Engine oil standard
If you need to add engine oil, use an oil that
meets the engine oil standard listed on the sticker
fig. 147. The sticker with the
specified
standard is located in the front of the engine co
General information
Park the vehicle as far as possible from moving
traffic in the event of a breakdown. In the event
of a flat tire, park the vehicle on a level surface.
If you are on a steep hill, be especially careful.
Set the parking brake.
Switch the emergency flashers on.
Have the passengers exit the vehi