Audi Q3: Speaker Ambient Lighting Bulb 1 and 2 -L211-/-L212-, Removing and Installing
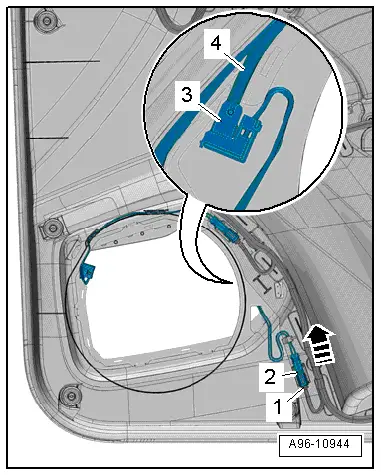
Speaker Ambient Lighting Bulb 1 -L211-, Removing and Installing, Front Door
Removing
- Remove the front door trim panel. Refer to → Body Interior; Rep. Gr.70; Front Door Trim Panels; Front Door Trim Panel, Removing and Installing.
- Disconnect the connector -4-.
- Push the connector -3- to release in the direction of -arrow- and free up the wiring harness.
- Remove the lamp -2- from the lighting strip -1-.
Installing
Install in reverse order of removal. Note the following:
- Install the front door trim panel. Refer to → Body Interior; Rep. Gr.70; Front Door Trim Panels; Front Door Trim Panel, Removing and Installing.
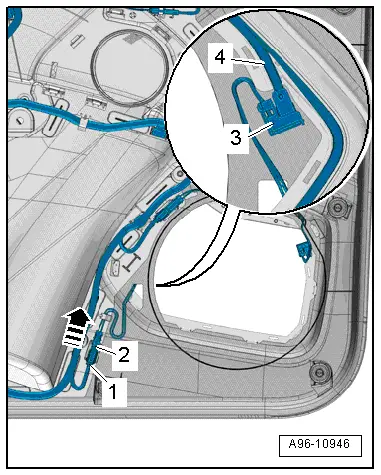
Speaker Ambient Lighting Bulb 2 -L212-, Removing and Installing, Front Door
Removing
- Remove the front door trim panel. Refer to → Body Interior; Rep. Gr.70; Front Door Trim Panels; Front Door Trim Panel, Removing and Installing.
- Disconnect the connector -1-.
- Push the connector -2- to release in the direction of -arrow- and free up the wiring harness.
- Remove the lamp -3- from the lighting strip -4-.
Installing
Install in reverse order of removal. Note the following:
- Install the front door trim panel. Refer to → Body Interior; Rep. Gr.70; Front Door Trim Panels; Front Door Trim Panel, Removing and Installing.
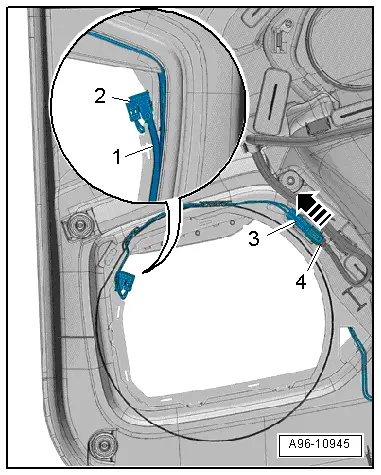
Speaker Ambient Lighting Bulb 1 -L211-, Removing and Installing, Rear Door
Removing
- Remove the rear door trim panel. Refer to → Body Interior; Rep. Gr.70; Rear Door Trim Panels; Rear Door Trim Panel, Removing and Installing.
- Disconnect the connector -3-.
- Push the connector -4- to release in the direction of -arrow- and free up the wiring harness.
- Remove the lamp -2- from the lighting strip -1-.
Installing
Install in reverse order of removal. Note the following:
- Install the rear door trim panel. Refer to → Body Interior; Rep. Gr.70; Rear Door Trim Panels; Rear Door Trim Panel, Removing and Installing.
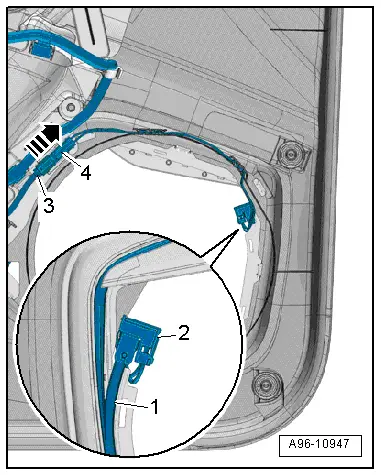
Speaker Ambient Lighting Bulb 2 -L212-, Removing and Installing, Rear Door
Removing
- Remove the rear door trim panel. Refer to → Body Interior; Rep. Gr.70; Rear Door Trim Panels; Rear Door Trim Panel, Removing and Installing.
- Disconnect the connector -1-.
- Push the connector -2- to release in the direction of -arrow- and free up the wiring harness.
- Remove the lamp -3- from the lighting strip -4-.
Installing
Install in reverse order of removal. Note the following:
- Install the rear door trim panel. Refer to → Body Interior; Rep. Gr.70; Rear Door Trim Panels; Rear Door Trim Panel, Removing and Installing.
READ NEXT:
 Left and Right Ambient Lighting Bulb for Rear Doors -L166-/-L167-, Removing
and Installing
Left and Right Ambient Lighting Bulb for Rear Doors -L166-/-L167-, Removing
and Installing
Removing
- Remove the switch mount. Refer to
→ Body Interior; Rep. Gr.70; Rear Door Trim Panels; Rear Pull
Handle Removing and Installing.
Note
The entire lamp mu
Component Location Overview - Instrument Panel Controls
1 - ASR/ESP Button -E256-
Removing and installing. Refer to
→ Chapter "ASR/ESP Button -E256-, Removing and Installing".
2 - Left Lower Button Unit
Equipment l
Component Location Overview - Center Console Controls
1 - Access/Start Authorization Button -E408-
Removing and installing. Refer to
→ Chapter "Access/Start Authorization Button -E408-, Removing and
Installing".
2 -&nbsSEE MORE:
Cover and Cushion, Removing and Installing
Cover and Cushion, Removing and Installing, Bench Seat
Removing
- Remove the rear bench seat. Refer to
→ Chapter "Bench Seat/Single Seat, Removing and Installing".
- Pry up the seat cover clamping strip
-2- with a screwdriver along the seat frame from the
molded part.
-&nb
Suspension Strut/Shock Absorber, Spring
Overview - Suspension Strut, Shock Absorber and Spring
1 - Lower Spring Support
Spring end rotated up to stop
2 - Coil Spring
Removing and installing. Refer to
→ Chapter "Spring, Removing and Installing".
3 - Upper Spring Support
4 - 