Audi Q3: Front Bumper Cover, Removing and Installing
Bumper Cover, Removing and Installing
Removing
- Remove the front wheel spoiler. Refer to → Chapter "Front Wheel Spoiler, Removing and Installing".
- Remove the front wheel housing liner. Refer to → Chapter "Front Wheel Housing Liner, Removing and Installing".
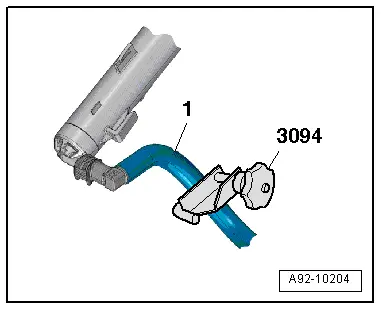
- Clamp off the washer fluid hose -1- with the Hose Clamps - Up To 25mm -3094-.
 Note
Note
Place a cloth underneath to soak up any escaping water.
- Vehicles through MY 2014: Press the release button and remove the washer fluid hose from the spray nozzle.
- Vehicles from MY 2015: Press the release button and remove the washer fluid hose from the headlamp washer system pump and free up the washer fluid hose.
- Loosen the front wheel cover tab on the bumper cover from the inside. Refer to → Chapter "Front Wheel Cover, Removing and Installing".
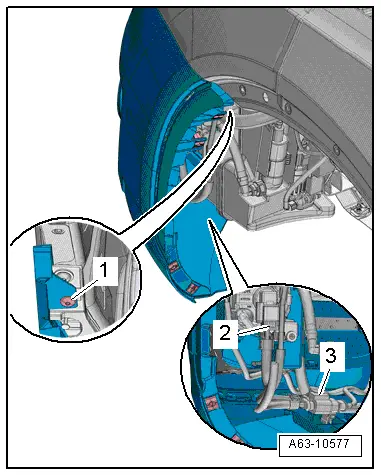
- Remove the bolt -1-.
- If installed, disconnect the connector -2- from the fog lamp.
- Disconnect the central connector -3-.
- Remove the lock carrier cover. Refer to → Chapter "Lock Carrier Cover, Removing and Installing, Vehicles through MY 2014".
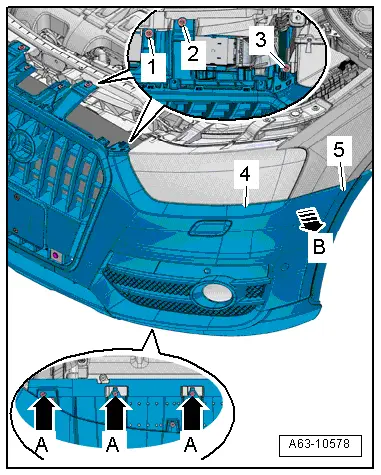
- Remove the screws -1, 2 and 3- and -A arrows-.
- Disengage the side piece -5- from the side panel -arrow B- and remove the bumper cover -4- with a second technician.
Installing
Install in reverse order of removal.
Front Bumper Cover, Adjusting
Procedure
- Remove the lock carrier cover. Refer to → Chapter "Attachments, Removing and Installing".
Longitudinal setting:
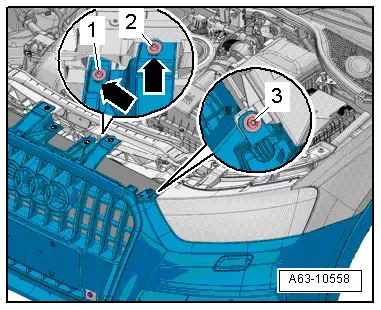
- Loosen bolts -1, 2, 3-.
- Adjust the front connector lengthwise to the markings -arrows-.
- Tighten the bolts.
- Check the gap dimension for evenness, and if necessary repeat.
Impact Member, Removing and Installing
Removing
- Remove the front bumper cover. Refer to → Chapter "Bumper Cover, Removing and Installing".
- Disconnect the connector from the horn and free it up.
- If equipped, remove the bolt -2- from the charge air cooler -1-.
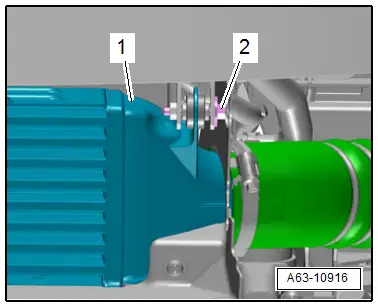
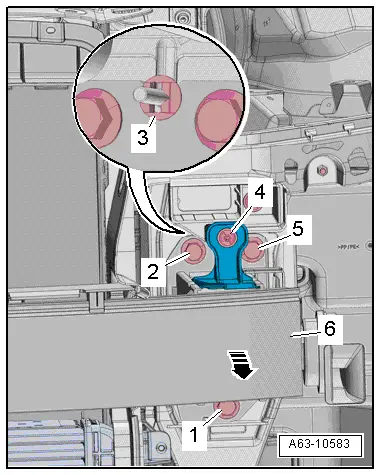
- Pull out locking washer -3-.
- Remove the bolts -1, 2, 4 and 5-.
- Tilt the upper impact member -6- forward -arrow- and remove from the lock carrier.
- If the impact member is replaced:
- Remove the horn bracket. Refer to → Electrical Equipment; Rep. Gr.90; Overview- Horn.
- Remove the lower mount bracket. Refer to → Chapter "Bumper Cover Mount Bracket, Removing and Installing".
- Remove the impact member cover.
Installing
Install in reverse order of removal. Note the following:
- Install the charge air cooler. Refer to → Rep. Gr.21; Overview - Charge Air System.
- Install the front bumper cover. Refer to → Chapter "Bumper Cover, Removing and Installing".
READ NEXT:
 Lock Carrier Cover, Removing and Installing, Vehicles through MY 2014
Removing
- To remove the expanding clips -arrows-,
push the clamping pin -1- carefully
to dimension -x- until it clicks
into the expanding clip -arrow A-.
Dimension -x- = 5 mm
-&nbs
Center Grille. Removing and Installing, Audi Q3 Offroad
Removing
- Remove the noise insulation. Refer to
→ Chapter "Overview - Noise Insulation".
- Remove the front bumper cover end plate. Refer to
→ Chapter "Front Bumper Cover
Bumper Cover Lower Section, Removing and Installing, Audi Q3
Removing
- Remove the front bumper cover. Refer to
→ Chapter "Bumper Cover, Removing and Installing".
- Remove the front bumper cover end plate. Refer to
→ Chapter "Front SEE MORE:
Camera-based traffic sign recognition
Description
Applies to: vehicles with camera-based traffic sign recognition
Fig. 92 Instrument cluster: traffic sign recognition
The traffic sign recognition shows the traffic
signs detected by the front camera in the instrument
cluster display. Data from the navigation
system is also included in t
Battery
Battery General Information
To guarantee a long service life, the Battery -A- must be
checked, serviced and maintained as described in this manual.
The Battery -A- supplies the power to start the engine. The
Battery -A- also acts as a power reserve for the entire vehicle
electrical system.
