Audi Q3: Driver Assistance Systems Front Camera
Driver Assistance Systems Front Camera Component Location Overview
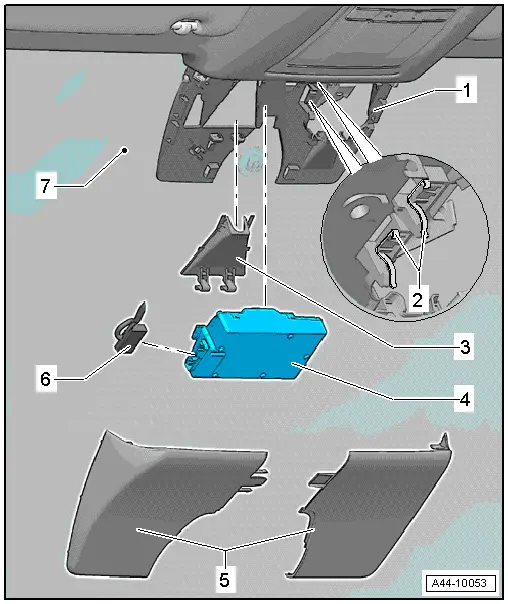
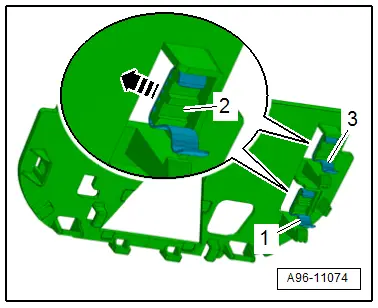
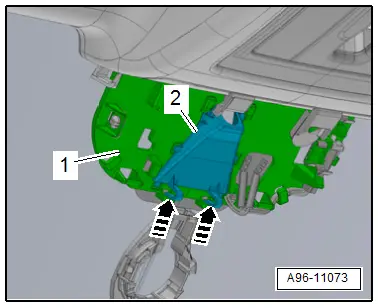
1 - Retaining Plate
- There are different versions. Refer to the Parts Catalog.
- With heated windshield
- Cannot be separated from the windshield
2 - Retaining Clips
- Replace after every removal
3 - Lens Shade
- Removing and installing. Refer to → Chapter "Driver Assistance Systems Front Camera -R242-, Removing and Installing".
4 - Driver Assistance Systems Front Camera -R242-
- Removing and installing. Refer to → Chapter "Driver Assistance Systems Front Camera -R242-, Removing and Installing".
5 - Cover
- There are different versions. Refer to the Parts Catalog.
6 - Connector
7 - Windshield
Driver Assistance Systems Front Camera -R242-, Removing and Installing
Driver Assistance Systems Front Camera -R242-, Removing and Installing, Version 1
- If replacing the control module, select the "Replace Control Module" function see Vehicle Diagnostic Tester.
Removing
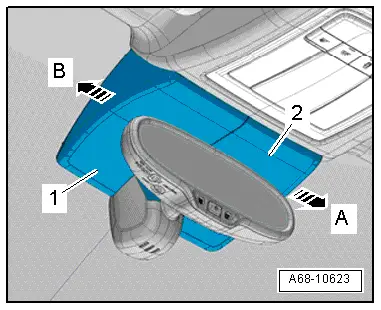
- Unclip the right cover -2- from the left cover and from the bracket in direction of -arrow A-.
- Unclip the left cover -1- from the bracket in direction of -arrow B- and remove.
- Free up the electrical wire if necessary.
- Remove the front interior lamp/reading lamp -1- from the roof opening. Refer to → Chapter "Front Interior Lamp/Reading Lamp, Removing and Installing".
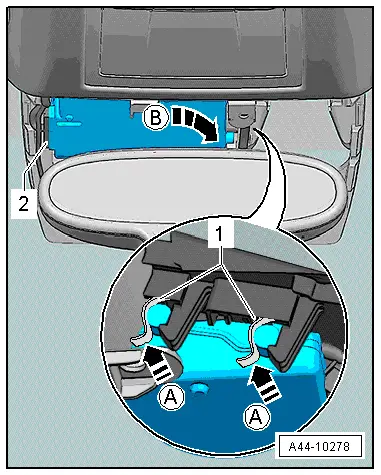
- Push the retaining tabs -1- in the direction of the vehicle interior in direction of -A arrows- and remove the Driver Assistance Systems Front Camera -R242- downward from the clips.
- Remove the Driver Assistance Systems Front Camera -R242- to the right from the retaining plate guide in the direction of -arrow B-.
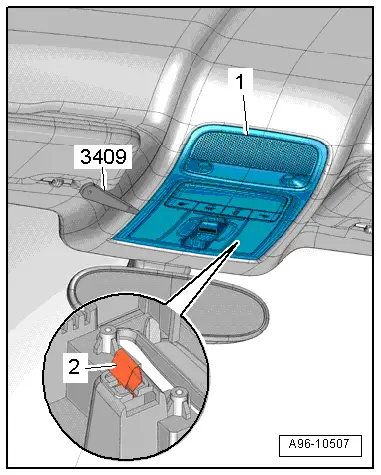
- remove the connector -2- and remove the Driver Assistance Systems Front Camera -R242-.
Lens Shade, Removing
- Press the clips in direction of -arrow- and remove the lens shade downward from its bracket.
Installing
Install in the reverse order of removal. Note the following:
 Note
Note
The camera vision range on the inside of the windshield must not be fogged up or dirty.
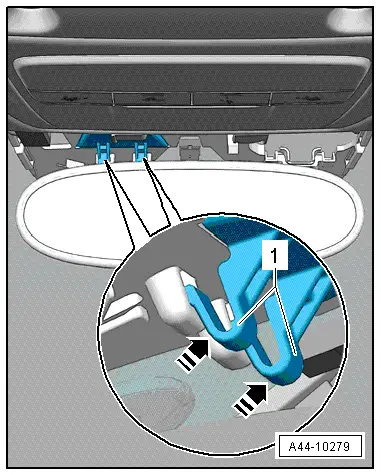
- The retaining tabs -1 and 3- must be replaced after removing the front camera, to do this remove the retaining tabs in the direction of -arrow- from the mount -2-.
- Clean the lens on the windshield with Cleaning Solution -D 009 401 04-.
- Calibrate the driver assistance systems front camera. Refer to → Suspension, Wheels, Steering; Rep. Gr.44; Driver Assistance Systems Front Camera; Driver Assistance Systems Front Camera, Calibrating.
Driver Assistance Systems Front Camera -R242-, Removing and Installing, Version 2
- If replacing the control module, select the "Replace Control Module" function see Vehicle Diagnostic Tester.
Removing
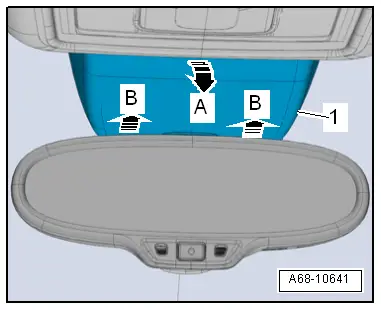
- Unclip the rear cover -1- from the headliner and pull it downward in direction of -arrow A-.
- Disengage the front cover on the front camera bracket in direction of -B arrows- and remove downward.
- Remove the sun visor center support. Refer to → Body Interior; Rep. Gr.68; Vehicle Equipment; Sun Visor Center Support, Removing and Installing.
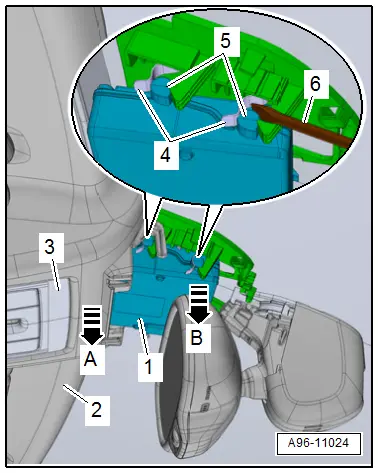
- Reach in the front of the headliner -2- by hand and with a light tug on the headliner in direction of -arrow A- lower the interior lamp -3- to the first catch on the retaining clamp.
 Note
Note
The interior lamp/reading lamp is not removed.
- Position the screwdriver -6- on the retaining pin -5- as illustrated and slowly press the front camera -1- out of the retaining clips -4- in direction of -arrow B-.
- Remove the front camera to the right from the retaining plate guides.
- Disconnect the connector and remove the front camera.
Lens Shade, Removing
- Press the retainers in direction of -arrow- and remove the lens shade -2- downward from the retaining plate -1-.
Installing
Install in the reverse order of removal. Note the following:
 Note
Note
The camera vision range on the inside of the windshield must not be fogged up or dirty.
- The retaining tabs -1 and 3- must be replaced after removing the front camera, to do this remove the retaining tabs in the direction of -arrow- from the mount -2-.
- Clean the lense on the windshield with Cleaning Solution -D 009 401 04-.
- Calibrate the driver assistance systems front camera. Refer to → Suspension, Wheels, Steering; Rep. Gr.44; Driver Assistance Systems Front Camera; Driver Assistance Systems Front Camera, Calibrating.

READ NEXT:
 Trailer Hitch
Overview - Trailer Hitch Socket and Towing Recognition Control Module
1 - LED Indicator Lamp
Trailer Hitch -Locked- Indicator Lamp -K226-, Trailer Hitch
-Unlocked- Indicator Lamp -K
Component Location Overview - Relay Carriers, Fuse Panels and E-Boxes
Overview - E-box, Wire Junction, Fuse Panel, Suppressor
1 - Nut
9 Nm
2 - Wiring Harness
3 - Nut
4.5 Nm
4 - Suppressor -C24-
Removing and iSEE MORE:
Air Intake Grille Trim, Removing and Installing
Removing
- Remove the air intake grille. Refer to
→ Chapter "Air Intake Grille, Removing and Installing, Vehicles
through MY 2014".
- Remove the front bumper cover. Refer to
→ Chapter "Bumper Cover, Removing and Installing".
- If equipped, remove the parking aid
Tire Requirements
A - Wet braking behavior
B - Comfort
C - Steering precision
D - Driving stability
E - Tire weight
F - Service life expectancy
G - Rolling resistance
H - Hydroplaning
The pie chart represents the tire's performa