Audi Q3: Trailer Hitch
Trailer Hitch Socket, Removing and Installing - Version 1
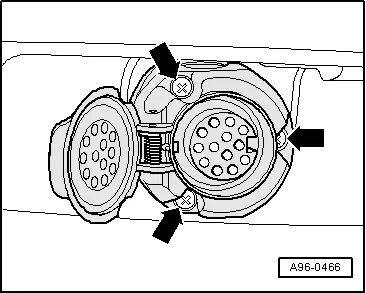
Removing
- Turn off the ignition and remove the key.
- Remove the bolts -arrows-.
- Detach the socket from the retaining plate.
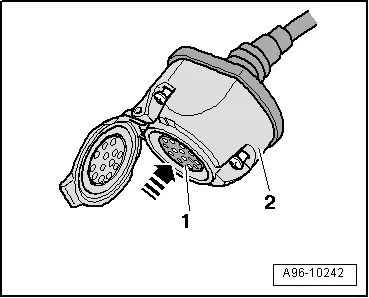
Socket with Rear Fog Lamp Shut-Off Contact Switch -F216-:
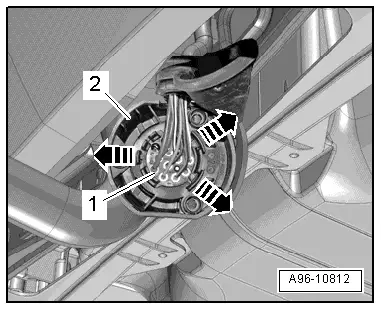
- Remove harness connector -2- for the Rear Fog Lamp Shut-Off Contact Switch -F216- and harness connector -1- from the Trailer Socket -U10-.

Socket without a Rear Fog Lamp Shut-Off Contact Switch -F216-:
- Press multiple connector -1- in direction of -arrow- out of socket -2-.
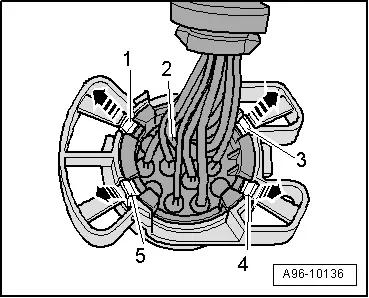
Version 1
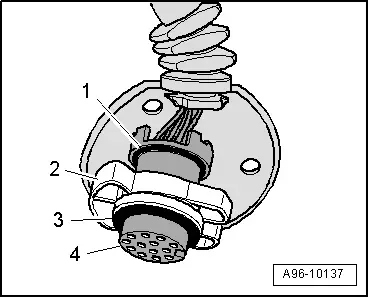
- Release securing tabs in direction of -arrows- and then release retainer clips -1 and 3 through 5-.
- Remove the retainer from the connectors -2-.
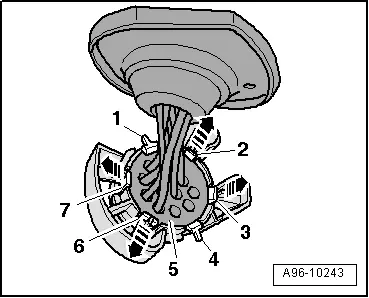
Version 2
- First release securing tabs in direction of -arrows- and then retaining clips -1, 2, 3, 4, 6, and 7-.
- Remove the retainer from the multi-pin connector -5-.
Installing
Install in reverse order of removal. Note the following:
 Note
Note
Make sure the O-rings -1 and 3- are not damaged.
- Slide the connectors -4- into the retainer -2- until they click into place.
Trailer Hitch Socket, Removing and Installing - Version 2
Removing
 Note
Note
During installation, install the cable ties at the same location.
- Turn off the ignition and remove the key.
- Unfold and engage the trailer hitch.
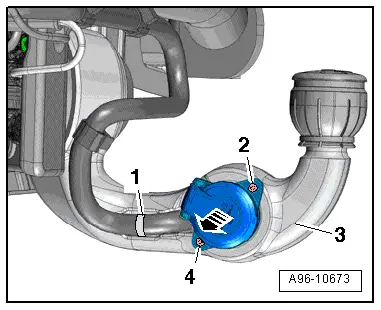
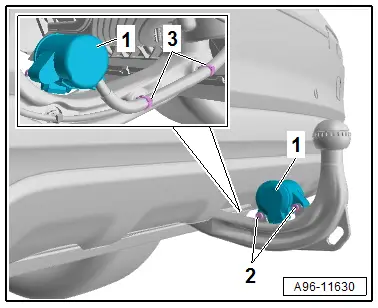
- Cut the cable tie -1- and remove the screws -2 and 4-.
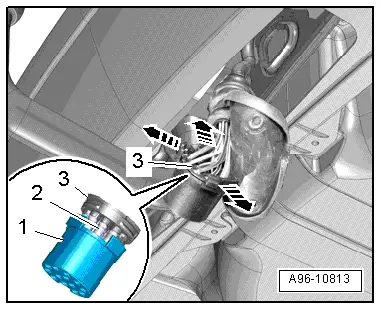
- Press the socket out of trailer hitch -3- in direction of -arrow-.
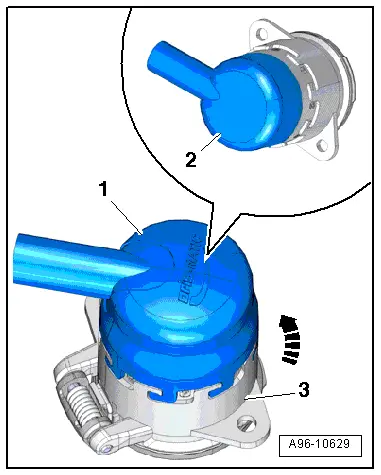
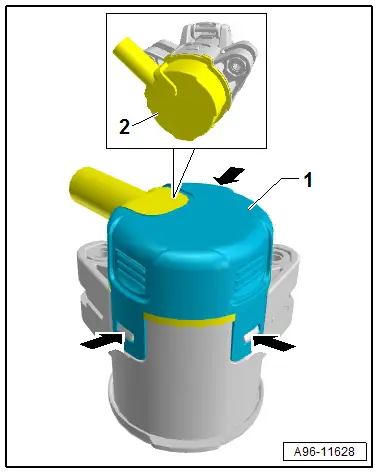
- Turn cap -1- counterclockwise -arrow- and remove it from socket -3-.
- Remove rubber cover -2-.
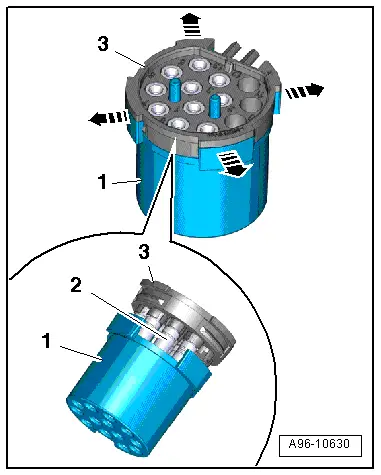
- Release the retaining clips -arrows- and press multiple connector -2- out of socket -1-.

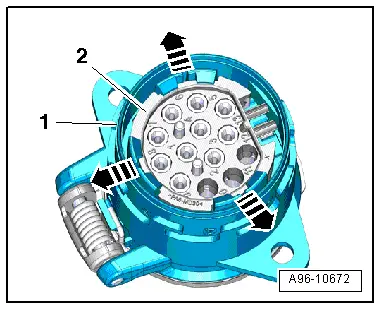
- Release the retaining clips -arrows- and remove retainer -1- from multiple connector -3-.
 Note
Note
Carefully remove the retainer so that contacts -2- of the multiple connector are not disconnected from the wiring harness.
Installing
Install in reverse order of removal. Note the following:
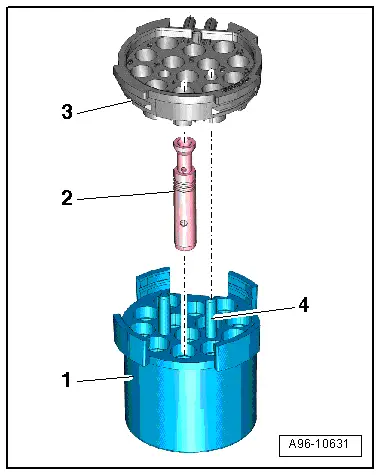
- The retainer -1- can be pushed onto multiple connector -3- in only one position.
- Guide pins -4- can be inserted into the retainer in only one position. Contacts -2- must be inserted in the retainer for this purpose.
- Insert the retainer into the multiple connector until it engages audibly.
Trailer Hitch Socket, Removing and Installing - Version 3
Removing
- Fold out the trailer hitch. Refer to the vehicle Owner's Manual.
- Switch off the ignition and remove the ignition key.
- Remove the bolts -arrows-.
- Remove the socket from the retaining plate.
- Remove the rubber cover from the socket.

- Release the retaining clips in direction of -arrows- and press multiple connector -1- out of socket -2-.
- Release the retaining clips in direction of -arrows- and remove retainer -2- from multiple connector -3-.
 Note
Note
Carefully remove the retainer so that contacts -2- of the multiple connector are not disconnected from the wiring harness.
Installing
Install in reverse order of removal. Note the following:
- The retainer -1- can be pushed onto multiple connector -3- in only one position.
- Guide pins -4- can be inserted into the retainer in only one position. Contacts -2- must be inserted in the retainer for this purpose.
- Insert the retainer into the multiple connector until it engages audibly.

Trailer Hitch Socket, Removing and Installing - Version 4
Removing
 Note
Note
During installation, install the cable ties at the same location.
- Turn off the ignition and all electrical equipment.
- Move out the trailer hitch.
- Cut through the cable tie -3-.
- Remove the bolts -2-.
- Remove the socket from the trailer hitch -1-.
- Release the retainers -arrows-.
- At the same time remove the cap -1- from the socket.
- Remove rubber cover -2-.
- Release the clips -arrows- and press multiple connector -2- out of socket -1-.
- Release the clips -arrows- and remove retainer -1- from multiple connector -3-.
 Note
Note
Carefully remove the retainer so that contacts -2- of the multiple connector are not disconnected from the wiring harness.

Installing
Install in reverse order of removal. Note the following:
- The retainer -1- can be pushed onto multiple connector -3- in only one position.
- Guide pins -4- can be inserted into the retainer -1- in only one position. Contacts -2- must be inserted in the retainer for this purpose.
- Insert the retainer into the multiple connector until it engages audibly.

READ NEXT:
 Vehicle Diagnosis, Testing and Information Systems
WARNING
During road tests using a vehicle diagnostic and
information system, there is the hazard of extreme to
lethal injuries!
If vehicle diagnostic and information system is
de
Vehicle Electrical System, General Repair Information
Caution
When disconnecting and connecting battery, the
procedure must be followed as described in the Repair
Manual.
WARNING
Some tools are supplied with a tool safety clip,SEE MORE:
General information
Safety precautions
WARNING
As the driver, you are always completely responsible
for all driving tasks. The assist
systems cannot replace the driver's attention.
Give your full attention to driving the
vehicle, and be ready to intervene in the
traffic situation at all times.
Activate the ass
Sill Panel Strip, Removing and Installing
Front Sill Panel Strip, Removing and Installing
Special tools and workshop equipment
required
Trim Removal Wedge -3409-
Omega Clip Tool -T40280-
Removing
- Remove the instrument panel side cover. Refer to
→ Chapter "Instrument Panel Side Cover, Removing and Installing".
-&