Audi Q3: Sill Panel Strip, Removing and Installing
Front Sill Panel Strip, Removing and Installing
Special tools and workshop equipment required
- Trim Removal Wedge -3409-
- Omega Clip Tool -T40280-
Removing
- Remove the instrument panel side cover. Refer to → Chapter "Instrument Panel Side Cover, Removing and Installing".
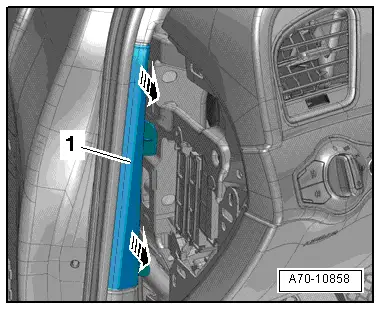
- Unclip the A-pillar gap cover -1- using the Trim Removal Wedge -3409--arrows- and remove.
Driver side:
- Remove the hood release cable operating lever. Refer to → Body Exterior; Rep. Gr.55; Hood; Hood Release Lever, Removing and Installing.
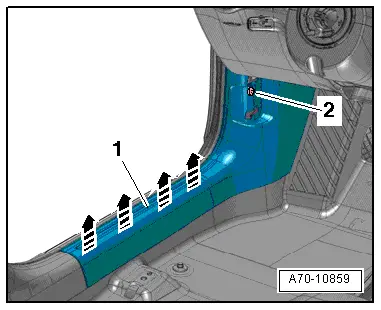
- Remove the front sill panel expanding clip -2-.
Procedure for both sides of vehicle:
- Unclip the front sill panel strip -1- from the sill panel starting at the back using the Trim Removal Wedge -3409--arrows- and remove it toward the rear.
- Remove the front sill panel strip.
Installing
Install in reverse order of removal. Note the following:
- Driver side: engage the front sill panel trim on the operating lever mount and push it into the foot compartment.
- Front passenger side: slide the front sill panel trim guide into the carpet.
Installation notes, for example tightening specifications, replacing components. Refer to → Chapter "Overview - Front Sill Panel Strip".
Rear Sill Panel Strip, Removing and Installing
Special tools and workshop equipment required
- Trim Removal Wedge -3409-
- Omega Clip Tool -T40280-
Removing
- Remove the rear bench seat. Refer to → Chapter "Bench Seat/Single Seat, Removing and Installing".
- Versions with a side cushion: remove the side cushion. Refer to → Chapter "Rear Side Padding With Side Airbag, Removing and Installing".
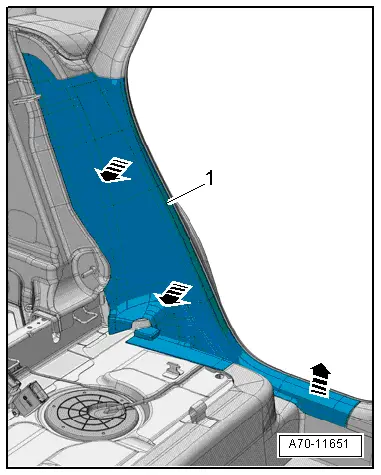
- Unclip the sill panel strip -1- from the sill panel strip and side panel starting at the front -arrows- using a Trim Removal Wedge -3409-.
- Remove the lower sill panel strip from the belt guide and C-pillar trim.
- Remove the sill panel strip.
Installing
Install in reverse order of removal.
Installation notes, for example tightening specifications, replacing components. Refer to → Chapter "Overview - Rear Sill Panel Strip".
READ NEXT:
 A-Pillar Trim Panel, Removing and Installing
Special tools and workshop equipment
required
Pry Lever -80-200-
Omega Clip Tool -T40280-
Removing
WARNING
Follow all safety precautions when working with
pyrotechnic componen
Foot Rest, Removing and Installing
Special tools and workshop equipment
required
Trim Removal Wedge -3409-
Removing
- Remove the front driver side sill panel trim. Refer to
→ Chapter "Front Sill Panel Strip, Remo
Component Location Overview - Luggage Compartment Trim Panels
1 - Lock Carrier Trim
Overview. Refer to
→ Chapter "Overview - Lock Carrier Trim".
2 - Luggage Compartment Floor Covering
Overview. Refer to
→ ChapteSEE MORE:
Drive Axle, Disassembling and Assembling
Drive Axle, Disassembling and Assembling, Drive Axle with 100 mm Inner CV
Joint
Special tools and workshop equipment
required
Tripod Joint Tool -T10065-
Torque Wrench 1331 5-50Nm -VAG1331-
Torque Wrench 1332 40-200Nm -VAG1332-
Clamping Pliers -VAG1682A-
Circlip Pliers -VW161A-
Pre
Special Tools
Special tools and workshop equipment
required
Shock Absorber Set -T10001-
Tensioning Strap -T10038-
Tripod Joint Tool -T10065-
Locating Pins -T10096-
Engine/Gearbox Jack Adapter - Wheel Hub Support -T10149-
Socket - Xzn 18 -T10162-
Bearing Installer - 