Audi Q3: Repair a wiring 0.35 mm 2 or greater with intermediate wire section
 Note
Note
For the repair use repair wires with a cross section of 0.35 mm2 through 6.0-mm2.
Procedure
- Free up the wire to be repaired at two places approximately 20 cm on both sides of the repair point.
 Caution
Risk of damaging the electrical wires.
Expose wrapped wiring harnesses carefully.
- If necessary, removing the wiring harness wrapping using a knife.
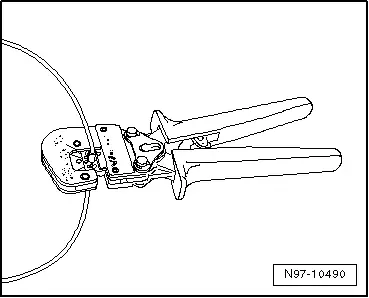
- Route the yellow repair wire next to the damaged wiring harness and cut the repair wire to the required length using the Wiring Harness Repair Set - Wire Strippers -VAS1978/3-.
- Cut damaged wire section from the vehicle-specific single wire.
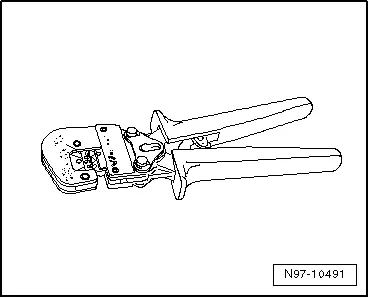
- Adjust the sliding stop in the Wiring Harness Repair Set - Wire Strippers -VAS1978/3- pliers jaws to 6 to 7 mm for the wire to be stripped.
- Insert the vehicle-specific single wire end from the front into the pliers jaws as far as the stop and squeeze the pliers together completely.
- Open pliers again and remove the stripped wire end.
- Repeat the procedure on the other end of the vehicle-specific individual wire.
- For the repair, use two suitable crimp connectors from the Wiring Harness Repair Set -VAS1978B-.
 Note
Note
- Always be sure to use the corresponding crimp connector and the correct crimping slot for the crimping connection used. Refer to → Chapter "Crimping Pliers with Insert".
- Do not crimp wire insulation.
- Use the Wiring Harness Repair - Crimping Plier - Base Tool -VAS1978/1-2- to press the crimp connector.
The following exchangeable heads are available for the Wiring Harness Repair - Crimping Plier - Base Tool -VAS1978/1-2-:
- Wiring Harness Repair - Crimping Head - .35-2.5mm -VAS1978/1-1-
- Wiring Harness Repair Set - Crimping Head - 4-6mm -VAS1978/2 A-
- Slide the crimp connector onto the vehicle-specific single wire at one side and onto repair wire at the other side.
- Crimp the crimp connection at both wire ends using crimp pliers.
- Repeat this procedure on the other wire ends.
 Note
Note
Do not crimp wire insulation.
After crimping, crimp connections must be heat-shrunk using hot air gun to prevent moisture penetration.
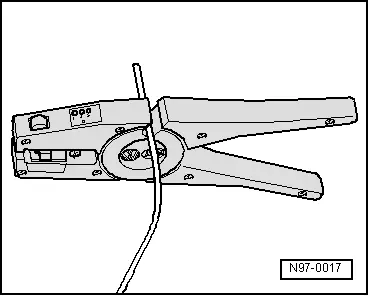
- Insert the Wiring Harness Repair - Blower - Shrink Element -VAS1978/15A- on the Wiring Harness Repair Set - Hot Air Blower -VAS1978/14A-.
 Caution
Risk of damaging surrounding components.
- When heat-shrinking crimp connections, be careful not to damage any other wiring, plastic parts or insulating material with the hot nozzle of the hot air blower.
- Always observe operating instructions of heat gun.
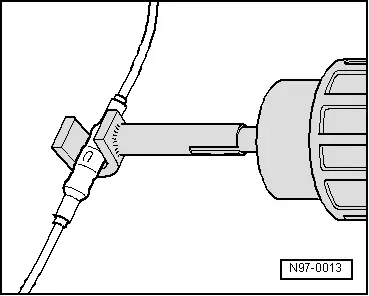
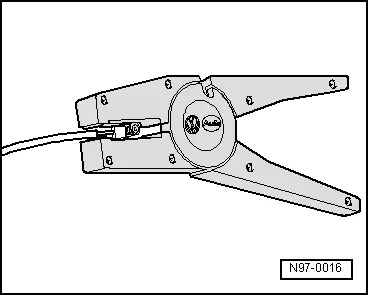
- Heat crimp connection using the hot air blower lengthwise from center outward until it is sealed completely and adhesive comes out the ends.
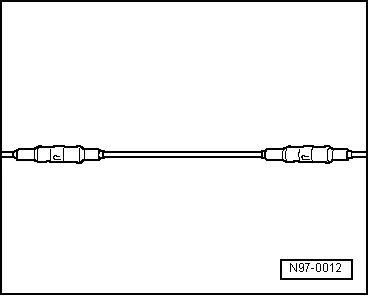
- This is how the completed repair location with the inserted wire and two crimp connectors should look.
 Note
Note
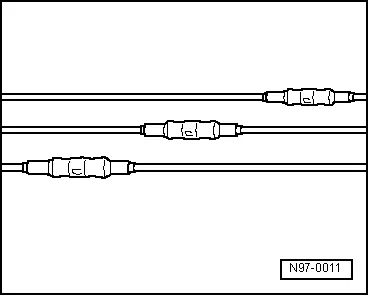
- Make sure that crimp connections do not lie directly next to each other when several wires need to be repaired. Arrange the crimp connectors at a slight offset so that the circumference of the wiring harness does not become too large.
- If the repair point was previous taped, this point must be taped again with yellow insulating tape after repairs.
- Secure the repaired wiring harness if necessary with a cable tie to prevent flapping noises while driving.
READ NEXT:
 10 mm2- or 16 mm2
Wires with Separate Butt Connectors, Repairing
10 mm2- or 16 mm2
Wires with Separate Butt Connectors, Repairing
Special tools and workshop equipment
required
Wiring Harness Repair Set - Hot Air Blower -VAS1978/14A-
from the Wiring Harness Repair Set -VAS1978B-
Wiring Harness Repair - Blower - Shrink E
2.,5 mm2, 4 mm2 or
6 mm2 Aluminum Wires with Separate Butt Connectors,
Repairing
Special tools and workshop equipment
required
Wiring Harness Repair Set - Hot Air Blower -VAS1978/14A-
from the Wiring Harness Repair Set -VAS1978B-
Wiring Harness Repair - Blower - Shrink E
Fiber-Optic Cables, Repairing
Caution
Do not bend the fiber-optic cable too much. The
bending radius must be no less than 25 mm.
Fiber optic cables must not be routed over sharp
edges.
The fiber-optic cable must nSEE MORE:
Data memories
Vehicle control modules
Fig. 175 Driver's side footwell: connection port for the On
Board Diagnostic System (BD)
Your vehicle is equipped with electronic control
modules fou various vehicle systems such as the
airbags. These vehicle control modules store data
while driving normally that is required
Rear Lid, Removing and Installing
Rear Lid, Removing and Installing
A second technician will be needed during removal and
installation to support and to hold the rear lid.
Removing:
Note
Mark the position of the rear lid on the rear lid hinge with
a felt-tip pen before removing.
- Remove the rear lid trim