Audi Q3: Rear Lid, Removing and Installing
Rear Lid, Removing and Installing
- A second technician will be needed during removal and installation to support and to hold the rear lid.
Removing:
 Note
Note
Mark the position of the rear lid on the rear lid hinge with a felt-tip pen before removing.
- Remove the rear lid trim panel. Refer to → Body Interior; Rep. Gr.70; Luggage Compartment Trim Panels; Rear Lid Upper Trim Panel, Removing and Installing
- Disconnect the electric wires on the connectors and pull them out of the rear lid.
- Remove the top bolt on the rear lid side first.
- Remove the bolts on both sides of the rear lid and then remove the rear lid. Refer to → Chapter "Hinges, Removing and Installing".
Install in reverse order of removal.
Adjusting:
- Adjust the front height and the position of the hood lengthwise using the hood hinge.
- Adjust the height of the back of the rear lid by adjusting the rear lid latch.
- Align the rear lid so it is centered according to the gap dimensions. Refer to → Chapter "Rear Lid, Adjusting".
- Adjusting buffer stops.
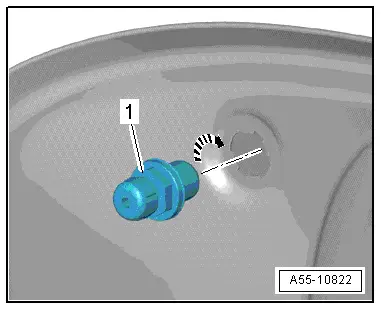
Adjusting Buffer, Removing and Installing
Removing
- Release the adjusting buffer by pushing and turning left with a 24 mm socket on the hex fitting and remove.
Installing
Install in reverse order of removal. Note the following:
- To install the adjusting buffer insert in the correct position on the rear lid and lock with a 24 mm socket turning right in the direction of the -arrow-.
Rear Lid, Adjusting
Special tools and workshop equipment required
- Gauge - Gap Adjustment -3371-
Gap Dimensions
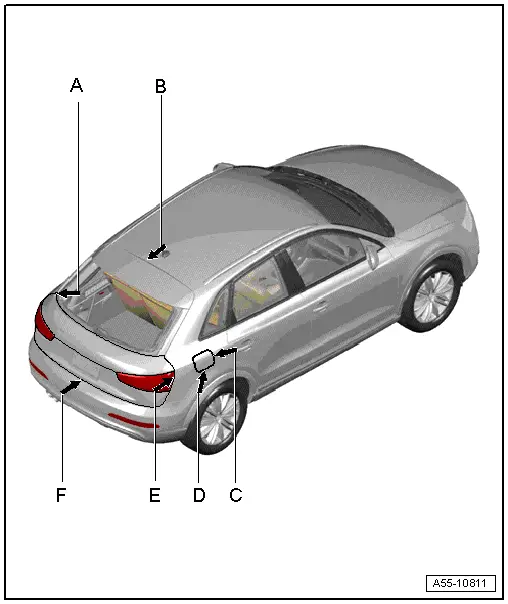
The gap dimensions can be checked with the Adjustment Gauge -3371-.
- Dimension -A- = 4.5 mm
- Dimension -B- = 5.5 mm
- Dimension -C- = 2.3 mm
- Dimension -D- = 2.5 mm
- Dimension -E- = 5.0 mm
- Dimension -F- = 5.3 mm
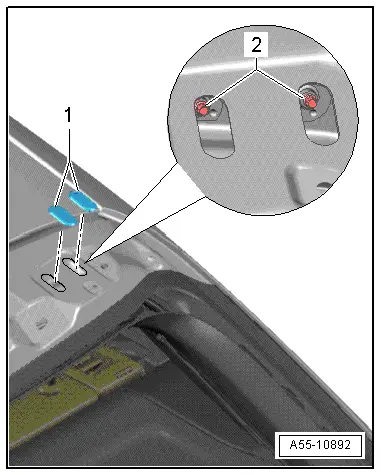
Adjusting via the Hinge
- The roof spoiler is removed. Refer to → Chapter "Roof Edge Spoiler, Removing and Installing".
- Remove the seal -1-.
To ensure that it is water tight, after installing the seal coat it completely with Adhesive/Sealant - D 511 500 A2-.
- Loosen the bolts on the lid -2- from the inside at the hex fitting.
- Close the rear lid and align it with the body contour.
- Fasten the bolts -2- to the lid retainer with an outer torx socket E5 to the left to maximum of 7 Nm.
- Open the rear lid and tighten the bolts on the bolts on the hex fitting. Refer to -item 2-.
- Install the rear spoiler.
Adjustment using Lid Catch, vehicle with Fixed Catch
- Remove the lock carrier trim panel. Refer to → Body Interior; Rep. Gr.70; Luggage Compartment Trim Panels; Lock Carrier Trim Panel, Removing and Installing.
 Note
Note
- Before adjusting, install the adjusting buffer on the rear lid side completely → Fig. "Adjusting Screw for Adjusting Buffer".
- The rear height can be adjusted by sliding the locking plate.
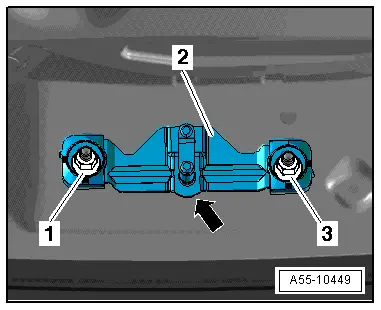
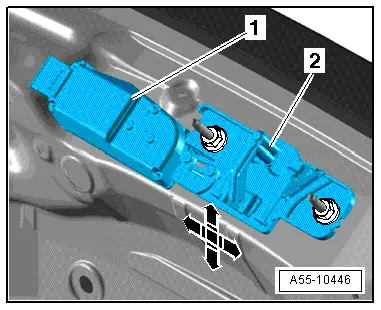
- Loosen nuts -1- and -3-. The catch -2- must be movable.
- Close the rear lid and check the position.
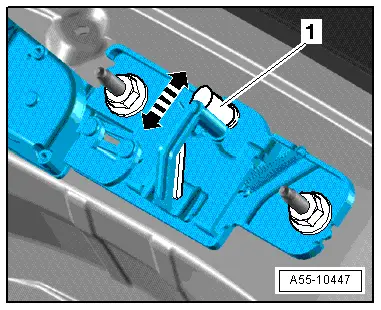
- If necessary adjust the striker pin the in upper adjusting buffer.
- Rear lid latch must be engaged in main detent (second retainer) during this.
- Tighten the nuts on the striker pin to the tightening specification. Refer to -10-.
- Turn the lower adjusting buffer until the closed rear lid with the adjusting buffer comes into contact position on the stop buffers in the body.
- Check whether rear lid still closes easily, repeat adjustment at adjusting buffer if necessary.
- If rear lid is difficult to close, tighten the adjusting buffer slightly.
Adjust using Catch, vehicles with Rear Lid Lock Unit
- Remove the lock carrier trim panel. Refer to → Body Interior; Rep. Gr.70; Luggage Compartment Trim Panels; Lock Carrier Trim Panel, Removing and Installing.
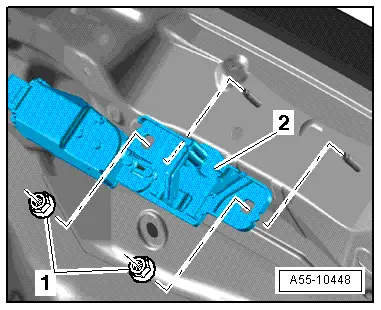
- Loosen the nuts. The rear lid lock unit -1- and striker pin -2- must still be movable.
- For easier installation, there are markings in the rear lid end piece to help adjust the rear lid lock unit.
 Caution
Risk of damage!
- To adjust the rear lid, the striker pin must be in the "rear lid closed" position (lower end position).
- Striker pin cannot be installed in position not visible in drawing (upper end position) -1- because rear lid can block contact when closing and can be damaged.
- Do not use the Door Closing Assist Control Module to adjust the power rear lid.
- Turn the upper section of the rear lid side of the adjusting buffer completely before adjusting the rear lid. Refer to → Fig. "Adjusting Screw for Adjusting Buffer".
- Close the rear lid and check the position.
- If necessary adjust the striker pin the in upper adjusting buffer.
- Rear lid latch must be engaged in main detent (second retainer) during this.
- Tighten the nuts -1- on the Rear Lid Lock Unit -2- to the tightening specification. Tightening specification: Refer to → Chapter "Overview - Rear Lid, Rear Lid Motor".
- Remove the lower adjusting buffer until the closed rear lid with the adjusting buffers comes into contact with the stop buffers in the body.
- See if rear lid still closes easily, continue adjusting the adjusting buffer if necessary.
- If rear lid is difficult to close, tighten the adjusting buffer slightly.
Adjusting Buffer, Adjusting
1 - Side Panel
2 - Stop
- Removing and Installing. Refer to → Chapter "Adjusting Buffer, Removing and Installing".
3 - Adjusting Buffer
- Removing and Installing
- There is an adjusting screw for adjusting the height.
- When rear lid is adjusted correctly, adjusting buffer must make contact with light pre-tension with stop on rear lid side.
4 - Rear Lid
- When adjusted correctly, adjusting buffer -3- must contact stop buffer -2- with light pretension when rear lid is closed.
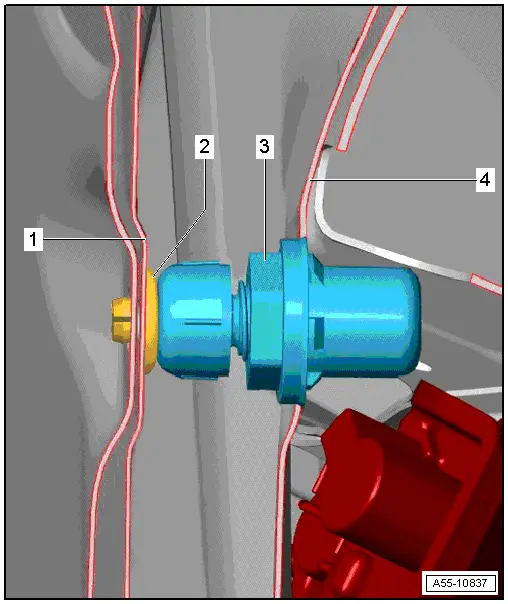
Adjusting Screw for Adjusting Buffer
- Before adjusting rear lid, install adjusting screw -2- with protective cap -1- completely in adjusting buffer -3-
- Remove the adjusting screw -2- just enough until the cap -1- makes contact with light pre-tension with stop on rear lid side when the rear lid is closed.
- Check whether lid sits without play and in flush position by pushing or pulling on the side edge of rear lid below rear window.
- Repeat the adjustment if necessary.

Lid Latch, Removing and Installing
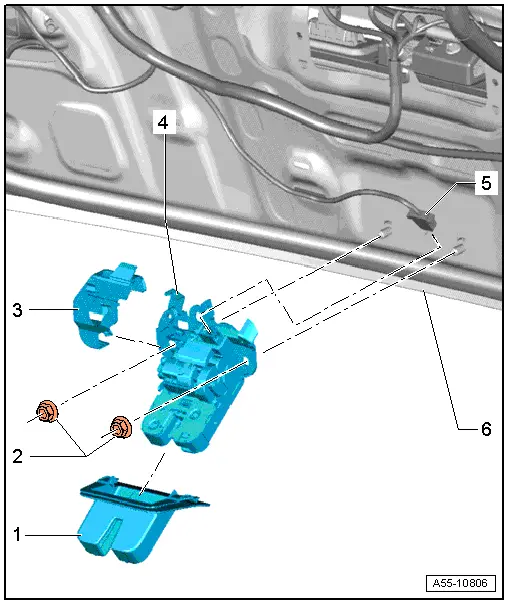
1 - Cover
- After removing, remove the lid trim from the lid lock.
2 - Nut
- 21 Nm
3 - Cover for Lid Latch
- When installing, cover must engage audibly in lid latch.
4 - Lid Latch
- Before removal, remove the lid latch cover.
- The rear lid lower trim panel is removed. Refer to → Body Interior; Rep. Gr.70; Luggage Compartment Trim Panels; Rear Lid Lower Trim Panel, Removing and Installing.
- Disconnect the connector.
- Remove nuts and remove lid latch.
- Remove the lid latch with the clip from the centering hole.
5 - Connector
6 - Rear Lid
READ NEXT:
 Actuator, Removing and Installing
Rear Lid Motor 1 and 2 -V444-/-V445-, Removing and Installing
WARNING
After removing and installing, the Rear Lid Motor 1
- V444- or Rear Lid Motor 2 -V445- must be adapted via
Guided
Rear Lid Seal, Removing and Installing
1 - Rear Lid
2 - Rear Lid Seal
To remove, remove seal from body flange.
When installing, align the seal with the joint
-arrow- with the marking in the center of the vehi
Fuel Filler Door Unit
Overview - Fuel Filler Door Unit
Overview - Fuel Filler Door Unit
1 - Drain Hose
Make sure the routing is correct. Refer to
→ Chapter "Overview - Fuel Filler Door Unit DrainSEE MORE:
Towing Guide
Towing Guide
Note
This is a "guide" for Audi models and their towing weights.
The proper towing weight of the respective vehicle must
always adhere to the corresponding vehicle document (certificate
of conformity).
For the towing weights of individual models and special
model
Wheel, Changing and Mounting
Special tools and workshop equipment
required
Torque Wrench 1332 40-200Nm -VAG1332-
Wheel Lock Set -T10101-
Wheel Lock Set -T10101A-
Wheel Lock Set -T40004-
Wheel Lock Set -T40073-
Wax Spray -D 322 000 A2-
Optimol TA Paste -G 052 109 A2-
Note
The wrench size of the inc