Audi Q3: 2.,5 mm2, 4 mm2 or 6 mm2 Aluminum Wires with Separate Butt Connectors, Repairing
Special tools and workshop equipment required
- Wiring Harness Repair Set - Hot Air Blower -VAS1978/14A- from the Wiring Harness Repair Set -VAS1978B-
- Wiring Harness Repair - Blower - Shrink Element -VAS1978/15A- from the Wiring Harness Repair Set -VAS1978B-
- Wiring Harness Repair Set -VAS631001-
 Note
Note
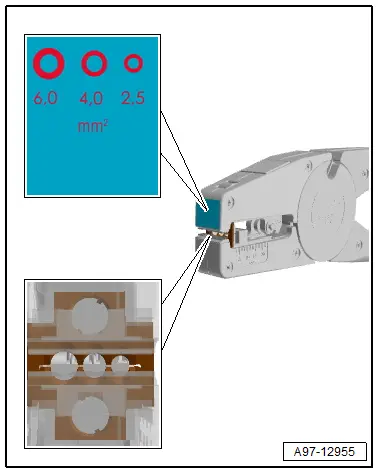
- For the repair there are copper repair wires with a 2.5mm2 or 4 mm2 or 6 mm2 cross section.
- There are also separate copper repair wires with a crimped on contacts available for the repair.
Procedure
- Install the corresponding crimp insert, crimp stamp and contact positioner for the wire cross-section with the contact cross bar as follows on the crimping tool.
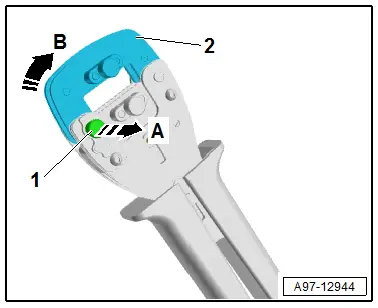
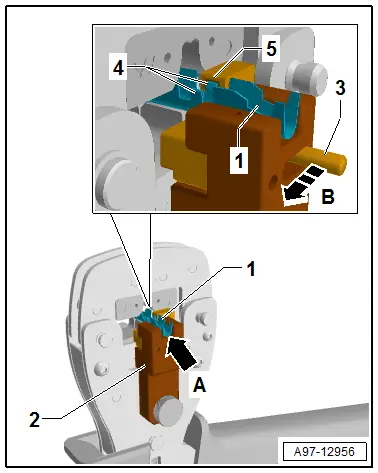
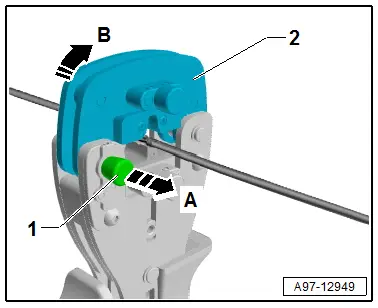
- Open the crimping tool from the Wiring Harness Repair Set -VAS 631 001-.
- Remove the locking pin -1- all the way in the direction of -arrow A-.
- Open the mount -2- in the direction of -arrow B-.
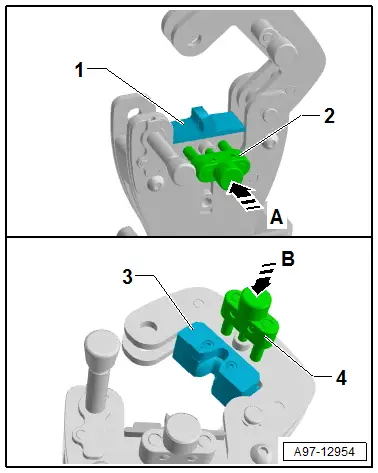
- Insert the crimp insert -1- in the crimping tool so that the crimp insert -1- is flush with the front of the clamps.
- Tighten the crimp insert with the pins -2- in direction of -arrow A- and the knurled screw hand tight.
- Insert the crimp stamp -3- that fits the crimp insert in the mount.
- Secure the crimp stamp with the pin -4- in direction of -arrow B- and the knurled screw hand-tight.
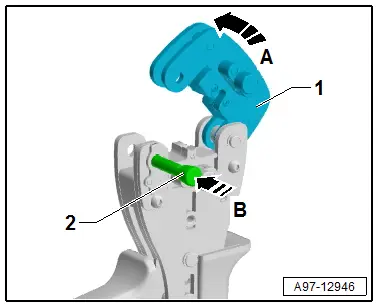
- Close the adapter -1- in the direction of -arrow A-.
- Push the locking pin -2- in the direction of -arrow- all the way.
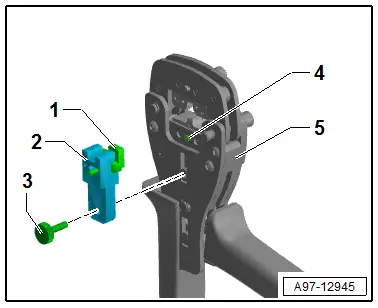
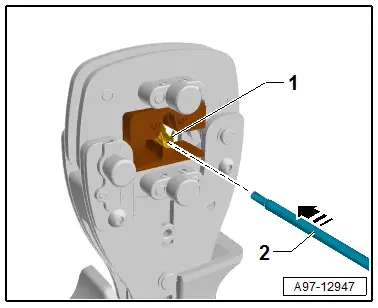
- Insert the contact cross bar -1- in the contact positioner -2-.
- Position the contact positioner with the contact cross bar on the crimping tool -5- at the same time push the holes in the contact positioner -2- over the knurled screw -4-.
- Install the knurled bolt -3- and tighten hand-tight.
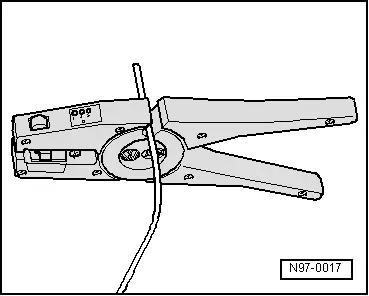
- Free up the wire to be repaired approximately 20 cm on both sides of the repair point.
 Caution
Risk of damaging the electrical wires.
Expose wrapped wiring harnesses carefully.
- If necessary, removing the wiring harness wrapping using a knife.
- Cut the damaged section of the wire with wire stripper from the Wiring Harness Repair Set -VAS 631 001-.
 Note
Note
When both ends of the vehicle-specific single wire are too short after cutting out the damaged wire section for a repair with a separate butt connector, insert a corresponding long piece of yellow copper repair wire with two butt connectors.
- Insert the wire end from the front all the way in to the wire cross-section corresponding mount in the jaws of the pliers.
- Push the pliers completely together.
- Open pliers again and remove the stripped wire end.
- The insolation must be cut cleanly and remove from the wires.
- No insolation can remain on bare wires.
- The single wires must not be damaged.
- For the repair remove the corresponding butt connection with a heat-shrinkable tube from the Wiring Harness Repair Set -VAS 631 001-.
- Push the heat-shrinkable tube on one of the wires.
- Place the butt connection -1- in the contact positioner -2-.
- The butt connection -1- must be flush with the contact positioner -2--arrow A-.
- Push the contact cross bar -3- all the way in the direction of the -arrow B- and secure it with the butt clamp -1-.
- The tab -4- on the butt connection -1- must engage in the groove -5- on the contact cross bar -3-.
- Insert the wire -2- with the bare wire end all the way in the butt connection -1--arrow-.
- All single wires must be pushed into the butt connection.
- The insolation end can at a maximum be flush with the front edge of the insolation crimps.
- Close the crimping tool completely until it reopens by itself.
- Push the contact cross bar -2- all the way in the direction of -arrow-.
- Remove the butt connection -1- from the contact positioner -3-.
- Turn the crimping tool for the second crimping.
- Repeat the wire crimping on the other side as described.

- Remove the securing pin -1- in the direction of -arrow A- until it stops.
- Open the mount -2- in the direction of -arrow B-.
- Remove the crimped butt connectors.
Correct crimping results
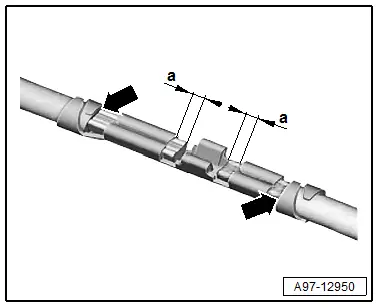
- The wire ends must project 0.1 mm to 1.0 mm on the front edge of the wire crimps, dimension -a-
- The insolation end must not be crimped in the wire crimps.
- The insolation end can at a maximum be flush with the front edge of the insolation crimps -arrows-.
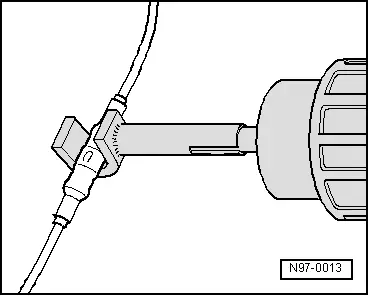
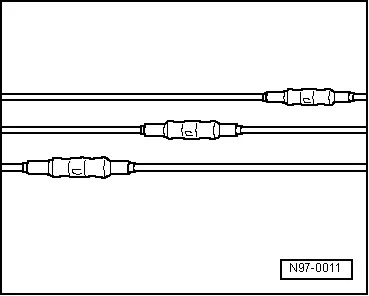
After crimping the heat-shrinkable tube must positioned over the butt connection and heat-shrunk with a hot air gun, to prevent moisture from entering.
- Insert the Wiring Harness Repair - Blower - Shrink Element -VAS 1978/15A- on the Wiring Harness Repair Set - Hot Air Blower -VAS 1978/14A-.
 Caution
Risk of damaging surrounding components.
- When heat-shrinking the heat-shrinkable tube, be careful not to damage any other wiring, plastic parts or insulating material with the hot nozzle of the hot air blower.
- Always observe operating instructions of heat gun.
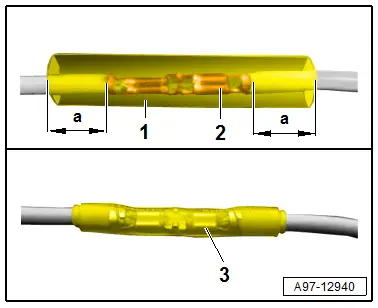
- Position the heat-shrinkable tube -1- centered over the butt connection -2-.
- The dimension -a- must be approximately the same on both sides
- Heat the heat-shrinkable tube using the hot air blower lengthwise from center outward until it is sealed completely and adhesive comes out the ends.
- The completed repair location -3- must look like so.
 Note
Note
- Make sure that the butt connections do not lie directly next to each other when several wires need to be repaired. Arrange the butt connection at a slight offset so that the circumference of the wiring harness does not become too large.
- If the repair point was previous taped, this point must be taped again with yellow insulating tape after repairs.
- Secure the repaired wiring harness if necessary with a cable tie to prevent flapping noises while driving.
READ NEXT:
 Fiber-Optic Cables, Repairing
Caution
Do not bend the fiber-optic cable too much. The
bending radius must be no less than 25 mm.
Fiber optic cables must not be routed over sharp
edges.
The fiber-optic cable must n
Antenna Wires, Repairing
Aerial Cable Repair Set VAS6720
Special tools and workshop equipment
required
Aerial Cable Repair Set -VAS6720-
The Aerial Cable Repair Set -VAS6720- makes it possible to
perform a quality
Connector Housings and Connectors, Repairing
Connector Housings and Connectors, Repair Information
Note
Observe general notes for repairs on the vehicle electrical
system. Refer to
→ Chapter "Vehicle Electrical System, GSEE MORE:
Lock Carrier
Overview - Lock Carrier
1 - Lock Carrier
Removing and installing. Refer to
→ Chapter "Lock Carrier, Removing and Installing".
2 - Bolt
4.5 Nm
3 - Bolt
4.5 Nm
4 - Lower Mount
For the front bumper cover, and headlamp housing
Component Location Overview - Passenger Compartment Trim
1 - Cover
Overview. Refer to
→ Chapter "Overview - C-Pillar Trim Panel".
2 - Rear Sill Panel Strip
Overview. Refer to
→ Chapter "Overview - Rear Sill Panel Strip".
3 - Lower B-Pillar Trim Panel
Overview. Refer to
→ Chapter 