
Audi Q3: Rain/Light Recognition Sensor, Removing and Installing
Rain/Light Recognition Sensor -G397-, Removing and Installing
Special tools and workshop equipment required
- D 009 401 04 -Cleaning Solution-
Removing
- Turn off the ignition.
- Vehicles with ignition lock: Remove the key.
- Remove the interior rearview mirror. Refer to → Body Interior; Rep. Gr.68; Interior Rearview Mirror; Interior Rearview Mirror, Removing and Installing.
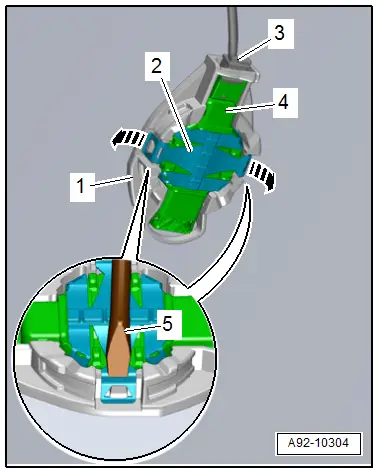
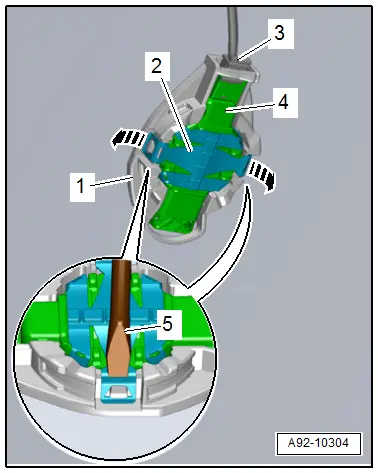
- Disconnect the connector -3-.
- Insert a narrow screwdriver -5- into the opening as shown and release the retaining tabs -2- in direction of -arrows-.
- Wait one minute so that the silicon pad can release without leaving any residue.
- Loosen the Rain/Light Recognition Sensor -G397--4- by moving it back and forth and remove it from the mount -1-.
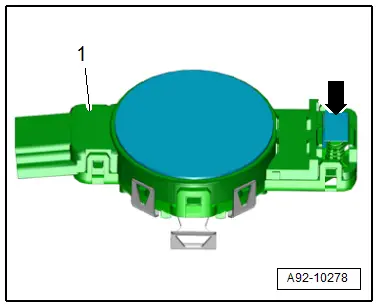
 Caution
Risk of damage to the humidity sensor.
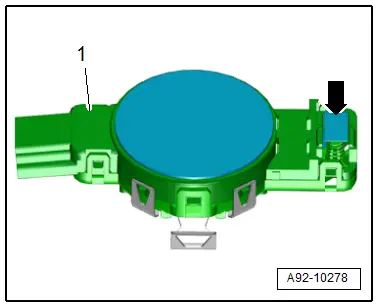
- The humidity sensor -arrow-on the rain/light recognition sensor -1- is extremely sensitive and must not be damaged.
- A damaged humidity sensor must be replaced.
Installing
Install in the reverse order of removal. Note the following:
 Note
Note
Replace the silicon pad and retainer.
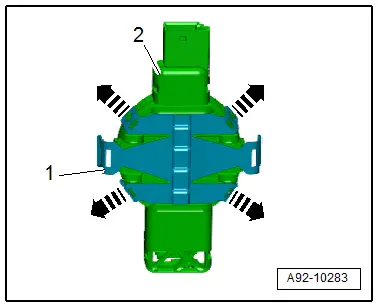
- Release the retaining tabs on the retainer -1--arrows- and remove it from the sensor -2-.
- Press on the new retainer until it audibly engages.
- Clean the adhesive surface on the windshield with Cleaning Solution -D 009 401 04-.
- Any silicone residue must be completely removed.
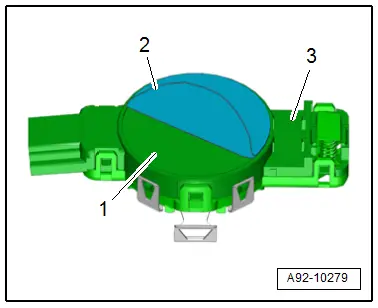
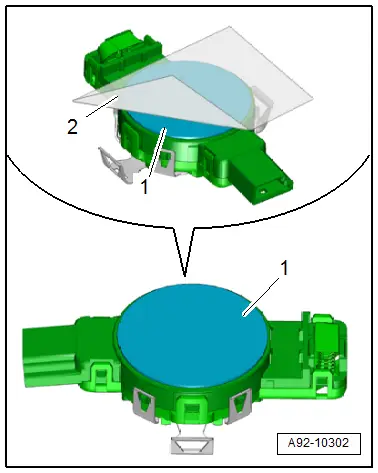
- Remove the silicone pad -2- cleanly from the sensor -3-.
- Clean the adhesive surface -1- on the sensor with Cleaning Solution -D 009 401 04-.
- Remove the silicone paper -1- from the silicone pad -3-.
- The clear protective film -2- remains on the silicone pad as an assembly aid.
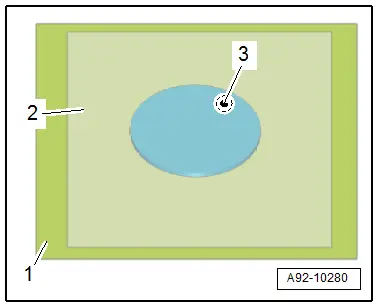
- Center the silicone pad -2- on the sensor -3- using the clear protective film -1-.
- Press the silicone pad through the protective film onto the sensor without forming any bubbles.
 Note
Note
To avoid contaminating the silicone pad, remove the protective film just before installing it.
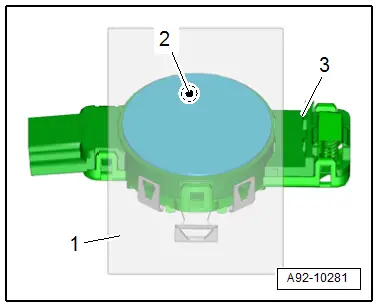
- Remove the protective film -2- from the silicone pad -1-.
- Spray the entire surface of the silicone pad with the Cleaning Solution -D 009 401 04-.
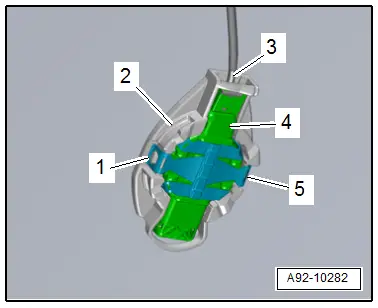
- Insert the sensor -4- into the mount -2-.
 Caution
The Rain/Light Recognition Sensor -G397- must have no embedded objects or bubbles between it and the windshield to function correctly.
- Press the retaining clips -1 and 5- until they audibly engage.
- Connect the connector -3-.
Rain/Light Recognition Sensor -G397-, Replacing
Special tools and workshop equipment required
- D 009 401 04 -Cleaning Solution-
Removing
- If replacing the control module, select the "Replace Control Module" function Vehicle Diagnostic Tester.
- Turn off the ignition.
- Vehicles with ignition lock: Remove the key.
- Remove the interior rearview mirror. Refer to → Body Interior; Rep. Gr.68; Interior Rearview Mirror; Interior Rearview Mirror, Removing and Installing.
- Disconnect the connector -3-.
- Insert a narrow screwdriver -5- into the opening as shown and release the retaining tabs -2- in direction of -arrows-.
- Wait one minute so that the silicon pad can release without leaving any residue.
- Loosen the Rain/Light Recognition Sensor -G397--4- by moving it back and forth and remove it from the mount -1-.
- Clean the adhesive surface on the windshield with Cleaning Solution -D 009 401 04-.
- Any silicone residue must be completely removed.
Installing
Install in the reverse order of removal. Note the following:
 Caution
Risk of damage to the humidity sensor.
- The humidity sensor -arrow-on the rain/light recognition sensor -1- is extremely sensitive and must not be damaged.
- A damaged humidity sensor must be replaced.
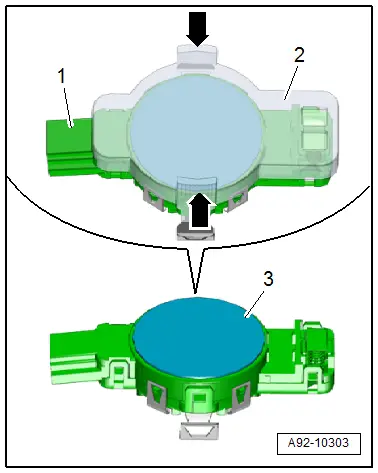
- Press the grip surfaces -arrows- on the protective cap -2- gently together and remove from the sensor -1-.
 Note
Note
To avoid contaminating the silicone pad, remove the protective cap just before installing it.
- Spray the entire surface of the silicone pad -3- with the Cleaning Solution -D 009 401 04-.
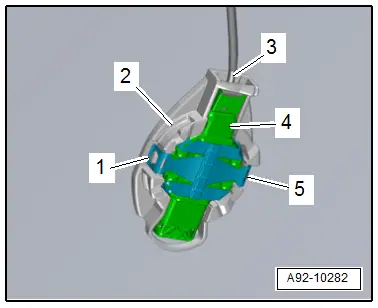
- Insert the sensor -4- into the mount -2-.
 Caution
The Rain/Light Recognition Sensor -G397- must have no embedded objects or bubbles between it and the windshield to function correctly.
- Press the retaining clips -1 and 5- until they audibly engage.
- Connect the connector -3-.
- After replacing the rain/light recognition sensor, it must be re-coded in "Guided Functions". Refer to Vehicle Diagnostic Tester.
READ NEXT:
 Windshield Washer System
Overview - Windshield Washer System
Overview - Windshield Washer System, through MY 2014
1 - Washer Fluid Reservoir
Removing and installing. Refer to
→ Chapter "Windshield W
Rear Window Wiper System
Overview - Rear Window Washer System
1 - Water Hose
For the rear window washer system
2 - Nut
8 Nm
3 - Rear Window Wiper Motor -V12-
Removing and ins
Rear Window Washer System
Overview - Rear Window Washer System
1 - Windshield Washer Fluid Reservoir
The combined washer fluid reservoir for the front and rear washer
systems is located in the left wheel houSEE MORE:
Display overview
Applies to: vehicles with adaptive cruise assist
Fig. 97 Instrument cluster: display in speedometer
Fig. 98 Instrument cluster: driver assistance display
Indicator lights and messages in the speedometer
1 - 3 inform you about the driving situation
and the settings. In the Driver assistance display
Multimedia connections
USB adapter
Fig. 139 Audi Genuine Accessories: USB adapter
You can connect your mobile devices to the MMI
using the USB ports with charging function and a
USB adapter, and charge the battery at the same
time.
You can purchase the USB adapter cable from an
authorized Audi dealer or at specialty stor