Audi Q3: Parallel Parking Assist
Overview - Parallel Parking Assist
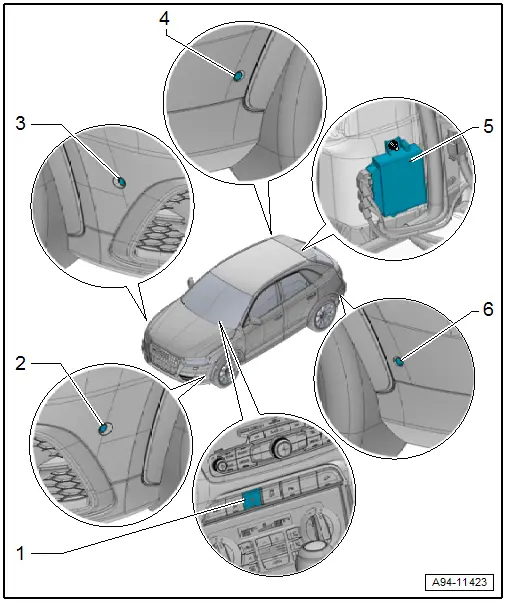
1 - Parallel Parking Assistance Button -E581-
- Overview. Refer to → Chapter "Component Location Overview - Instrument Panel Controls".
2 - Left Front Parallel Parking Assistance Sensor -G568-
- Only on vehicles with parallel parking assistance
- Removing and installing. Refer to → Chapter "Front Sensor, Removing and Installing".
3 - Right Front Parallel Parking Assistance Sensor -G569-
- Only on vehicles with parallel parking assistance
- Removing and installing. Refer to → Chapter "Front Sensor, Removing and Installing".
4 - Right Rear Parallel Parking Assistance Sensor -G717-
- Removing and installing. Refer to → Chapter "Rear Sensor, Removing and Installing".
5 - Parallel Parking Assistance Control Module -J791-
- Removing and installing. Refer to → Chapter "Parking Aid Control Module -J446-, Removing and Installing".
6 - Left Rear Parallel Parking Assistance Sensor -G716-
- Removing and installing. Refer to → Chapter "Rear Sensor, Removing and Installing".
Front Sensor, Removing and Installing
Removing
- Remove the front wheel spoiler. Refer to → Body Exterior; Rep. Gr.66; Wheel Housing Liner; Front Wheel Housing Liner, Removing and Installing.
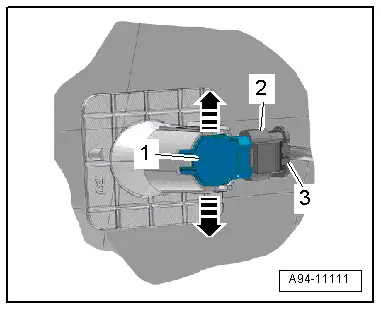
- Press both tabs -arrows- to the side and press the sensor -1- inward from the outside.
- Disconnect the connector -2- by sliding the retainer -3- back and pressing the release down.
Installing
Install in reverse order of removal.
Tightening Specifications
- Wheel spoiler.
Rear Sensor, Removing and Installing
Removing
- Press both tabs -arrows- to the side and press the sensor -1- inward from the outside.
- Disconnect the connector -2- by sliding the retainer -3- back and pressing the release down.
Installing
Install in reverse order of removal.

READ NEXT:
 Automatic Headlamp Range Control
Overview - Automatic Head Lamp Range Control
1 - Left Front Level Control System Sensor -G78-
Component location: on the left front control arm
Removing and installing. Refer to
â
Component Location Overview - Instrument Panel Lamps
1 - Center Instrument Panel Vent Illumination Bulb -L68-
integrated in the center instrument panel vent Cannot be replaced
separately if faulty.
Center Instrument Panel Vent, removSEE MORE:
Spare tire
Removing the subwoofer
Applies to: vehicles with subwoofer
The subwoofer must be removed before the
spare tire/temporary spare tire can be removed.
Fig. 166 Spare tire well: subwoofer
Removing the subwoofer
Pull out the red connector lock 1.
Remove the connector 2 and set the disconnected
cable
Rear Bumper Cover, Removing and Installing
Caution
If the vehicle has lane change assistance, the lane
change assistance control module -J769-/-J770- must be
recalibrated. Refer to
→ Electrical Equipment; Rep. Gr.96; Lane Change
Assistance; Lane Change Assistance, Calibrating.
Special tools and workshop e