Audi Q3: Component Location Overview - Instrument Panel Lamps

1 - Center Instrument Panel Vent Illumination Bulb -L68-
- integrated in the center instrument panel vent Cannot be replaced separately if faulty.
- Center Instrument Panel Vent, removing and installing. Refer to → Body Interior; Rep. Gr.70; Instrument Panel; Instrument Panel Vent, Removing and Installing.
2 - Right Footwell Lamp -W10-
- Removing and installing. Refer to → Chapter "Left/Right Footwell Lamp -W9- / -W10-, Removing and Installing".
3 - Glove Compartment Lamp -W6-
Through MY 2014
- 12 V, 5 W
- Removing and installing. Refer to → Chapter "Glove Compartment Lamp -W6-, Removing and Installing".
From MY 2015 as LED version. Cannot be replaced separately if faulty.
4 - Right Instrument Panel Vent Illumination Bulb -L69-
- Equipment level
- Cannot be replaced separately if faulty.
- Replacing. Refer to → Body Interior; Rep. Gr.70; Instrument Panel; Instrument Panel Vent, Removing and Installing.
5 - Left Instrument Panel Vent Illumination Bulb -L67-
- Equipment level
- Cannot be replaced separately if faulty.
- Replacing. Refer to → Body Interior; Rep. Gr.70; Instrument Panel; Instrument Panel Vent, Removing and Installing.
6 - Left Footwell Lamp -W9-
- Removing and installing. Refer to → Chapter "Left/Right Footwell Lamp -W9- / -W10-, Removing and Installing".
Component Location Overview - Front Door Lamps
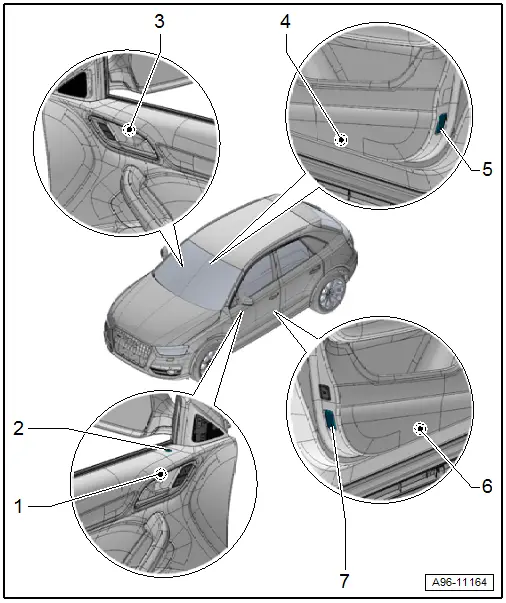
1 - Driver Door Opener Illumination Bulb -L108-
- Removing and installing. Refer to → Chapter "Driver and Front Passenger Door Opener Illumination Bulb -L108-/-L109-, Removing and Installing".
2 - Central Locking -SAFE- Indicator Lamp -K133-
- Removing and installing. Refer to → Chapter "Central Locking -SAFE- Indicator Lamp -K133-, Removing and Installing".
3 - Front Passenger Door Opener Illumination Bulb -L109-
- Removing and installing. Refer to → Chapter "Driver and Front Passenger Door Opener Illumination Bulb -L108-/-L109-, Removing and Installing".
4 - Right Front Entry Lamp -W32-
- 12 V, 3 W
- Removing and installing. Refer to → Chapter "Left/Right Front Entry Lamp -W31-/-W32-, Removing and Installing".
5 - Front Passenger Door Warning Lamp -W36-
- 12 V, 3 W
- Removing and installing. Refer to → Chapter "Driver/Front Passenger Door Warning Lamp -W30-/-W36-, Removing and Installing".
6 - Left Front Entry Lamp -W31-
- 12 V, 3 W
- Removing and installing. Refer to → Chapter "Left/Right Front Entry Lamp -W31-/-W32-, Removing and Installing".
7 - Driver Door Warning Lamp -W30-
- 12 V, 3 W
- Removing and installing. Refer to → Chapter "Driver/Front Passenger Door Warning Lamp -W30-/-W36-, Removing and Installing".
Component Location Overview - Rear Door Lamps
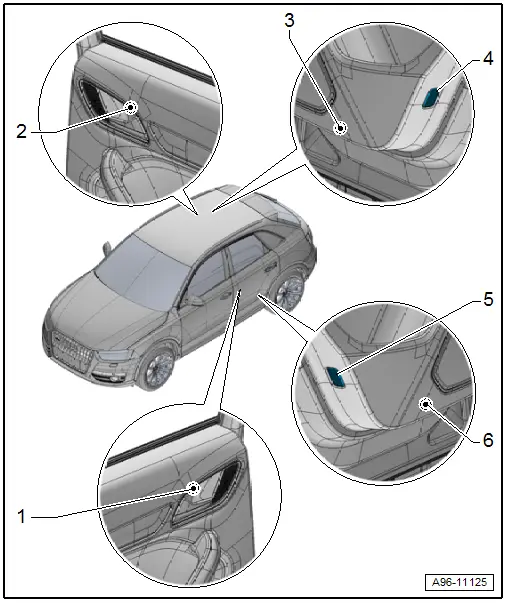
1 - Left Rear Door Opener Illumination Bulb -L110-
- Removing and installing. Refer to → Chapter "Left/Right Rear Door Opener Illumination Bulb -L110- / -L111-, Removing and Installing".
2 - Right Rear Door Opener Illumination Bulb -L111-
- Removing and installing. Refer to → Chapter "Left/Right Rear Door Opener Illumination Bulb -L110- / -L111-, Removing and Installing".
3 - Right Rear Entry Lamp -W34-
- 12 V, 3 W
- Removing and installing. Refer to → Chapter "Left/Right Rear Entry Lamp -W33- / -W34-, Removing and Installing".
4 - Right Rear Door Warning Lamp -W38-
- 12 V, 3 W
- Removing and installing. Refer to → Chapter "Left/Right Rear Door Warning Lamp -W37-/-W38-, Removing and Installing".
5 - Left Rear Door Warning Lamp -W37-
- 12 V, 3 W
- Removing and installing. Refer to → Chapter "Left/Right Rear Door Warning Lamp -W37-/-W38-, Removing and Installing".
6 - Left Rear Entry Lamp -W33-
- 12 V, 3 W
- Removing and installing. Refer to → Chapter "Left/Right Rear Entry Lamp -W33- / -W34-, Removing and Installing".
READ NEXT:
 Component Location Overview - Door Ambient Lighting
1 - Storage Compartment Illumination Bulb -L120- in the Front Center
Console
Equipment level
Removing and installing. Refer to
→ Chapter "Storage Compartment Illumination
Glove Compartment Lamp -W6-, Removing and Installing
Removing
- Turn the light switch to position "0".
- Press in the tab -1- using a
flat-head screwdriver and pry out the glove compartment lamp
-2-.
- Disconnect the connector -3-.
Driver/Front Passenger Door Warning Lamp -W30-/-W36-, Removing and
Installing
Removing
- Press the tab -1- with a
flat-blade screwdriver and remove the door warning lamp
-2-.
- Disconnect the connector -3-.
- Carefully pry out the cover over the lamp in dSEE MORE:
Seat Depth Adjuster, Removing and Installing
Special tools and workshop equipment
required
Trim Removal Wedge -3409-
Removing
WARNING
Follow all safety precautions when working with
pyrotechnic components. Refer to
→ Chapter "Pyrotechnic Components Safety Precautions".
Before handling pyrotechnic components
Tires, Mounting, Run-Flat Tires
Caution
It is mandatory for run-flat tires to have a tire
pressure monitoring system in the vehicle.
- Coat rim flanges, tire beads and inside of upper tire beads
thoroughly with tire mounting paste.
WARNING
The minimum mounting temperature for a tire may not
be be