Audi Q3: Overview - Front Bumper Cover
Overview - Bumper Cover, Audi Q3 through MY 2014
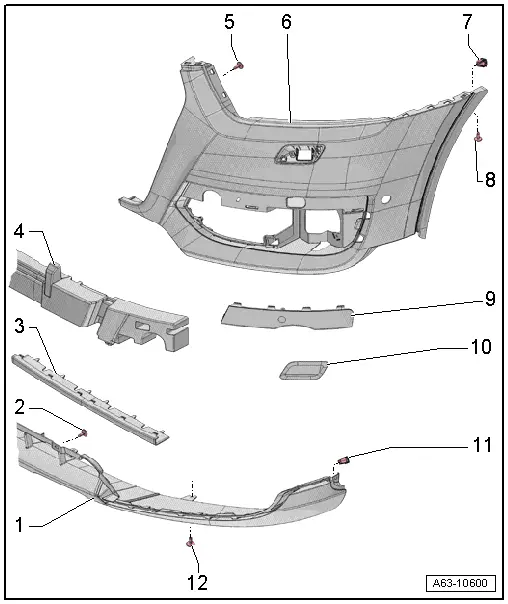
1 - Bumper Cover Lower Section
- Removing and installing. Refer to → Chapter "Bumper Cover Lower Section, Removing and Installing, Audi Q3".
2 - Bolt
- 2 Nm
- Quantity: 6
3 - Bumper Cover Center Part
- Removing and installing. Refer to → Chapter "Bumper Cover Center Part, Removing and Installing".
4 - Molded Foam Part
- Removing and installing. Refer to → Chapter "Molded Foam Part, Removing and Installing, Audi Q3 through MY 2014".
5 - Bolt
- 2 Nm
- Quantity: 8
6 - Bumper Cover Outer Panel
- Removing and installing. Refer to → Chapter "Bumper Cover, Removing and Installing".
- Bumper cove outer panel, removing and installing. Refer to → Chapter "Bumper Cover Outer Panel, Removing and Installing, Audi Q3".
7 - Clip Nut
- Quantity: 2
8 - Bolt
- 2 Nm
9 - Trim
- For the air intake grille
- Removing and installing. Refer to → Chapter "Air Intake Grille Trim, Removing and Installing".
10 - Spray Nozzle Cover
- For the headlamp washer system
- Removing and installing. Refer to → Chapter "Headlamp Washer System Spray Nozzle Cover, Removing and Installing".
11 - Clip Nut
- Quantity: 2
12 - Bolt
- 2.5 Nm
- Quantity: 4
Overview - Bumper Cover, Audi Q3 from MY 2015
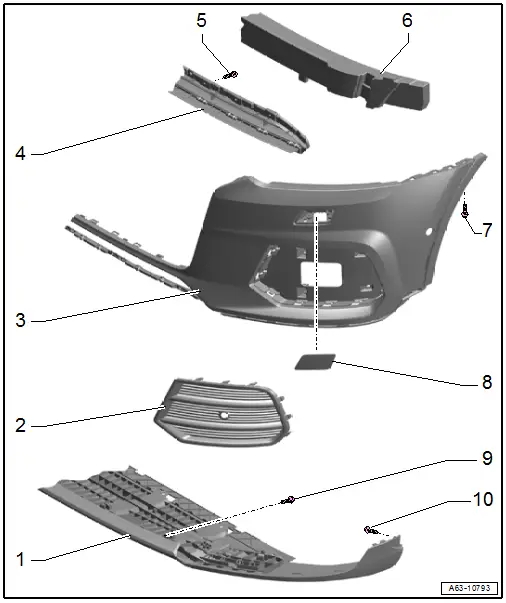
1 - Bumper Cover Lower Section
- Removing and installing. Refer to → Chapter "Bumper Cover Lower Section, Removing and Installing, Audi Q3 from MY 2015".
2 - Air Intake Grille
- Removing and installing. Refer to → Chapter "Air Intake Grille, Removing and Installing, Vehicles from MY 2015".
3 - Bumper Cover
- Removing and installing. Refer to → Chapter "Bumper Cover, Removing and Installing".
4 - Center Grille
- Removing and installing. Refer to → Chapter "Center Grille, Removing and Installing, Audi Q3 from MY 2015".
5 - Bolt
- 2 Nm
- Quantity: 14
6 - Molded Foam Part
- Removing and installing. Refer to → Chapter "Molded Foam Part, Removing and Installing, Audi Q3 from MY 2015".
7 - Bolt
- 2 Nm
8 - Spray Nozzle Cover
- For the headlamp washer system
- Removing and installing. Refer to → Chapter "Headlamp Washer System Spray Nozzle Cover, Removing and Installing".
9 - Bolt
- 2 Nm
- Quantity: 4
10 - Bolt
- 2 Nm
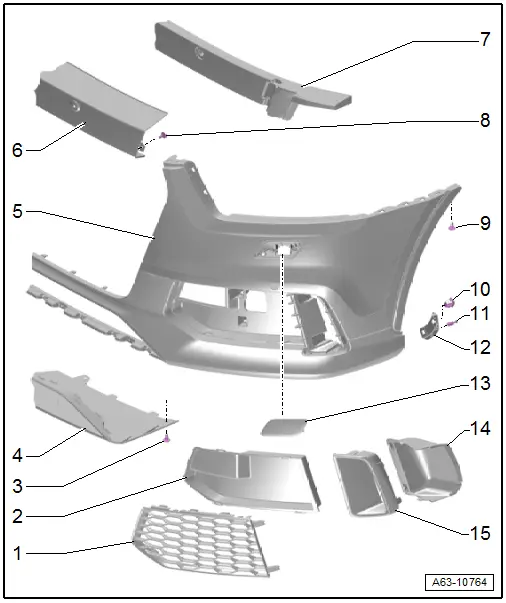
Overview - Bumper Cover, Audi Q3 Offroad

1 - Bolt
- 2.5 Nm
- Quantity: 4
2 - Impact Guard
- Removing and installing. Refer to → Chapter "Impact Guard, Removing and Installing, Audi Q3 Offroad".
3 - Center grille
- Removing and installing:
- Audi offroad. Refer to → Chapter "Center Grille. Removing and Installing, Audi Q3 Offroad".
- Audi S-line. Refer to → Chapter "Center Grille, Removing and Installing, Audi Q3 S Line through MY 2014".
4 - Bolt
- 2 Nm
- Quantity: 16
5 - Bumper cover outer panel
- Removing and installing. Refer to → Chapter "Bumper Cover, Removing and Installing".
- Bumper cove outer panel, removing and installing. Refer to → Chapter "Bumper Cover Outer Panel, Removing and Installing, Audi Q3".
6 - Molded Foam Part
- Removing and installing. Refer to → Chapter "Molded Foam Part, Removing and Installing, Audi Q3 through MY 2014".
7 - Bolt
- 2 Nm
8 - Spray Nozzle Cover
- For the headlamp washer system
- Removing and installing. Refer to → Chapter "Headlamp Washer System Spray Nozzle Cover, Removing and Installing".
9 - Bolt
- 2 Nm
10 - Bumper Cover Lower Section
- Removing and installing. Refer to → Chapter "Bumper Cover Lower Section, Removing and Installing, Audi Q3 Offraod".
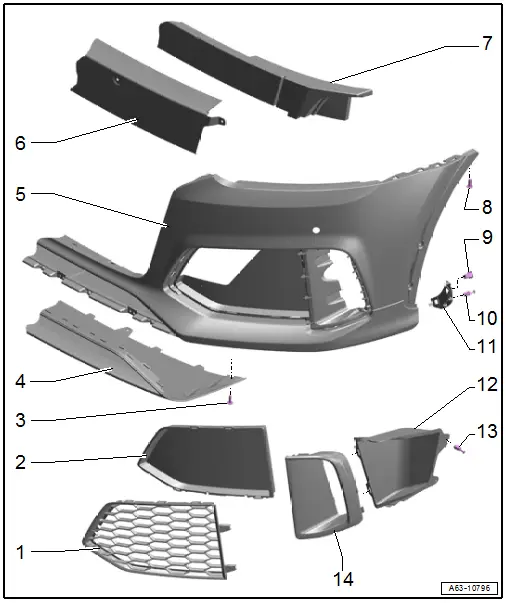
Overview - Bumper Cover, Audi RS Q3 through MY 2014
1 - Air Intake Grille
- Removing and installing. Refer to → Chapter "Air Intake Grille, Removing and Installing, Audi RS Q3".
2 - Trim
- For the air intake grille
3 - Bolt
- 2.5 Nm
- Quantity: 2
4 - Spoiler Lower Section
- Removing and installing. Refer to → Chapter "RSQ3 Spoiler-Lower Section, Removing and Installing".
5 - Bumper Cover
- Removing and installing. Refer to → Chapter "Bumper Cover, Removing and Installing".
6 - Mount
- For molded foam part
- Removing and installing. Refer to → Chapter "Molded Foam Part Mount, Removing and Installing, Audi RS Q3 from MY 2015".
7 - Molded Foam Part
- Removing and installing. Refer to → Chapter "Molded Foam Part, Removing and Installing, Audi RS Q3".
8 - Bolt
- 2 Nm
9 - Bolt
- 2 Nm
10 - Clip Nut
- Quantity: 2
11 - Expanding Rivet
- Quantity: 2
12 - Intermediate Piece
- For securing the wheel housing liner
13 - Spray Nozzle Cover
- For the headlamp washer system
- Removing and installing. Refer to → Chapter "Headlamp Washer System Spray Nozzle Cover, Removing and Installing".
14 - Mount
- For the exterior air intake grille
- Removing and installing. Refer to → Chapter "Side Air Intake Trim, Removing and Installing, Audi RS Q3 through MY 2014".
15 - Trim
- For the side air intake grille
- Removing and installing. Refer to → Chapter "Side Air Intake Trim, Removing and Installing, Audi RS Q3 through MY 2014".
Overview - Bumper Cover, Audi RS Q3 from MY 2015
1 - Air Intake Grille
- Removing and installing. Refer to → Chapter "Air Intake Grille, Removing and Installing, Audi RS Q3".
2 - Trim
- For the air intake grille
3 - Bolt
- Quantity: 2
- 2.5 Nm
4 - Spoiler Lower Section
- Removing and installing. Refer to → Chapter "RSQ3 Spoiler-Lower Section, Removing and Installing".
5 - Bumper Cover
- Removing and installing. Refer to → Chapter "Bumper Cover, Removing and Installing".
6 - Mount
- for molded foam part
- Removing and installing. Refer to → Chapter "Molded Foam Part Mount, Removing and Installing, Audi RS Q3 from MY 2015".
7 - Molded Foam Part
- Removing and installing. Refer to → Chapter "Molded Foam Part, Removing and Installing, Audi RS Q3".
8 - Bolt
- 2 Nm
9 - Clip Nut
- Quantity: 2
10 - Expanding Rivet
- Quantity: 2
11 - Intermediate Piece
- For securing the wheel housing liner
12 - Mount
- For the exterior air intake grille
- Removing and installing. Refer to → Chapter "Side Air Intake Trim, Removing and Installing, Audi RS Q3 from MY 2015".
13 - Expanding Rivet
- Quantity: 2
14 - Trim
- For the side air intake grille
- Removing and installing. Refer to → Chapter "Side Air Intake Trim, Removing and Installing, Audi RS Q3 from MY 2015".
Overview - Bumper Cover, Lock Carrier Cover, Air Intake Grille and End Panel
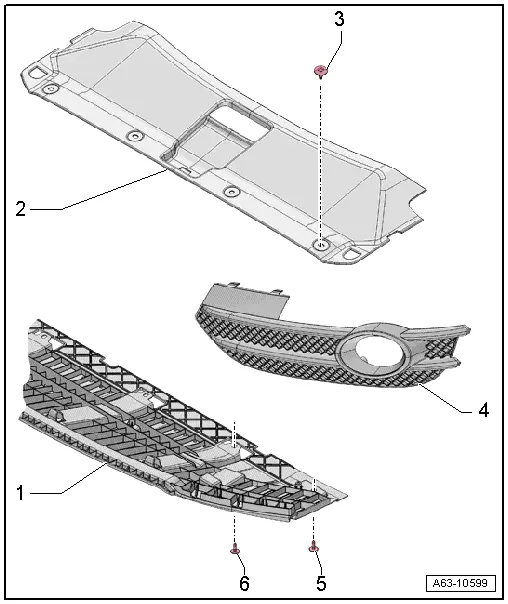
1 - Bumper Cover End Plate
- Removing and installing. Refer to → Chapter "Front Bumper Cover End Plate, Removing and Installing".
2 - Lock Carrier Cover
- There are different versions. Refer to the Parts Catalog.
- Removing and installing:
- through MY 2014. Refer to → Chapter "Lock Carrier Cover, Removing and Installing, Vehicles through MY 2014"
- from MY 2015. Refer to → Chapter "Lock Carrier Cover, Removing and Installing, Vehicles from MY 2015"
3 - Expanding Clip
- Vehicles through MY 2014
- Quantity: 4
4 - Air Intake Grille
- Vehicles through MY 2014
- There are different versions. Refer to the Parts Catalog.
- Removing and installing. Refer to → Chapter "Air Intake Grille, Removing and Installing, Vehicles through MY 2014".
5 - Bolt
- 2.5 Nm
6 - Bolt
- 2.5 Nm
- Quantity: 4
Overview - Impact Member
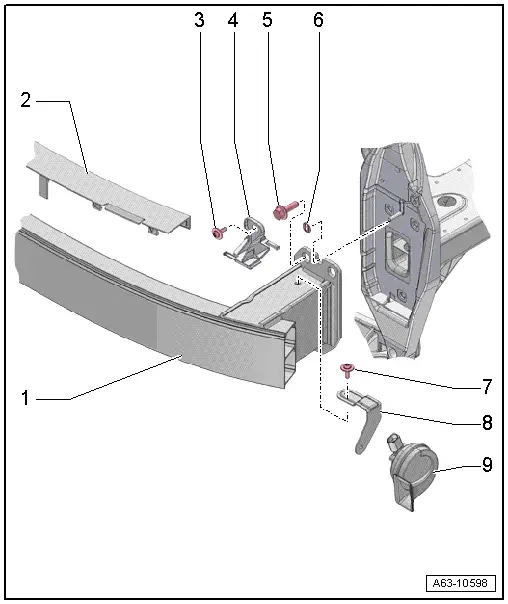
1 - Impact Member
- Removing and installing. Refer to → Chapter "Impact Member, Removing and Installing".
2 - Cover
- Versions. Refer to the Parts Catalog.
- For impact member
3 - Bolt
- 4.5 Nm
4 - Lower Mount Bracket
- For the bumper cover
- Removing and installing. Refer to → Chapter "Bumper Cover Mount Bracket, Removing and Installing".
5 - Bolt
- 55 Nm
- Quantity: 3
6 - Lock Washer
- Secures the lock carrier
7 - Bolt
- Tightening specification. Refer to → Electrical Equipment; Rep. Gr.90; Overview - Horn.
8 - Bracket
- For the signal horn
- Removing and Installing. Refer to → Electrical Equipment; Rep. Gr.90; Horn; High Tone HornH2/Low Tone HornH7 Removing and Installing.
9 - Horn
- Removing and installing. Refer to → Electrical Equipment; Rep. Gr.90; Overview - Horn.
READ NEXT:
 Front Bumper Cover, Removing and Installing
Bumper Cover, Removing and Installing
Removing
- Remove the front wheel spoiler. Refer to
→ Chapter "Front Wheel Spoiler, Removing and Installing".
- Remove the front wheel housi
Lock Carrier Cover, Removing and Installing, Vehicles through MY 2014
Removing
- To remove the expanding clips -arrows-,
push the clamping pin -1- carefully
to dimension -x- until it clicks
into the expanding clip -arrow A-.
Dimension -x- = 5 mm
-&nbs
Center Grille. Removing and Installing, Audi Q3 Offroad
Removing
- Remove the noise insulation. Refer to
→ Chapter "Overview - Noise Insulation".
- Remove the front bumper cover end plate. Refer to
→ Chapter "Front Bumper CoverSEE MORE:
Opening navigation
Applies to: vehicles with navigation system
Fig. 128 Route guidance not started
The navigation system directs you to your destination,
around traffic incidents, and on alternative
routes, if desired.
Opening navigation
Applies to: MMI: Press NAVIGATION on the
home screen.
After accessing the na
Check Valve, Checking
Check valve is removed, refer to
→ Chapter "Check Valve, Removing and Installing".
Note
The check valve is installed directly in front of the vacuum
pump.
Valve must allow air to flow in direction of arrow.
Valve must remain closed in opposite direction.
