Audi Q3: Check Valve, Checking
- Check valve is removed, refer to → Chapter "Check Valve, Removing and Installing".
 Note
Note
The check valve is installed directly in front of the vacuum pump.
- Valve must allow air to flow in direction of arrow.
- Valve must remain closed in opposite direction.
 Note
Note
- Make sure it is installed in the correct position
- The flow direction arrow faces the vacuum pump.
Check Valve, Removing and Installing
 Note
Note
- The check valve is installed directly in front of the vacuum pump.
- The vacuum pump does not have to be removed.
Removing
Audi Q3:
- Open the clamp on the vacuum hose using suitable pliers.
- Remove the vacuum hose from the Brake System Vacuum Pump -V192-.
 Caution
Be careful not to damage the vacuum hose. Replace the vacuum hose if damaged.
Audi RS Q3:
- Remove the air filter housing, refer to → Engine Mechanical, Fuel Injection and Ignition; Rep. Gr.24; Air Filter; Air Filter Housing, Removing and Installing.
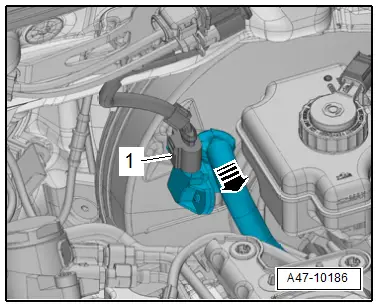
- Disconnect the connector -1-.
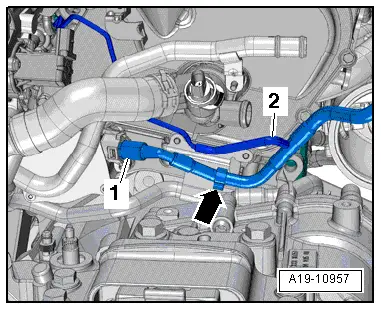
- Remove the vacuum hose from the brake booster -arrow-.
- Remove the vacuum hose -2-.
- Free up the vacuum hose -1--arrow-, pull it out of the brake booster vacuum pump and remove it.
 Caution
Be careful not to damage the vacuum hose. Replace the vacuum hose if damaged.
Installing
 Note
Note
Coat the check valve and the vacuum hose lightly with some water, not oil, to make them easier to install.
- Slide the new clamp over the vacuum hose.
READ NEXT:
 Vacuum Sensor -G608-, Removing and Installing
Removing
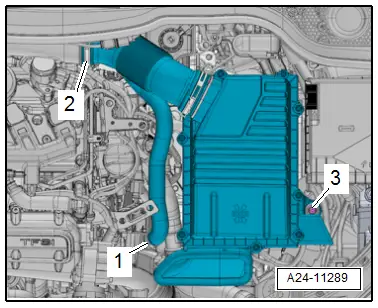
Audi Q3:
- Open the clamps -arrows- and
remove the air guide pipe -1-.
- Disconnect the connector -2-.
- Remove the vacuum hose -3-.
Audi RS Q3:
- Loosen the h
Vacuum Pump, Removing and Installing
Vacuum Pump, Removing and Installing, Vehicles with 2.0L TFSI Engine
Removing
- Remove the engine cover, refer to
→ Rep. Gr.10; Engine Cover; Engine Cover, Removing and
Installi
Brake Lines
Separating Points
Brake Line on the Underbody
1 - Brake line
2 - Brake hose
3 - Spring
4 - Brake hose bracket
Tightening Specifications
Refer to iteSEE MORE:
Foot Rest, Removing and Installing
Special tools and workshop equipment
required
Trim Removal Wedge -3409-
Removing
- Remove the front driver side sill panel trim. Refer to
→ Chapter "Front Sill Panel Strip, Removing and Installing".
- Unclip foot rest -1- using the
Trim Removal Wedge -3409--arrow-
an
CV Joint, Servicing, Drive Axle with Triple Roller Joint AAR3300i, Mounted
in Transmission
Special tools and workshop equipment
required
Tripod Joint Tool -T10065-
Puller - Driveshaft -T10382-
Hose Clip Pliers -VAG1275A-
Torque Wrench 1331 5-50Nm -VAG1331-
Torque Wrench 1332 40-200Nm -VAG1332-
Clamping Pliers -VAG1682A-
Press Plate -VW401-
Press Plate -VW402-
Press P