
Audi Q3: Overview - Parking Aid
In the Front of the Vehicle
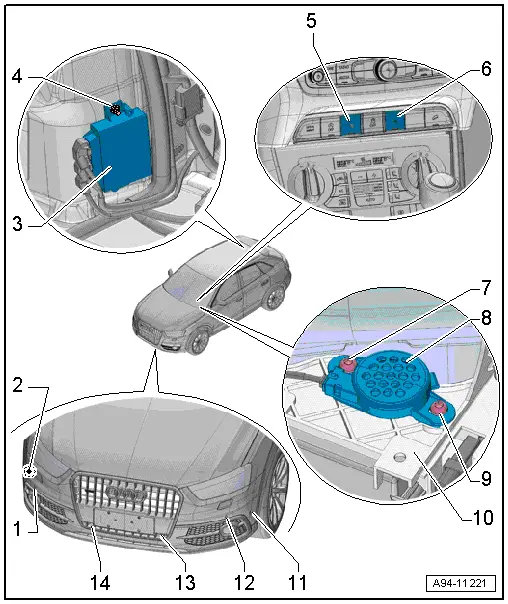
1 - Right Front Parking Aid Sensor -G252-
- In the front bumper cover
- Removing and installing. Refer to → Chapter "Front Parking Aid Sensor, Removing and Installing".
2 - Right Front Parallel Parking Assistance Sensor -G569-
- Overview. Refer to → Chapter "Overview - Parallel Parking Assist".
3 - Parking Aid Control Module -J446-/Parallel Parking Assistance Control Module -J791-
- Removing and installing. Refer to → Chapter "Parking Aid Control Module -J446-, Removing and Installing".
4 - Nut
- 3 Nm
- Quantity: 2
5 - Parallel Parking Assistance Button -E581-
- Component location overview. Refer to → Chapter "Component Location Overview - Instrument Panel Controls".
6 - Parking Aid Button -E266-
- Only for 8-channel parking aid
- Component location overview. Refer to → Chapter "Component Location Overview - Instrument Panel Controls".
7 - Expanding Clip
8 - Front Parking Aid Warning Buzzer -H22-
- Only for 8-channel parking aid
- On the central tube for the instrument panel behind the driver side storage compartment
- Removing and installing. Refer to → Chapter "Front Parking Aid Warning Buzzer -H22-, Removing and Installing".
9 - Expanding Clip
10 - Mount
- For the relay and fuse panel control module
11 - Left Front Parallel Parking Assistance Sensor -G568-
- Overview. Refer to → Chapter "Overview - Parallel Parking Assist".
12 - Left Front Parking Aid Sensor -G255-
- In the front bumper cover
- Removing and installing. Refer to → Chapter "Front Parking Aid Sensor, Removing and Installing".
13 - Left Front Center Parking Aid Sensor -G254-
- Inside the radiator grille
- Removing and installing. Refer to → Chapter "Front Parking Aid Sensor, Removing and Installing".
14 - Right Front Center Parking Aid Sensor -G253-
- Inside the radiator grille
- Removing and installing. Refer to → Chapter "Front Parking Aid Sensor, Removing and Installing".
In the Rear of the Vehicle
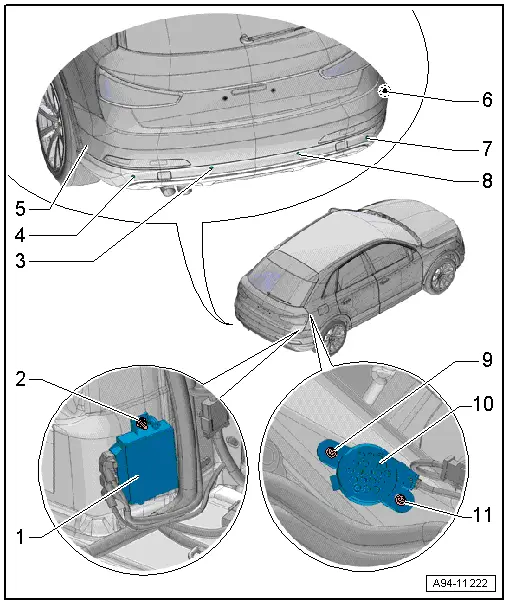
1 - Parking Aid Control Module -J446-/Parallel Parking Assistance Control Module -J791-
- Removing and installing. Refer to → Chapter "Parking Aid Control Module -J446-, Removing and Installing".
2 - Nut
- Quantity: 2
- Tightening specification. Refer to → Chapter "Overview - Parking Aid".
3 - Left Rear Center Parking Aid Sensor -G204-
- Removing and installing. Refer to → Chapter "Rear Parking Aid Sensor, Removing and Installing".
4 - Left Rear Parking Aid Sensor -G203-
- Removing and installing. Refer to → Chapter "Rear Parking Aid Sensor, Removing and Installing".
5 - Left Rear Parallel Parking Assistance Sensor -G716-
- Overview. Refer to → Chapter "Overview - Parallel Parking Assist".
6 - Right Rear Parallel Parking Assistance Sensor -G717-
- Overview. Refer to → Chapter "Overview - Parallel Parking Assist".
7 - Right Rear Parking Aid Sensor -G206-
- Removing and installing. Refer to → Chapter "Rear Parking Aid Sensor, Removing and Installing".
8 - Right Rear Center Parking Aid Sensor -G205-
- Removing and installing. Refer to → Chapter "Rear Parking Aid Sensor, Removing and Installing".
9 - Expanding Clip
10 - Rear Parking Aid Warning Buzzer -H15-
- Removing and installing. Refer to → Chapter "Rear Parking Aid Warning Buzzer -H15-, Removing and Installing".
11 - Expanding Clip
READ NEXT:
 Parking Aid Control Module -J446-, Removing and Installing
Note
On vehicles with parallel parking assist the Parallel
Parking Assistance Control Module -J791- is integrated in the
Parking Aid Control Module -J446-.
- If replacing the contr
Front Parking Aid Sensor, Removing and Installing
Front Parking Aid Sensors, Removing and Installing, through MY 2014
Right/Left Front Parking Aid Sensor -G252-/-G255-
Special tools and workshop equipment
required
Hook Tool -T40207-
Removi
Parallel Parking Assist
Overview - Parallel Parking Assist
1 - Parallel Parking Assistance Button -E581-
Overview. Refer to
→ Chapter "Component Location Overview - Instrument Panel Controls".
2&SEE MORE:
Special driving situations
Driving uphill and downhill
When driving uphill, downhill, or at high altitudes,
note the following information:
Drive slowly and carefully.
Do not try to turn around if you cannot safely
drive on an incline or hill. Instead, drive in reverse.
When driving down hills, you can activate the
hill
Parking Aid Control Module -J446-, Removing and Installing
Note
On vehicles with parallel parking assist the Parallel
Parking Assistance Control Module -J791- is integrated in the
Parking Aid Control Module -J446-.
- If replacing the control module, select the "Replace Control
Module" function Vehicle Diagnostic Tester.
Removing
-&nb