Audi Q3: Noise Insulation
Overview - Noise Insulation
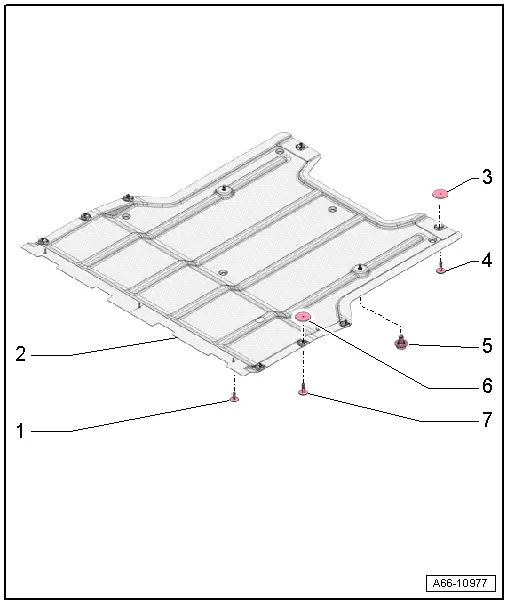
1 - Bolt
- 2.5 Nm
- Quantity: 3
2 - Front Noise Insulation
- For the engine
- Removing and installing. Refer to → Chapter "Noise Insulation, Removing and Installing".
3 - Rubber Washer
- Quantity: 2
4 - Quick Release
- Quantity: 2
5 - M8 bolt
- 6 Nm
- Through MY 2014: quantity - 2
- From MY 2015: quantity - 3
6 - Rubber Washer
- Quantity: 6
7 - Quick Release
- Quantity: 6
Noise Insulation, Removing and Installing
Removing
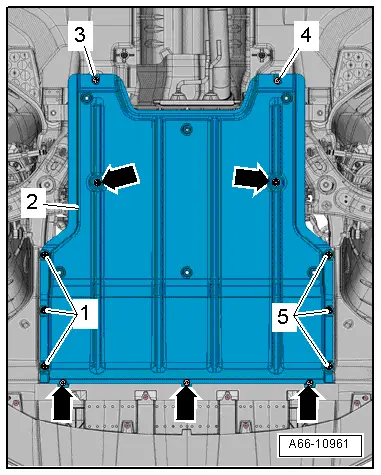
- Remove the bolts -arrows- and quick-release fasteners -1, 3, 4, 5-.
- Remove the front noise insulation -2- to the rear.
- The guide tabs for the front noise insulation will disengage while doing this.
- Remove the front noise insulation.
Installing
Install in reverse order of removal.
READ NEXT:
 Underbody Panel
Overview - Underbody Panels
1 - Nut
2 Nm
Quantity: 11
2 - Spring Nut
For the quick release
3 - Underbody Panel
Removing and installing. Refer to
Roof Bars/Roof Rails
Overview - Roof Railing
1 - Nut
Quantity: 4
Install with locking compound. For the correct locking compound,
refer to the Parts Catalog.
Tightening sequence. Refer to
→
Roof Railing, Removing and Installing
Roof Railing, Removing and Installing
WARNING
Follow all Safety Precautions when working with
pyrotechnic components. Refer to
→ Body Interior; Rep. Gr.00; Safety PrecSEE MORE:
Front Center Console Storage Compartment, Removing and Installing
Front Storage Compartment, Removing and Installing
Removing
- Remove the center console insert. Refer to
→ Chapter "Center Console Insert, Removing and Installing".
- Release the storage compartment -1-
from the hooks -2- and remove
rearward from the center console mount
-
Seat Position Sensor
Overview - Seat Position Sensor
Note
The illustration shows the passenger seat position sensor with the
wiring harness.
1 - Connector
Connector station in the vehicle floor under on the sill panel under
the seat.
2 - Cable Holder/Cable Tie
Clipped in
© 2019-2026 Copyright www.auq3.net | 0.0092
