Audi Q3: Underbody Panel
Overview - Underbody Panels

1 - Nut
- 2 Nm
- Quantity: 11
2 - Spring Nut
- For the quick release
3 - Underbody Panel
- Removing and installing. Refer to → Chapter "Underbody Panels, Removing and Installing".
4 - Nut
- 2.5 Nm
5 - Nut
- 2.5 Nm
6 - Center Rear Underbody Panel
- Only for Front Wheel Drive (FWD)
- Removing and installing. Refer to → Chapter "Rear Center Underbody Panel, Removing and Installing".
7 - Nut
- 2.5 Nm
8 - Bracket
9 - Expanding Rivet
- Quantity: 2
10 - Nut
- 2.5 Nm
11 - Nut
- 2.5 Nm
12 - Bolt
- 2.5 Nm
- Quantity: 3
13 - Rear Underbody Trim
- Removing and installing. Refer to → Chapter "Underbody Panels, Removing and Installing".
14 - Metal Nut
- Quantity: 2
15 - Bolt
- 2.5 Nm
- Quantity: 2
Underbody Panels, Removing and Installing
Underbody Panels, Removing and Installing
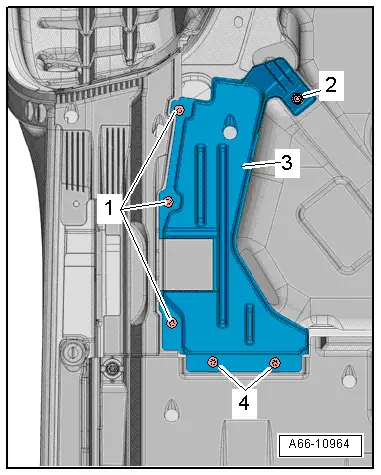
Removing
- Remove the nut -2- and bolts -1 and 4-.
- Remove the rear underbody panel -3-.
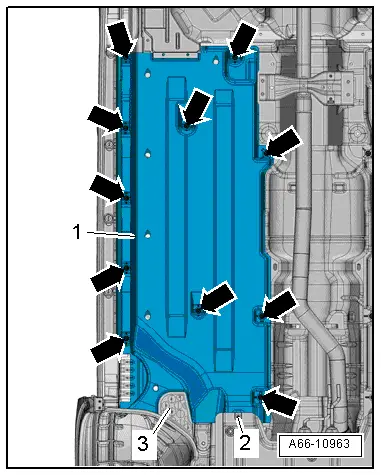
- Loosen the quick-release fastener -2-.
- Remove the nuts -arrows-.
- Remove the underbody panel -1-.
Installing
Install in reverse order of removal. Note the following:
- The underbody panel must be pushed behind the rear underbody panel -3-.
Rear Center Underbody Panel, Removing and Installing
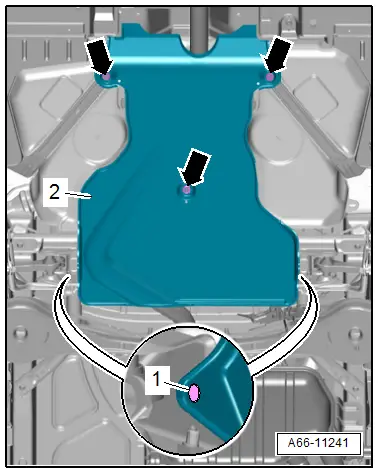
Removing
- Remove the expanding rivet -1-.
- Remove the nuts -arrows- and the underbody panel -2-.
Installing
Install in reverse order of removal. Note the following:
Tunnel Bridge, Removing and Installing
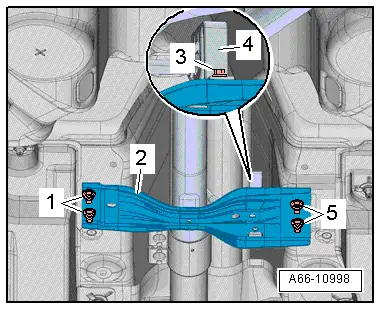
Removing
- Remove the nuts -1 and 5-
- Remove the bolts -3- from the suspended mount -4- for the center muffler.
- Remove the crossbrace -2-.
Installing
Install in reverse order of removal. Note the following:
- Install the center muffler suspended mount. Refer to → Rep. Gr.26; Exhaust Pipes/Mufflers; Overview - Muffler.
READ NEXT:
 Roof Bars/Roof Rails
Overview - Roof Railing
1 - Nut
Quantity: 4
Install with locking compound. For the correct locking compound,
refer to the Parts Catalog.
Tightening sequence. Refer to
→
Roof Railing, Removing and Installing
Roof Railing, Removing and Installing
WARNING
Follow all Safety Precautions when working with
pyrotechnic components. Refer to
→ Body Interior; Rep. Gr.00; Safety Prec
Exterior Rearview Mirror
Overview - Exterior Rearview Mirror
1 - Bolt
1 Nm
2 - Mirror Adjusting Unit
Removing and installing. Refer to
→ Chapter "Mirror Adjusting Unit, Removing and SEE MORE:
Modular Wiring Routing with Corrugated Tube
Opening the corrugated tube and removing the individual wire
WARNING
Follow all safety precautions when working with
pyrotechnic components. Refer to
→ Chapter "Pyrotechnic Components Safety Precautions".
Before handling pyrotechnic components (for example,
disconnectin
Overview - Steering Column Switch Module
Steering Column Switch Module Assembly Overview, with Mechanical Ignition
Switch
1 - Steering Column
2 - Bolt
Quantity: 2
For steering lock housing (shear bolt)
3 - Lock Cylinder
Removing and installing. Refer to
→ Chapter "Lock Cylinder, Rem