Audi Q3: Front Center Console Storage Compartment, Removing and Installing
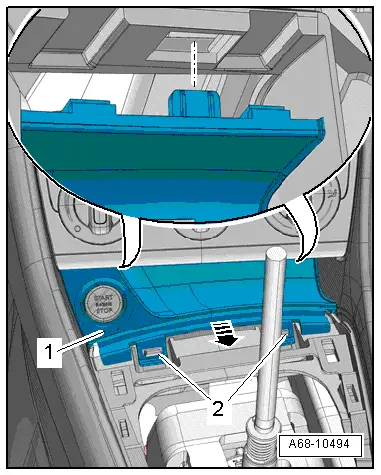
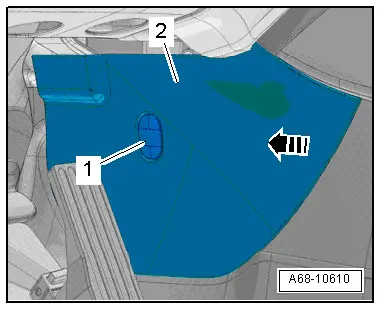
Front Storage Compartment, Removing and Installing
Removing
- Remove the center console insert. Refer to → Chapter "Center Console Insert, Removing and Installing".
- Release the storage compartment -1- from the hooks -2- and remove rearward from the center console mount -arrow-.
- Versions with Access/Start Authorization Button -E408-: Remove the A/C Control Module -J301-/Climatronic Control Module -J255-. Refer to → Heating, Ventilation, and Air Conditioning; Rep. Gr.87; Display and Control Unit, Removing and Installing.
- Versions with Access/Start Authorization Button -E408-: disconnect the connector.
Installing
Install in reverse order of removal.
Installation notes, for example tightening specifications, replacing components. Refer to → Chapter "Overview - Center Console".
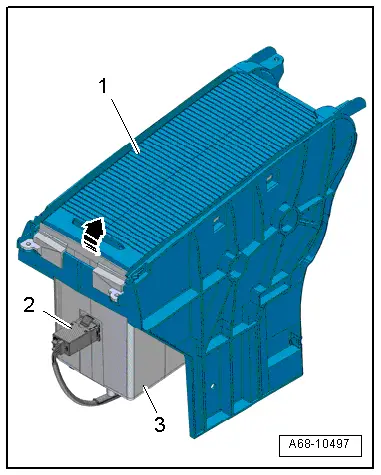
Front Center Console Storage Compartment, Removing and Installing
Removing
- Remove the center console. Refer to → Chapter "Center Console, Removing and Installing".
- Remove the storage compartment masking panel compartment. Refer to → Chapter "Storage Compartment Masking Panel in Center Console, Removing and Installing".
- Open the masking panel -1- and push rearward until stop.
- Versions with External Audio Source Connection -R199-: Remove the External Audio Source Connection -R199--item 2-. Refer to → Communication; Rep. Gr.91; External Multimedia Device Source Connections External Audio Source ConnectionR199 Removing and Installing.
- Remove the storage compartment -3- upward from the masking panel compartment -arrow- and remove.
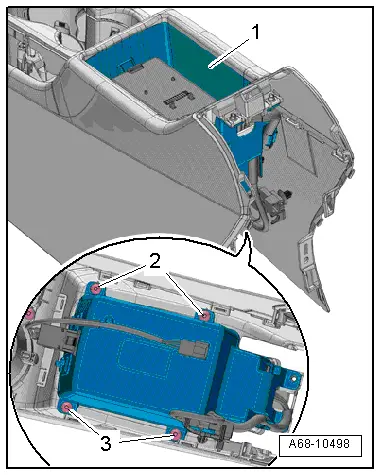
- Vehicles with a front center armrest: remove the front center armrest. Refer to → Chapter "Front Center Armrest, Removing and Installing".
- Remove the screws -2-, -3- and then remove the storage compartment -1- downward.
- Versions with External Audio Source Connection -R199-: Remove the External Audio Source Connection -R199-. Refer to → Communication; Rep. Gr.91; External Multimedia Device Source Connections External Audio Source ConnectionR199 Removing and Installing.
- Versions with Telephone Baseplate -R126-: Remove the Telephone Baseplate -R126-. Refer to → Communication; Rep. Gr.91; Telephone System; Telephone BaseplateR126 Removing and Installing.
Installing
Install in reverse order of removal.
Installation notes, for example tightening specifications, replacing components. Refer to → Chapter "Overview - Center Console".
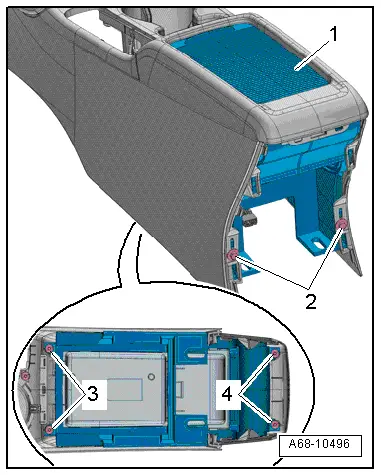
Storage Compartment Masking Panel in Center Console, Removing and Installing
Removing
- Remove the center console. Refer to → Chapter "Center Console, Removing and Installing".
- Remove the bolts -2-.
- Turn the center console.
- Remove the bolts -3- and -4-.
- Remove the masking panel compartment -1- with storage compartment from the center console.
Installing
Install in reverse order of removal.
Installation notes, for example tightening specifications, replacing components. Refer to → Chapter "Overview - Center Console".
Front Footwell Center Console Trim Panel, Removing and Installing
Front Footwell Center Console Trim Panel, Removing and Installing
Removing
- Remove the cap -1- with a screwdriver and remove the bolt in the rear for the footwell trim panel.
- Remove footwell trim panel -2- forward out of the center console -arrow- and remove.
Installing
Install in reverse order of removal. Note the following:
- Engage the rear footwell trim panel -1- in the center console -arrow-.
Installation notes, for example tightening specifications, replacing components. Refer to → Chapter "Overview - Center Console, Footwell Trim Panel".

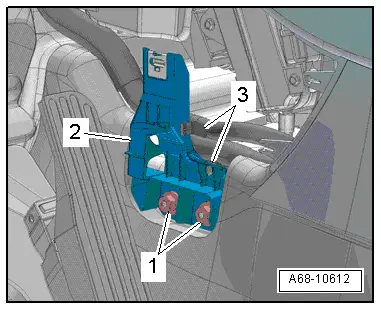
Front Footwell Center Console Trim Panel Bracket, Removing and Installing
Removing
- Remove the footwell trim panel. Refer to → Chapter "Front Footwell Center Console Trim Panel, Removing and Installing".
- Unclip the clips -3- from the footwell trim panel bracket.
- Push back the carpet in the area of the bolted connections and remove the nuts -1-.
- Remove footwell trim panel bracket -2-.
Installing
Install in reverse order of removal.
Installation notes, for example tightening specifications, replacing components. Refer to → Chapter "Overview - Center Console, Footwell Trim Panel".
READ NEXT:
 Center Console, Removing and Installing
Center Console, Removing and Installing
Removing
- Remove the center console insert. Refer to
→ Chapter "Center Console Insert, Removing and Installing".
- Versions with Access/St
Front Center Armrest
Overview - Front Center Armrest
1 - Front Center Armrest
Removing and installing. Refer to
→ Chapter "Front Center Armrest, Removing and Installing".
2 - Lower C
Overview - Interior Rearview Mirror
Overview - Interior Rearview Mirror, Version 1
1 - Front Cover
For the mirror base
Removing and installing. Refer to
→ Chapter "Interior Rearview Mirror, Removing and InstaSEE MORE:
Side assist
Description
Applies to: vehicles with side assist
Fig. 110 Driving situations and displays in the exterior mirror
General information
Side assist monitors the blind spot and traffic behind
your vehicle and provides assistance when
you are changing lanes. If the system detects an
object approaching
Inner Window Shaft Strip, Removing and Installing
Removing
- Remove the rear window frame trim panel. Refer to
→ Body Interior; Rep. Gr.70; Rear Door Trim Panels; Window Frame
Trim Panel, Removing and Installing.
- Remove the window shaft strip -1-
upward -arrows-.
Installing
Install in reverse order of removal