Audi Q3: Lock Carrier
Overview - Lock Carrier
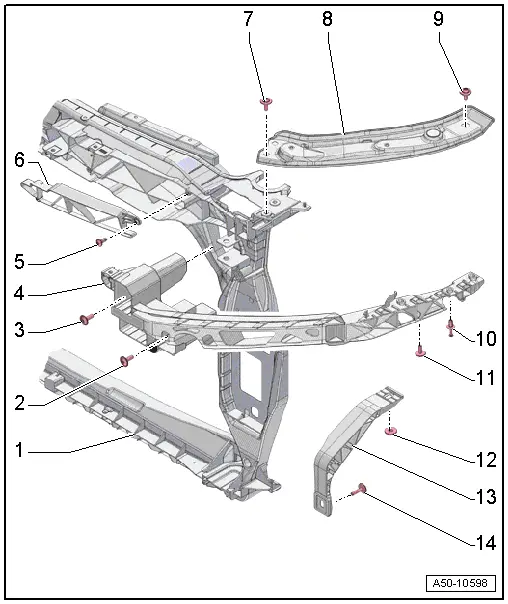
1 - Lock Carrier
- Removing and installing. Refer to → Chapter "Lock Carrier, Removing and Installing".
2 - Bolt
- 4.5 Nm
3 - Bolt
- 4.5 Nm
4 - Lower Mount
- For the front bumper cover, and headlamp housing bracket
- Removing and installing. Refer to → Chapter "Bumper Cover Lower Mount, Removing and Installing".
5 - Bolt
- 1.5 Nm
- Quantity: 2
6 - Air Guide
- Removing and installing. Refer to → Chapter "Air Duct, Removing and Installing".
7 - Bolt
- 8 Nm
- Quantity: 2
8 - Upper Mount
- For the headlamp housing and lock carrier
- Removing and installing. Refer to → Chapter "Lock Carrier And Headlamp Housing Upper Mount, Removing and Installing".
9 - Bolt
- 10 Nm
10 - Expanding Clip
11 - Bolt
- 4.5 Nm
- Quantity: 2
12 - Nut
- 5 Nm
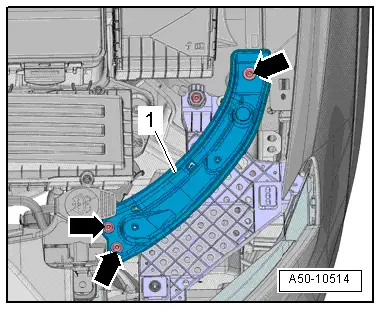
13 - Brace
- For the lock carrier
- Removing and installing. Refer to → Chapter "Lock Carrier Brace, Removing and Installing".
14 - Bolt
- 5 Nm
Lock Carrier, Removing and Installing
Lock Carrier, Removing and Installing
Special tools and workshop equipment required
- Engine Bung Set -VAS6122-
- Shop Crane - Drip Tray -VAS6208-
- Hose Clip Pliers -VAS6362-
Removing
- Drain refrigerant circuit. Refer to Air Conditioning (A/C) System with Refrigerant R134a.
- Remove the refrigerant lines from the condenser. Refer to → Heating, Ventilation and Air Conditioning; Rep. Gr.87; Refrigerant Circuit; Refrigerant Lines, Disconnecting and Connector at Condenser.
- Remove the noise insulation. Refer to → Chapter "Noise Insulation, Removing and Installing".
- Remove the impact member and install one bolt. Refer to → Chapter "Impact Member, Removing and Installing".
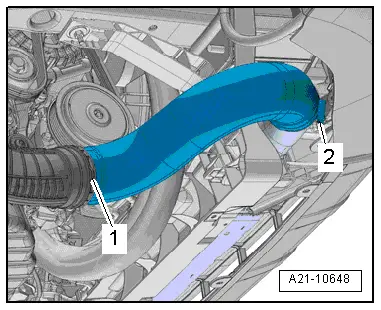
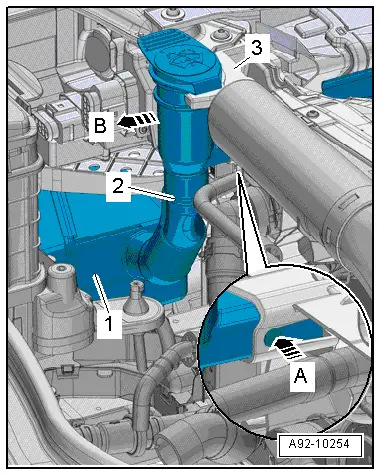
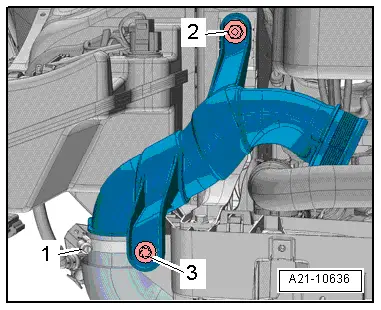
- Loosen the hose clamps -1 and 2- and remove the air guide hose.
- Seal the open lines and connections with clean plugs from the Engine Bung Set -VAS6122-.

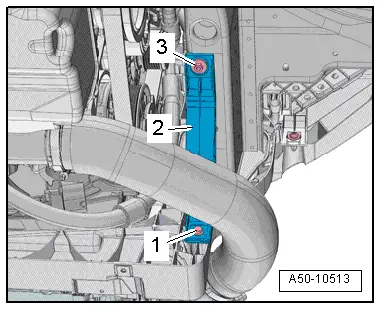
- Left: Remove the nut -2- and bolt -3-.
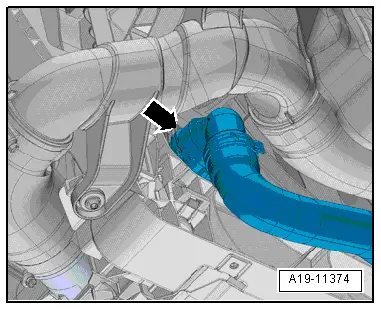
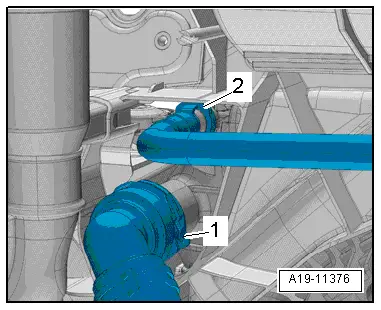
- Loosen the clamp -1- and remove the air guide pipe.
- Seal the open lines and connections with clean plugs from the Engine Bung Set -VAS6122-.
- Right: remove the nut on the lock carrier brace.

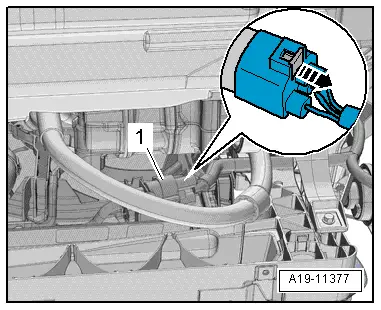
- Open the clamp -1- and remove the air guide hose.
- Seal the open lines and connections with clean plugs from the Engine Bung Set -VAS6122-.
 Note
Note
Ignore -item 2-.
 Note
Note
Collect escaping coolant in a clean container for disposal or reuse.
- Place the Shop Crane - Drip Tray -VAS6208- under engine.
- Open the clamp, drain the coolant and then remove the left lower coolant hose -arrow- from the radiator.
 WARNING
There is a risk of injury if the radiator fan turns on by itself.
Disconnect the connectors before working near the fan shroud.
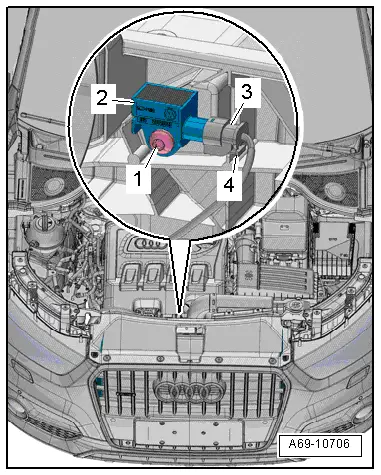
- Disconnect the coolant fan connector -1- by sliding the retainer back -arrow- and pressing the release down.
- Remove the air filter housing. Refer to → Rep. Gr.23; Air Filter Housing, Removing and Installing or → Engine Mechanical, Fuel Injection and Ignition; Rep. Gr.24; Air Filter; Air Filter Housing, Removing and Installing.
- Remove the filler neck from the bracket -3--arrow B-, to do this press the release button -arrow A-.
 Note
Note
Ignore -items 1 and 2-.
- Open the clips -1 and 2- and remove the upper left coolant hoses from the radiator.
- Disconnect and free up the connector on the left and right of the rear lid lock.
- Disconnect the hood lock cable at the coupling and place it on the lock carrier. Refer to → Chapter "Overview - Release Cable".
 WARNING
Before working on pyrotechnic components (for example, disconnecting the electrical connector), the person handling it must "discharge static electricity". This can be done by touching the door striker, for example. Refer to → Body Interior; Rep. Gr.00; Safety Precautions; Pyrotechnic Components Safety Precautions.
- Pull out connector lock -4- and press down, disconnect harness connector -3- at the crash sensor -2-.
 Note
Note
Ignore -item 1-.
- Free up the wiring harness for the crash sensor and horns.
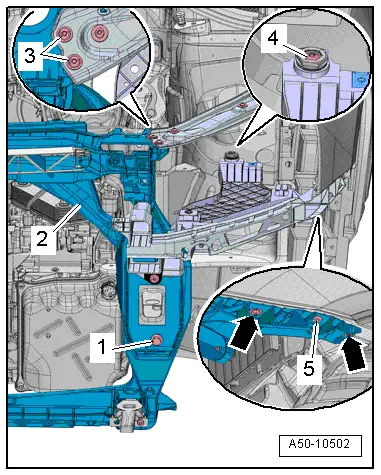
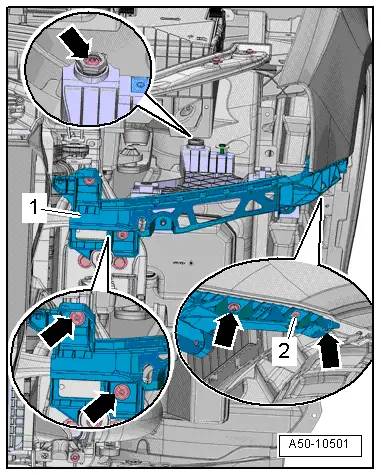
- Remove the expanding pin -5- and remove the clip.
- Remove the bolts -3 and 4- and -arrows-.
- Have a second technician hold the lock carrier -2- and remove the bolt -1-.
- Remove the lock carrier with a second technician.
To replace the lock carrier the condenser, the charge air cooler, the fan shroud and the radiator must be removed.
- Remove the condenser. Refer to → Heating, Ventilation and Air Conditioning; Rep. Gr.87; Refrigerant Circuit; Condenser, Removing and Installing.
- Remove the charge air cooler. Refer to → Rep. Gr.21; Overview - Charge Air System.
- Remove the fan shroud and radiator. Refer to → Rep. Gr.19; Overview - Radiator/Coolant Fan.
Installing
Install in reverse order of removal. Note the following:
- Connect the coolant hose with the connector coupling and fill the coolant. Refer to → Rep. Gr.19; Coolant System/Coolant; Coolant, Draining and Filling.
- Install the air guide hose and air guide pipe. Refer to → Rep. Gr.21; Overview - Charge Air System.
- Install the impact member. Refer to → Chapter "Impact Member, Removing and Installing".
- Install the refrigerant lines on the condenser. Refer to → Heating, Ventilation and Air Conditioning; Rep. Gr.87; Refrigerant Circuit; Refrigerant Pipes, Disconnecting and Connecting from Condenser.
Lock Carrier And Headlamp Housing Upper Mount, Removing and Installing
Removing
- Remove the headlamp housing. Refer to → Electrical Equipment; Rep. Gr.94; Headlamps; Headlamps Removing and Installing.
- Remove the bolts -arrows-.
- Remove the upper bracket -1-.
Installing
Install in reverse order of removal. Note the following:
- Install the headlamp housing. Refer to → Electrical Equipment; Rep. Gr.94; Headlamps; Headlamps, Removing and Installing.
Bumper Cover Lower Mount, Removing and Installing
Removing
- Remove the front bumper cover. Refer to → Chapter "Bumper Cover, Removing and Installing".
- Remove the headlamp housing. Refer to → Electrical Equipment; Rep. Gr.94; Headlamps; Headlamps Removing and Installing.
- Remove the bolt -4-.
- Release the securing tabs -1 and 3- carefully upward, and at the same time turn the bracket -2- clockwise -arrow-.
- Remove the impact member bracket.
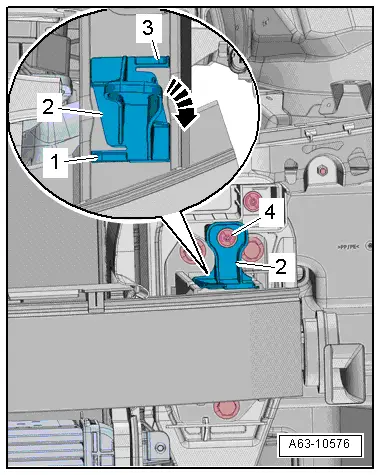
- Remove the expanding pin -2- and remove the clip.
- Remove the bolts -arrows-.
- Remove the bracket -1- forward.
- In the lower mount is replaced, remove the lower headlamp housing mount. Refer to → Electrical Equipment; Rep. Gr.94; Overview - Headlamp.
Installing
Install in reverse order of removal. Note the following:
- Install the bracket for the bumper cover mount.
- Install the headlamp housing. Refer to → Electrical Equipment; Rep. Gr.94; Headlamps; Headlamps, Removing and Installing.
- Install the front bumper cover. Refer to → Chapter "Bumper Cover, Removing and Installing".
Lock Carrier Brace, Removing and Installing
Removing
- Remove the noise insulation. Refer to → Chapter "Noise Insulation, Removing and Installing".
- Remove the front wheel spoiler. Refer to → Chapter "Front Wheel Spoiler, Removing and Installing".
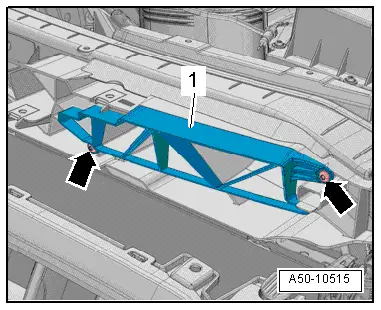
- Left: Remove the nut -2- and bolt -3-.
- Remove the air guide pipe from the threaded pin.
 Note
Note
Ignore -item 1-.
- Right: remove the nut -3-.
- Remove the bolt -1- and then remove the brace -2-.
Installing
Install in reverse order of removal. Note the following:
- Left: install the air guide pipe. Refer to → Rep. Gr.21; Overview - Charge Air System.
- Install the front wheel spoiler. Refer to → Chapter "Front Wheel Spoiler, Removing and Installing".
- Install the noise insulation. Refer to → Chapter "Noise Insulation, Removing and Installing".
Air Duct, Removing and Installing
Removing
- Remove the lock carrier cover. Refer to → Chapter "Lock Carrier Cover, Removing and Installing, Vehicles through MY 2014".
- Remove the bolts -arrows-.
- Remove the air guide -1- from the lock carrier.
Installing
Install in reverse order of removal. Note the following:
- Install the lock carrier cover. Refer to → Chapter "Lock Carrier Cover, Removing and Installing, Vehicles through MY 2014".
READ NEXT:
 Fender
Overview - Fender
1 - Bolt
8 Nm
Quantity: 2
2 - Lower bracket
For the fender
Removing and installing. Refer to
→ Chapter "Fender, Removing and Installing
Bulkhead
Overview - Bulkhead
1 - Gasket for Plenum Chamber
To remove, pull forward off the body flange.
Mount the seal on the foam piece -arrows-
and then push it onto the flange on the bo
SEE MORE:
Anti-Theft Alarm System
Overview - Interior Monitoring
1 - Nut
7 Nm
2 - Bracket
For Alarm Horn -H12-
3 - Alarm Horn -H12-
Removing and installing. Refer to
→ Chapter "Alarm Horn -H12-, Removing and Installing".
4 - Connector
5 - Right
When driving
Starting to drive, stopping, and parking
Starting from a stop
Press and hold the brake pedal.
Start the engine.
Select a gear.
Release the parking brake.
Release the brake pedal. The vehicle may roll.
Press the accelerator pedal to accelerate.
Securing the vehicle against rolling
Secure your
