Audi Q3: Left/Right HID Headlamp Control Module -J343-/-J344-, Removing and Installing
Left/Right HID Headlamp Control Module -J343-/-J344-, Removing and Installing, through MY 2014
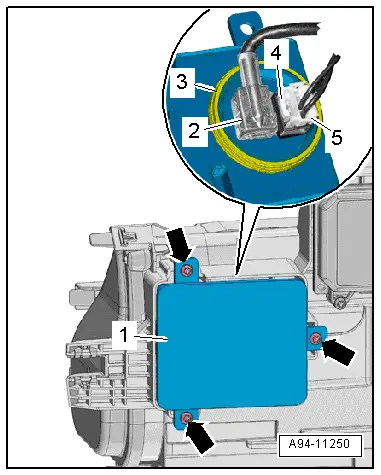
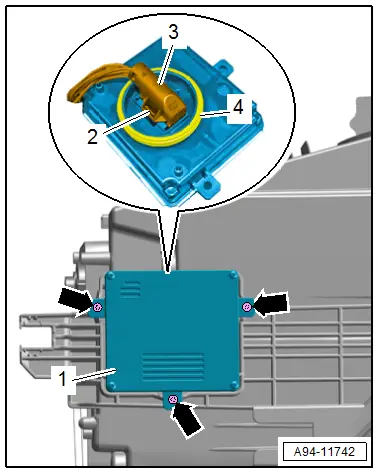
Removing
- Remove the headlamp housing. Refer to → Chapter "Headlamp, Removing and Installing, HID and LED Headlamps".
- Remove the bolts -arrows-.
- Remove the control module -1- from the headlamp housing.
- Disconnect the adapter cable -2- by pushing the securing tab if equipped.
- Disconnect the connector -5- by pushing the securing tab -4-.
- Remove the control module.
Installing
Install in reverse order of removal, while paying attention to the following:
- Check the seal -3- between the control module and the headlamp housing for damage.
- Install the headlamp housing. Refer to → Chapter "Headlamp, Removing and Installing, HID and LED Headlamps".
Left/Right HID Headlamp Control Module -J343-/-J344-, Removing and Installing, from MY 2015
 Note
Note
The Left/Right HID headlamp bulbs -L13-/-L14- is integrated in the Left/Right HID Headlamp Control Module -J343-/-J344-. The control module cannot be replaced separately if it is faulty. Remove the HID headlamp bulb. Refer to → Chapter "Left/Right HID Headlamp Bulb -L13-/-L14- with Left/Right HID Headlamp Control Module -J343-/-J344-, Removing and Installing, from MY 2015".
Left/Right Headlamp Power Output Stage -J667-/-J668-, Removing and Installing
Left/Right Headlamp Power Output Stage -J667-/-J668-, Removing and Installing, through MY 2014
Removing
- Remove the headlamp housing. Refer to → Chapter "Headlamp, Removing and Installing, HID and LED Headlamps".
- Remove the bolts -arrows-.
- Remove the control module -1- from the headlamp housing.
Installing
Install in reverse order of removal, while paying attention to the following:
- Check the seal -2- between the control module and the headlamp housing for damage.
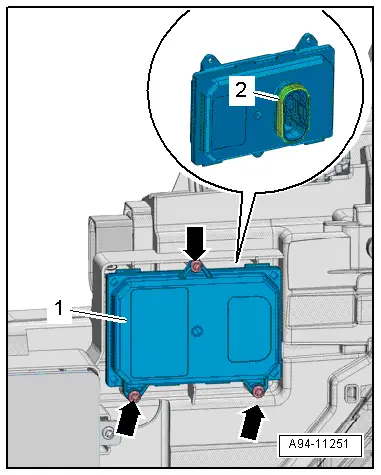
Left/Right Headlamp Power Output Stage -J667-/-J668-, Removing and Installing, from MY 2015
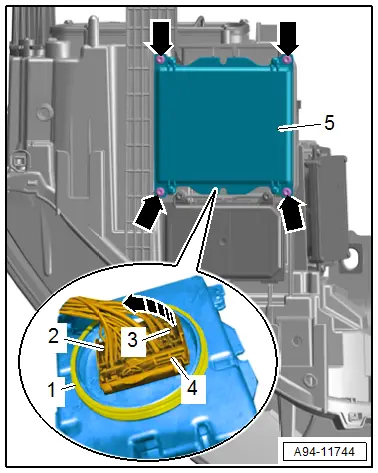
Removing
- Remove the headlamp housing. Refer to → Chapter "Headlamp, Removing and Installing, HID and LED Headlamps".
- Remove the bolts -arrows-.
- Remove the control module -2- from the headlamp housing.
Installing
Install in reverse order of removal, while paying attention to the following:
- Check the seal -1- between the control module and the headlamp housing for damage.
Left/Right Daytime Running Lamp and Position Lamp Control Module -J860-/-J861-, Removing and Installing
Left/Right Daytime Running Lamp and Position Lamp Control Module -J860-/-J861-, Removing and Installing, through MY 2014
Removing
- Remove the headlamp housing. Refer to → Chapter "Headlamp, Removing and Installing, HID and LED Headlamps".
- Remove the bolts -arrows-.
- Remove the control module -4- from the headlamp housing.
- Press the release button -1- and disconnect the connector -2-.
- Remove the control module.
Installing
Install in reverse order of removal, while paying attention to the following:
- Check the seal -3- between the control module and the headlamp housing for damage.
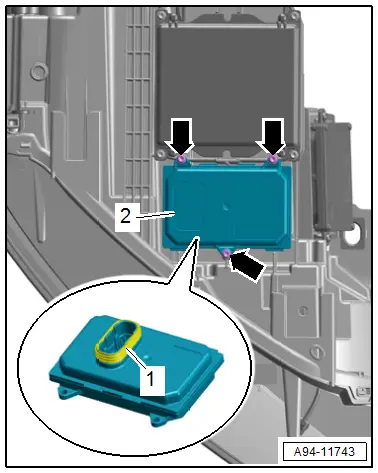
Left/Right Daytime Running Lamp and Position Lamp Control Module -J860-/-J861-, Removing and Installing, from MY 2015
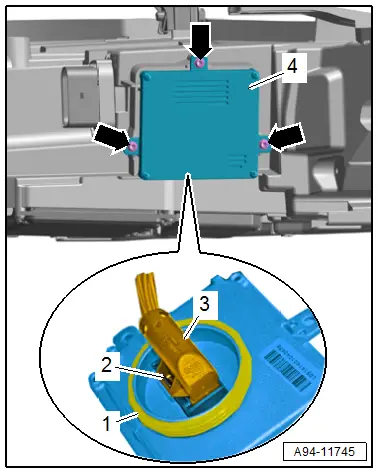
Removing
- Remove the headlamp housing. Refer to → Chapter "Headlamp, Removing and Installing, HID and LED Headlamps".
- Remove the bolts -arrows-.
- Remove the control module -1- from the headlamp housing.
- Press the release button -2- and disconnect the connector -3-.
- Remove the control module.
Installing
Install in reverse order of removal, while paying attention to the following:
- Check the seal -4- for damage.
Headlamp Power Output Stage, Removing and Installing
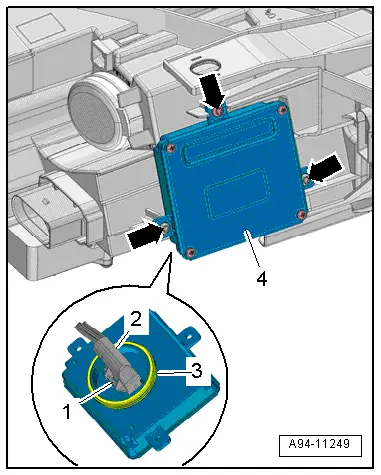
Right/Left LED Headlamp Power Output Module 1 -A27-/-A31-, Removing and Installing
Removing
- Remove the headlamp housing. Refer to → Chapter "Headlamp, Removing and Installing, HID and LED Headlamps".
- Remove the bolts -arrows-.
- Remove the power output stage -5-.
- Disconnect the connector -2-.
- To disconnect the connector, press the tab -3-, turn the retaining bracket -4- in direction of the -arrow- and remove the connector.
Installing
Install in reverse order of removal, while paying attention to the following:
- Check the seal -1- for damage.
Right/Left LED Headlamp Power Output Module 2 -A28-/-A32-, Removing and Installing
Removing
- If equipped, remove the left air filter housing. Refer to → Rep. Gr.23; Air Filter; Air Filter Housing, Removing and Installing or → Rep. Gr.24; Air Filter; Air Filter Housing, Removing and Installing.
- Vehicles with TDI engine: Loosen fuel filter on and set aside with the lines connected. Refer to → Fuel Supply System; Rep. Gr.20; Fuel Filter; Fuel Filter, Removing and Installing.
- Remove the bolts -arrows-.
- Remove the power output stage -4-.
- Press the release button -2- and disconnect the connector -3-.
- Remove the power output stage.
Installing
Install in reverse order of removal, while paying attention to the following:
- Check the seal -1- for damage.
READ NEXT:
 Left/Right Headlamp Beam Adjustment Motor -V48-/-V49-, Removing and
Installing
Left/Right Headlamp Beam Adjustment Motor -V48-/-V49-, Removing and
Installing
Left/Right Headlamp Beam Adjustment Motor -V48-/-V49-, Removing and
Installing, Halogen Headlamps
Removing
- Remove the headlamp housing. Refer to
→ Chapter "Headlamp, Removing and I
Fog Lamp
Overview - Fog Lamps
1 - Air Intake Grille
2 - Fog Lamp
Removing and installing. Refer to
→ Chapter "Fog Lamp, Removing and Installing".
3 - Bolt
Side Marker Lamp
Overview - Side Marker Lamp
1 - Front Bumper Cover
2 - Rear Side Marker Lamp Bulb
The entire body tail lamp must be replaced if an LED is faulty
Left Rear Side Marker LamSEE MORE:
Backrest Adjuster, Removing and Installing
Backrest Adjustment Hand Wheel, Removing and Installing
Note
Only the hand wheel for the backrest adjustment wheel can be
removed and installed.
Special tools and workshop equipment
required
Assembly Tool -3399-
Removing
- Move the front seat all the way forward/up.
-&n
Subframe, Removing and Installing
Subframe, Removing and installing, FWD Vehicles
Special tools and workshop equipment
required
Locating Pins -T10096-
Torque Wrench 1332 40-200Nm -VAG1332-
Engine and Gearbox Jack -VAS6931-
Removing the Subframe and Attachments
- Disconnect the right and left electromechanical par