Audi Q3: Left/Right Headlamp Beam Adjustment Motor -V48-/-V49-, Removing and Installing
Left/Right Headlamp Beam Adjustment Motor -V48-/-V49-, Removing and Installing, Halogen Headlamps
Removing
- Remove the headlamp housing. Refer to → Chapter "Headlamp, Removing and Installing, Halogen Headlamps".
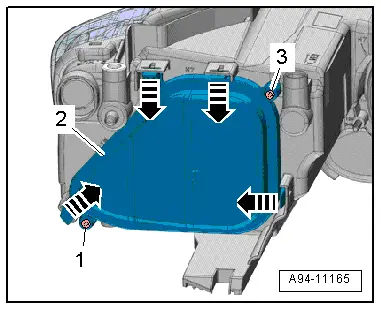
- If equipped, remove the bolts -1 and 3-.
- Open the tabs in direction of -arrows- and remove the housing cover -2-.
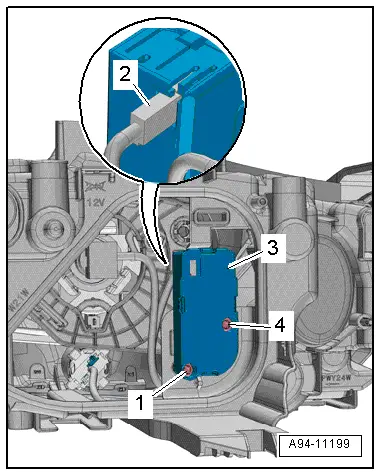
- Remove the bolts -1 and 4-.
- Remove the headlamp beam adjustment motor -3- by pushing the ball end of the positioning stem upward and out of the ball end mount by swiveling the adjustment motor.
- Remove the adjustment motor.
- Disconnect the connector -2-.
Installing
Install in reverse order of removal. Note the following:
- Connect the connector when guiding in.
- First insert the adjusting axle ball head into the reflector ball head mount from below by pulling the reflector back.
- Tighten the bolts.
- Install the headlamp housing. Refer to → Chapter "Headlamp, Removing and Installing, Halogen Headlamps".
Left/Right Headlamp Beam Adjustment Motor -V48-/-V49-, Removing and Installing, HID Headlamps, Version 1, through MY 2014
Removing
- Remove the headlamp housing. Refer to → Chapter "Headlamp, Removing and Installing, HID and LED Headlamps".
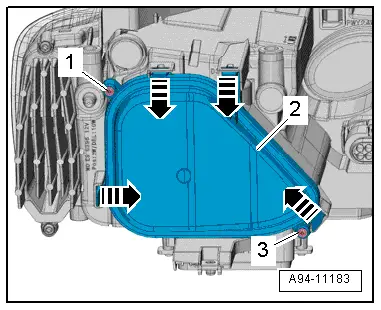
- If equipped, remove the bolts -1 and 3-.
- Open the tabs in direction of -arrows- and remove the housing cover -2-.
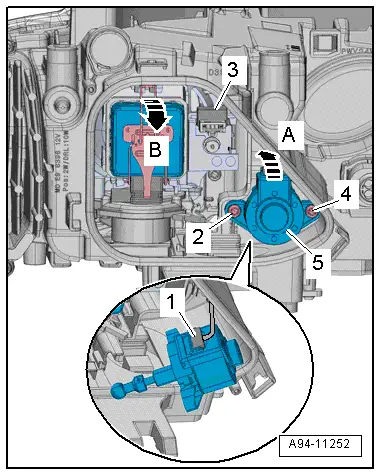
- Remove the bolts -2 and 4-.
- Push the ball end of the positioning stem upward in direction of -arrow A- and out of the ball end mount by swiveling the adjustment motor while at the same time pushing the reflector -3- forward in direction of -arrow B- to remove the headlamp beam adjustment motor -5-.
- Disconnect the connector -1-.
Installing
Install in reverse order of removal. Note the following:
- Connect the connector when guiding in.
- First insert the adjusting axle ball head into the reflector ball head mount from below by pulling the reflector back.
- Tighten the bolts.
- Install the headlamp housing. Refer to → Chapter "Headlamp, Removing and Installing, HID and LED Headlamps".
- Adjust the headlamp. Refer to → Chapter "Headlamp, Adjusting".
Left/Right Headlamp Beam Adjustment Motor -V48-/-V49-, Removing and Installing, HID Headlamps, Version 2, through MY 2014
Removing
- Remove the headlamp housing. Refer to → Chapter "Headlamp, Removing and Installing, HID and LED Headlamps".
- If equipped, remove the bolts -1 and 3-.
- Open the tabs in direction of -arrows- and remove the housing cover -2-.
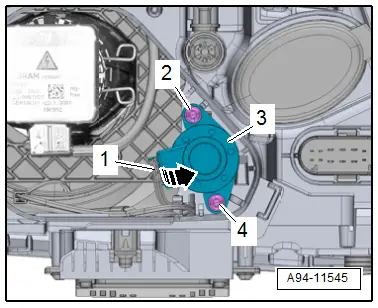
- Remove the bolts -2 and 4-.
- Remove the headlamp beam adjustment motor -3- by pushing the ball end of the positioning stem to the side -arrow- and out of the ball end mount by swiveling the adjustment motor.
- Disconnect the connector -1-.
Installing
Install in reverse order of removal. Note the following:
- Connect the connector when guiding in.
- Insert the adjusting axle ball head into the reflector ball socket to the side while pulling the reflector back.
- Tighten the bolts.
- Install the headlamp housing. Refer to → Chapter "Headlamp, Removing and Installing, HID and LED Headlamps".
- Adjust the headlamp. Refer to → Chapter "Headlamp, Adjusting".
Left/Right Headlamp Beam Adjustment Motor -V48-/-V49-, Removing and Installing, HID Headlamps and LED Headlamps, from MY 2015
Removing
- Remove the headlamp housing. Refer to → Chapter "Headlamp, Removing and Installing, HID and LED Headlamps".
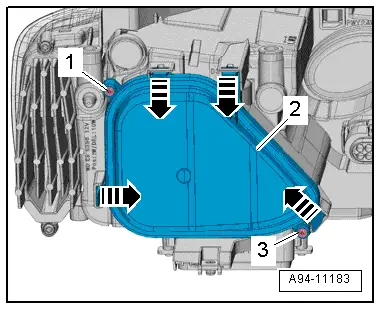
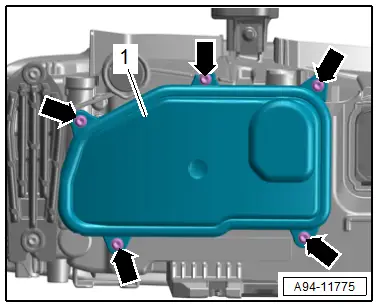
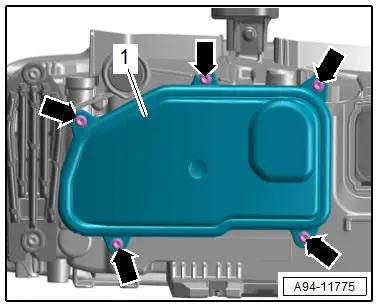
- Remove the bolts -arrows-.
- Remove the housing cover -1- from the headlamp housing.
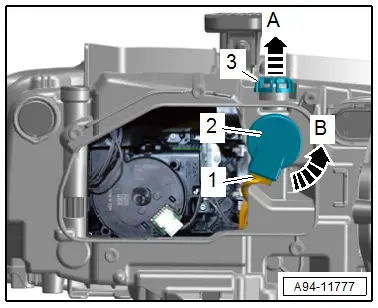
- Pry out the height adjusting screw -3--arrow A-.
- Turn the adjustment motor -2- counter-clockwise -arrow B- and tilt it downward. This disengages the ball head upward from the ball head mount.
- Disconnect the connector -1-.
Installing
Install in reverse order of removal, while paying attention to the following:
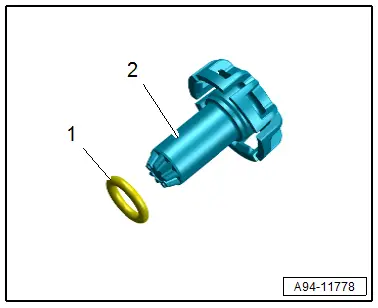
- Check the seal -1- on the height adjusting screw -2- for damage.
- Close the housing cover and tighten the bolts.
- Adjust the headlamp. Refer to → Chapter "Headlamp, Adjusting".
Headlamp Fan, Removing and Installing
Left/Right Headlamp Fan -V407-/-V408-, Removing and Installing
Removing
- Remove the headlamp housing. Refer to → Chapter "Headlamp, Removing and Installing, HID and LED Headlamps".
- Remove the bolts -arrows-.
- Remove the housing cover -1- from the headlamp housing.
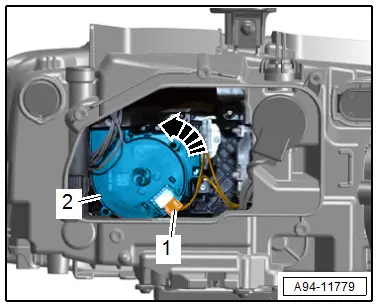
- Turn the fan -2- counter-clockwise -arrow- and remove.
- Press the release button and disconnect the connector -1-.
Installing
Install in reverse order of removal, while paying attention to the following:
- Close the housing cover and tighten the bolts.
Headlamp Housing Repair Set, Installing
 Note
Note
- Headlamp mounting tabs that have broken off can be replaced by installing the repair set. Completely replacing the headlamp is not necessary.
- There are different repair kits for left and right headlamps. Refer to Parts Catalog.
Procedure
- Remove the headlamp with the broken tabs. Refer to → Chapter "Headlamp, Removing and Installing, Halogen Headlamps".
- Remove the rest of the broken tab on the headlamp housing.
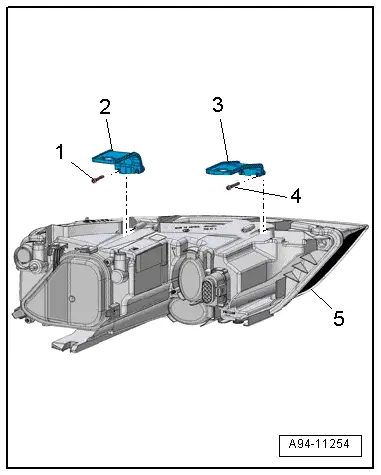
- Install the repair kit mounting tabs -2 and 3- on the headlamp housing -5- and secure the tab with the bolts -1 and 4-.
