Audi Q3: Exterior Rearview Mirror Lamps
Overview - Exterior Rearview Mirror Lamps
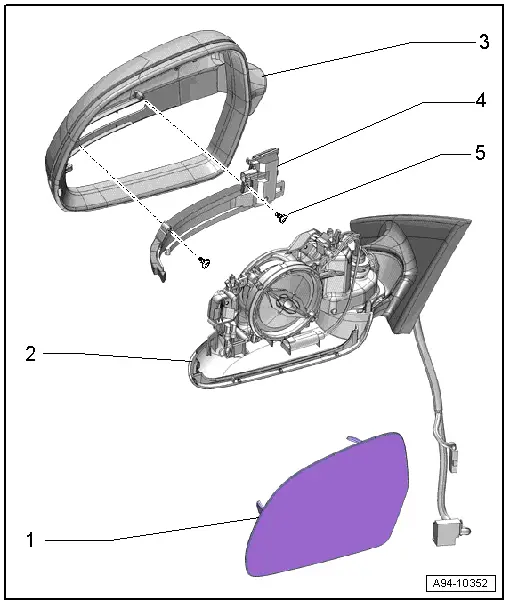
1 - Mirror Glass
2 - Mirror Adjusting Unit Mount
3 - Exterior Rearview Mirror Housing
4 - Exterior Rearview Mirror Turn Signal Bulb
- Driver Exterior Rearview Mirror Turn Signal Bulb -L131-
- Front Passenger Exterior Rearview Mirror Turn Signal Bulb -L132-
- Removing and installing. Refer to → Chapter "Driver/Front Passenger Exterior Rearview Mirror Turn Signal Bulb -L131-/-L132-, Removing and Installing".
5 - Bolt
- 0.9 Nm
Driver/Front Passenger Exterior Rearview Mirror Turn Signal Bulb -L131-/-L132-, Removing and Installing
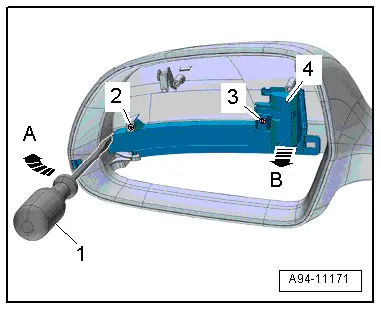
Removing
- Remove the exterior rearview mirror housing. Refer to → Body exterior; Rep. Gr.66; Overview - Exterior Rearview Mirror.
- Remove the bolts -2 and 3-.
- Pry the turn signal bulb housing -4- with a narrow screwdriver -1- from the mount in direction of -arrow A- and at the same time pivot out the exterior rearview mirror housing in direction of -arrow B-.
Installing
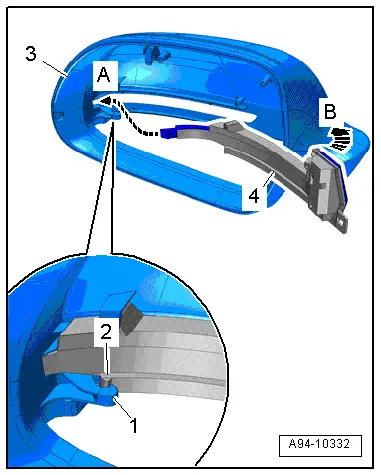
Install in reverse order of removal. Note the following:
 Note
Note
The entire exterior mirror turn signal must be replaced if an LED is faulty.
- Insert the tip of the turn signal in the slit in the exterior rearview mirror housing -3- in direction of -arrow A-.
- Tilt the turn signal bulb housing -4- into the exterior rearview mirror housing in direction of -arrow B-. The locking tab -2- must engage in the mount -1-.
- Install the exterior rearview mirror housing. Refer to → Body exterior; Rep. Gr.66; Overview - Exterior Rearview Mirror.
READ NEXT:
 Tail Lamps
Overview - Rear Lid Tail Lamps
LED tail lamps have LED bulbs and are integrated in the tail
lamps. The LEDs cannot be replaced; the entire tail lamp must be
replaced.
1 - Tail L
High-Mounted Brake Lamp
Overview - High-Mounted Brake Lamp
1 - High-Mounted Brake Lamp
High-Mounted Brake Lamp Bulb -M25-
Removing and installing. Refer to
→ Chapter "High-Mounted Brake Lamp Bulb,
Component Location Overview - Access/Start Authorization System
1 - Electronic Steering Column Lock Control Module -J764-
Overview. Refer to
→ Chapter "Overview - Steering Column Switch Module, with Electronic
Ignition Switch".
2 SEE MORE:
Overview - Door
1 - Door
Removing and installing. Refer to
→ Chapter "Door, Removing and Installing".
2 - Bolt
45 Nm
Note
The bolt is a fitting bolt so it is generally not necessary to
adjust the door using it.
If it is necessary to make an adjustment us
Steering Column
Overview - Steering Column
Note
Always replace corroded bolts/nuts.
1 - Instrument Panel Central Tube
2 - Shear Bolt
Tighten the shear bolt until head shears off.
3 - Steering Column
Removing and installing. Refer to
→ Chapter "Steerin