Audi Q3: Component Location Overview - Center Console Controls
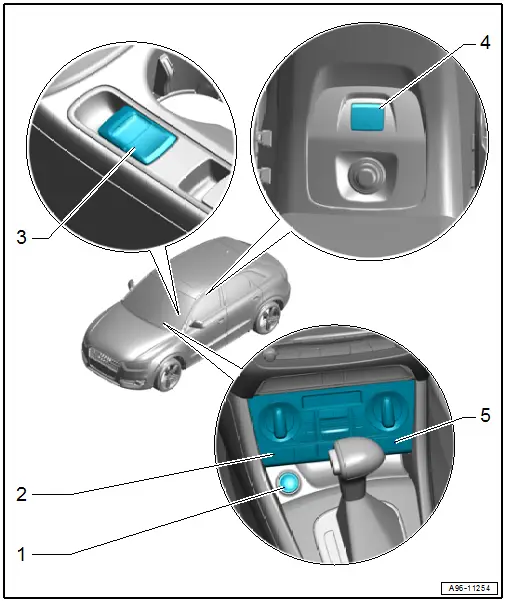
1 - Access/Start Authorization Button -E408-
- Removing and installing. Refer to → Chapter "Access/Start Authorization Button -E408-, Removing and Installing".
2 - Heated Driver Seat Adjuster -E94-
- Integrated in the A/C Control Module -J301-/ Climatronic Control Module -J255- control head. Cannot be replaced separately if faulty.
- Replacing the A/C Control Module -J301-/ Climatronic Control Module -J255-. Refer to → Heating, Ventilation, and Air Conditioning; Rep. Gr.87; Display and Control Unit, Removing and Installing.
3 - Electromechanical Parking Brake Button -E538-, -Auto Hold- Button -E540-
- Removing and installing. Refer to → Chapter "Electromechanical Parking Brake Button -E538-/ -AUTO HOLD- Button -E540-, Removing and Installing".
4 - Central Locking Button -E600-
- Removing and installing. Refer to → Chapter "Central Locking Button -E600-".
5 - Heated Front Passenger Seat Adjuster -E95-
- Integrated in the A/C Control Module -J301-/ Climatronic Control Module -J255- control head. Cannot be replaced separately if faulty.
- Replacing the A/C Control Module -J301-/ Climatronic Control Module -J255-. Refer to → Heating, Ventilation, and Air Conditioning; Rep. Gr.87; Display and Control Unit, Removing and Installing.
Component Location Overview - Roof Trim Panel Controls
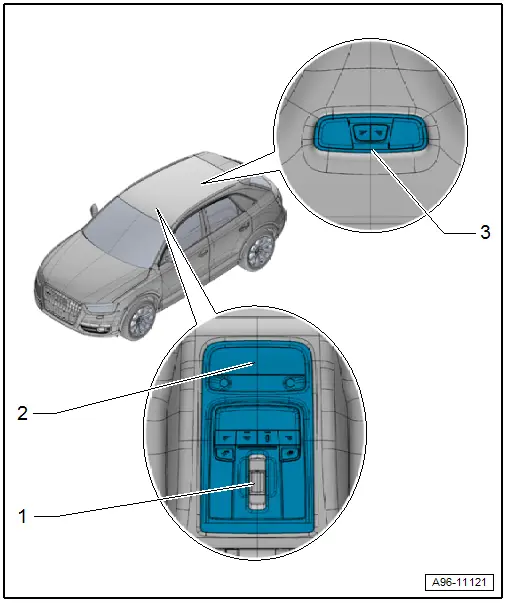
1 - Sunroof Button -E325-
- Equipment level
- Removing and installing. Refer to → Chapter "Sunroof Button -E325-, Removing and Installing".
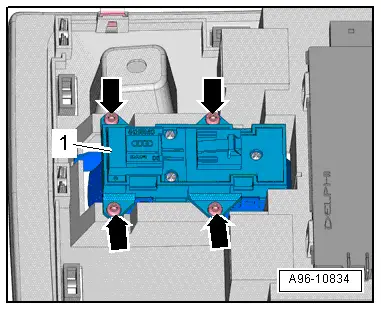
2 - Front Roof Module -WX3- - Interior Lamp/Reading Lamp
- There are different versions. Refer to the Parts Catalog.
- With interior lighting switch, reading lamp button, window shade button.
- Removing and installing. Refer to → Chapter "Front Interior Lamp/Reading Lamp, Removing and Installing".
3 - Interior Lamp/Rear Reading Lamp
- There are different versions. Refer to the Parts Catalog.
- Removing and installing. Refer to → Chapter "Rear Interior/Reading Lamp, Removing and Installing".
Tightening Specification Sunroof Button -E325-
- Tighten the screws -arrows- to 0.65 Nm.
Component Location Overview - Luggage Compartment Controls
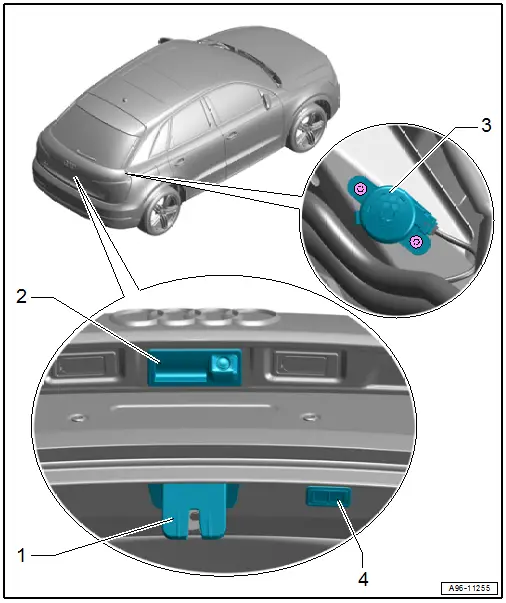
1 - Rear Lid Contact Switch
- Integrated inside the rear lid lock. Cannot be replaced separately if faulty.
- Removing and installing. Refer to → Chapter "Rear Lid Contact Switch, Removing and Installing".
2 - Rear Lid Lock Cylinder Unlock Button -F248-
- Removing and installing. Refer to → Chapter "Rear Lid Lock Cylinder Unlock Button -F248-, Removing and Installing".
3 - Rear Lid Warning Buzzer -H32-
- The buzzer is activated by closing the rear lid using the rear lid remote release button in the front door
- Removing and installing. Refer to → Chapter "Rear Lid Warning Buzzer -H32-, Removing and Installing".
4 - Rear Lid Closing Button -E574-
- With Locking Mechanism Button in the Rear Lid -E806-
- Removing and installing. Refer to → Chapter "Rear Lid Lock Button in Luggage Compartment -E406-, Removing and Installing".
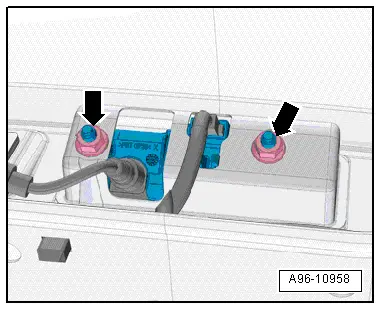
Tightening Specification: Anti-Theft Protection to Rear Lid Lock Cylinder Unlock Button -F248-.
- Tighten the nuts -arrows- to 6 Nm.
READ NEXT:
 Light Switch -E1-, Removing and Installing
Removing
- Turn the light switch to position "0".
- Push the light switch in direction of
-arrow A- and turn right at the same time in direction of
-arrow B-.
- Hold the switch in
Power Window Control Head In Driver Door -E512-, Removing and Installing
Removing
- Remove the pull handle with the switch mount. Refer to
→ Body Interior; Rep. Gr.70; Door Trim Panels; Front Pull
Handle, Removing and Installing.
- Carefully
Rear Lid Lock Cylinder Unlock Button -F248-, Removing and Installing
Removing
- Remove the rear lid trim panel. Refer to
→ Body Interior; Rep. Gr.70; Luggage Compartment Trim Panels;
Rear Lid Lower Trim Panel, Removing and Installing.
- SEE MORE:
Brake fluid
Fig. 151 Engine compartment: cap on brake fluid reservoir
Observe the safety precautions.
Checking the brake fluid level
Park the vehicle on a level surface.
Read the brake fluid level on the brake fluid
reservoir fig. 146. The brake
fluid
level must be between the MIN and MAX markings.
Th
Trailer Hitch
Overview - Trailer Hitch
1 - Grommet
For the cable
2 - Bolt
Quantity: 4
Tightening specification. Refer to
→ Chapter "Overview - Impact Member".
3 - Cable
For unlocking the trailer hitch
4 - Bolt
2 Nm
5 - Bra