Audi Q3: Overview - A-Pillar Trim Panel
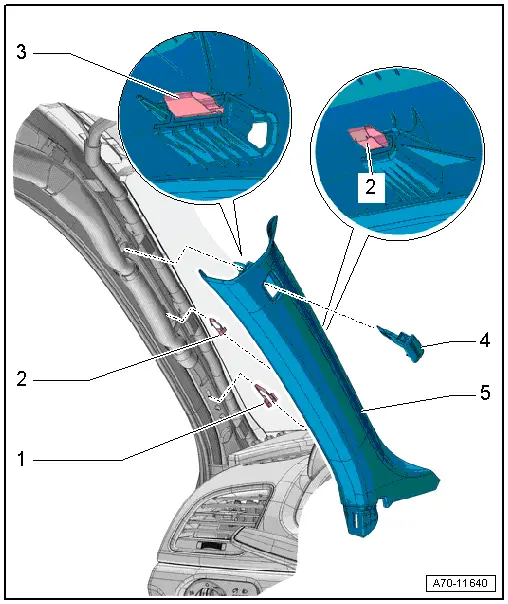
1 - Lower Clamp
- Without hooks
- Replace damaged or deformed clips
- Insert in the trim panel
- Remove any remaining clips in the body mounting points using the Omega Clip Tool -T40280-. To install, insert into the trim panel.
2 - Center Clamp
- with hooks
- Replace
- Insert in the trim panel
- Remove the clips that are still in the mounting points on the body using Omega Clip Tool -T40280-.
3 - Expanding Clip
- Insert in the trim panel
- Remove any remaining clips in the body mounting points using the Omega Clip Tool -T40280-. To install, insert into the trim panel.
4 - Expanding Cap
- With the "Airbag" symbol
- Carefully unclip
5 - Upper A-Pillar Trim Panel
- Removing and installing. Refer to → Chapter "A-Pillar Trim Panel, Removing and Installing".
- Press on until it engages audibly
- Stretch the door seal lip over
Overview - B-Pillar Trim Panel
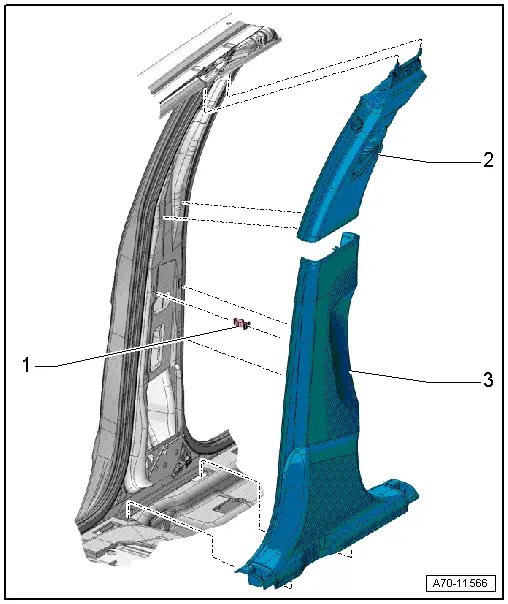
1 - Clip
- Quantity: 3
- Insert in the trim panel
- Remove any remaining clips in the body mounting points using the Omega Clip Tool -T40280-. To install, insert into the trim panel.
- Replace damaged or deformed clips
2 - Upper B-Pillar Trim Panel
- Removing and installing. Refer to → Chapter "Upper B-Pillar Trim, Removing and Installing".
- Insert in the upper part of the mounting points on the roof and clip into the belt guide
- Press on until it engages audibly
- Stretch the door seal lip over.
3 - Lower B-Pillar Trim Panel
- Removing and installing. Refer to → Chapter "Lower B-Pillar Trim Panel, Removing and Installing".
- Under in the mounting point on the sill panel, and clipped in the B-pillar
- Press on until it engages audibly
- Stretch the door seal lip over.
Overview - C-Pillar Trim Panel
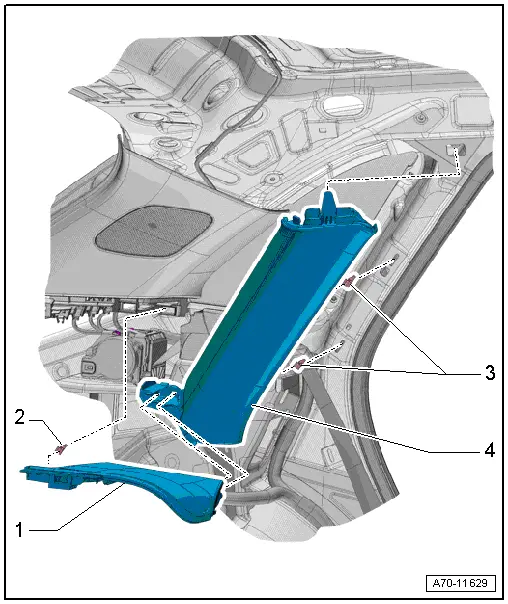
1 - Cover
- For belt guide
- Removing and installing. Refer to → Chapter "Seat Belt Guide Cover, Removing and Installing".
- Clipped in the C-pillar trim panel and the D-pillar trim panel
2 - Clip
- Quantity: 2
- Install in the seat belt guide cover
- Replace any damaged or deformed clips
3 - Clip
- Insert in the trim panel
- Remove any remaining clips in the body mounting points using the Omega Clip Tool -T40280-. To install, insert into the trim panel.
- Replace damaged or deformed clips
4 - C-Pillar Trim Panel
- Removing and installing. Refer to → Chapter "C-Pillar Trim Panel, Removing and Installing".
- Insert in the upper part of the mounting point on the roof and clip into the C-pillar
- Press on until it engages audibly
- Stretch the door seal lip over
Overview - D-Pillar Trim Panel
1 - D-Pillar Trim Panel
- Removing and installing. Refer to → Chapter "D-Pillar Trim Panel, Removing and Installing".
- Press on until it engages audibly
- Stretch the rear lid seal lip
2 - Clip
- Quantity: 5
- Insert in the trim panel
- Remove any remaining clips in the body mounting points using the Omega Clip Tool -T40280-. To install, insert into the trim panel.
- Replace damaged or deformed clips
Overview - Foot Rest and Carpet
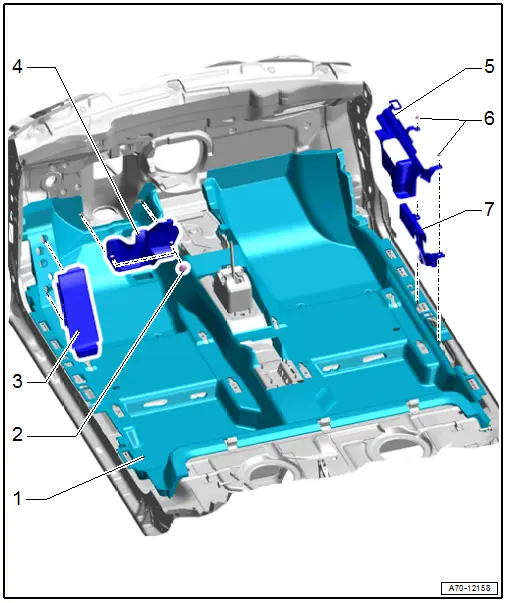
1 - Carpet
- One piece
- Removing and installing. Refer to → Chapter "Carpet, Removing and Installing".
2 - Push Button
- Quantity: 2
- Press on until stop
3 - Footrest
- Removing and installing. Refer to → Chapter "Foot Rest, Removing and Installing".
- Must engage completely in the mounts
4 - Steering Column Trim
- Removing and installing. Refer to → Chapter "Steering Column Trim, Removing and Installing".
5 - Carpet Reinforcement
- only USA and Canada market
- Quantity: 1 on the left and right side
6 - Nut
- 6.5 Nm
- Quantity: 2 on the left and right side
7 - Belt End Fitting Cover
- only USA and Canada market
- Quantity: 1 on the left and right side
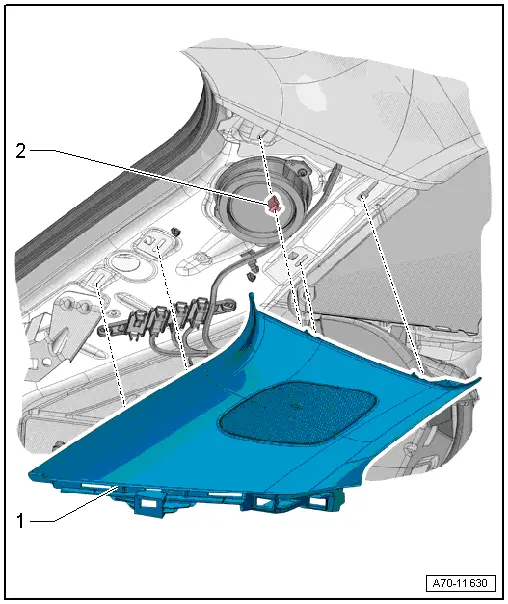
Overview - Rear Shelf
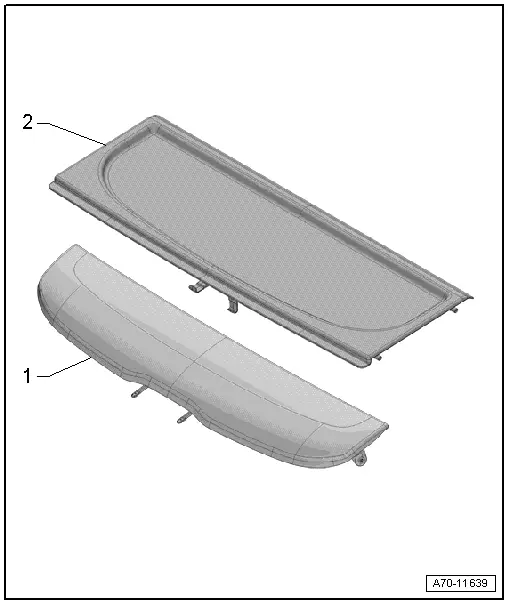
1 - Rear Shelf Rear Section
- Removing and installing. Refer to → Chapter "Rear Shelf Rear Section, Removing and Installing".
- hung on rear lid
2 - Front of the Rear Shelf
- Equipment levels
- Removing and installing. Refer to → Chapter "Front Rear Shelf, Removing and Installing".
- Insert into the mounts on the luggage compartment side trim panel and push it forward.
READ NEXT:
 Sill Panel Strip, Removing and Installing
Front Sill Panel Strip, Removing and Installing
Special tools and workshop equipment
required
Trim Removal Wedge -3409-
Omega Clip Tool -T40280-
Removing
- Remove the instrument pane
A-Pillar Trim Panel, Removing and Installing
Special tools and workshop equipment
required
Pry Lever -80-200-
Omega Clip Tool -T40280-
Removing
WARNING
Follow all safety precautions when working with
pyrotechnic componen
Foot Rest, Removing and Installing
Special tools and workshop equipment
required
Trim Removal Wedge -3409-
Removing
- Remove the front driver side sill panel trim. Refer to
→ Chapter "Front Sill Panel Strip, RemoSEE MORE:
Overview - Release Cable
Overview - Latch Release Cable
1 - Right Hood Latch
Removing and installing. Refer to
→ Chapter "Hood Latch, Removing and Installing".
2 - Hood Latch Cable
Removing and installing. Refer to
→ Chapter "Release Cable, Removing and Installing".
3&n
Rear Brake Caliper, Replacing
Brake Caliper, Replacing, Brakes 1KU
Note
In the following description the brake caliper is removed
and replaced without the brake carrier and pads. The brake hose
is removed.
Should the brake pads also be replaced, the parking brake
must be adjusted back, refer to
→ C
© 2019-2026 Copyright www.auq3.net | 0.0122
