Audi Q3: Horn
Overview - Horn
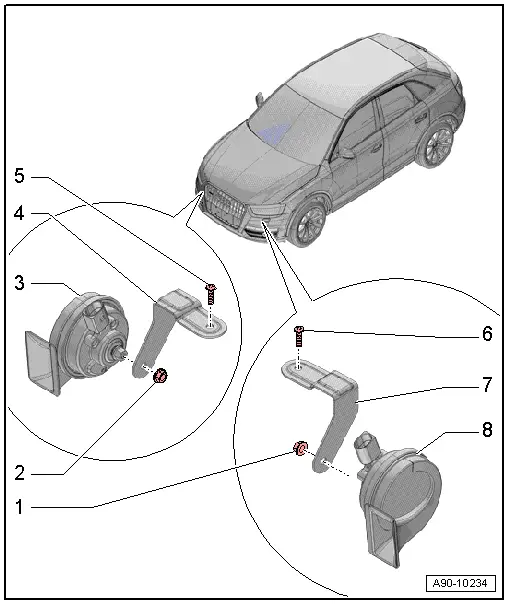
1 - Nut
- 9 Nm
2 - Nut
- 9 Nm
3 - Low Tone Horn -H7-
- Removing and installing. Refer to → Chapter "High Tone Horn -H2-/Low Tone Horn -H7-, Removing and Installing".
4 - Bracket
- For the right horn
5 - Bolt
- 20 Nm
6 - Bolt
- 20 Nm
7 - Bracket
- For the left horn
8 - High Tone Horn -H2-
- Removing and installing. Refer to → Chapter "High Tone Horn -H2-/Low Tone Horn -H7-, Removing and Installing".
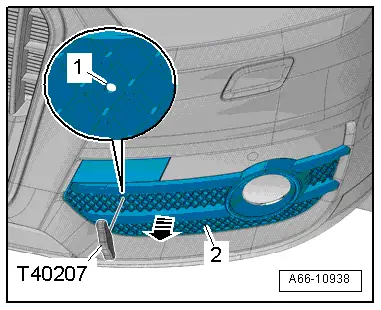
High Tone Horn -H2-/Low Tone Horn -H7-, Removing and Installing
High/Low Tone -H2-/-H7-, Removing and Installing, through MY 2014
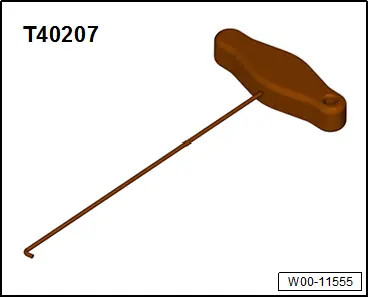
Special tools and workshop equipment required
- Hook Tool -T40207-
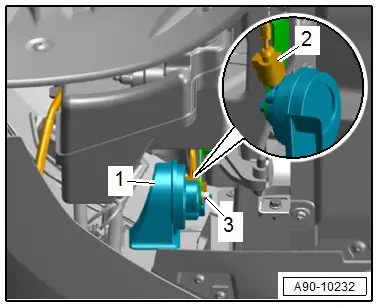
Removing
- Insert the Hook Tool -T40207- in the opening -1- and remove the lower air intake grille -2- from the bumper cover in direction of -arrow-.
- Remove the nut -1-.
- Remove the horn -3- from the bracket.
- Disconnect the connector -2-.
Installing
Install in reverse order of removal.

High/Low Tone -H2-/-H7-, Removing and Installing, from MY 2015
Removing
- Remove the wheel spoiler. Refer to → Body Exterior; Rep. Gr.66; Wheel Housing Liner; Front Wheel Housing Liner, Removing and Installing.
- Remove the nut -3-.
- Remove the horn -1- from the bracket.
- Disconnect the connector -2-.
Installing
Install in reverse order of removal.
Special Tools
Special tools and workshop equipment required
- Hook Tool -T40207-
READ NEXT:
 Windshield Wiper System
Overview - Windshield Wiper System
Overview - Windshield Wiper System
1 - Bolt
Tightening sequence. Refer to → Fig. " Windshield Wiper
Motor -V- - Tightening Specification
Windshield Wiper Arms, Removing and Installing
Special tools and workshop equipment
required
Puller - Wiper Arm Kit -T10369-
Removing
Note
If the windshield wiper motor is to be run during the work
procedure, the hood must beSEE MORE:
Rear Brake Caliper
Overview - Rear Brake Caliper
1 - Brake Caliper
Pre-bleed brake caliper after repairing, refer to
→ Chapter "Hydraulic System, Pre-Bleeding".
2 - Bolt
35 Nm
Replacing
Self-locking
When loosening and tightening, counter-hold at guide pin
3
Disposal
Front Shock Absorbers, Venting and Emptying
Method A - Venting through Drill Holes
- Secure gas-filled shock absorber vertically in vise, with
piston rod facing down.
WARNING
Wear protective eyewear while drilling.
Note
Gas escapes when drilling.
- Drill a 3 mm 