Audi Q3: Headrest, Removing and Installing
 Note
Note
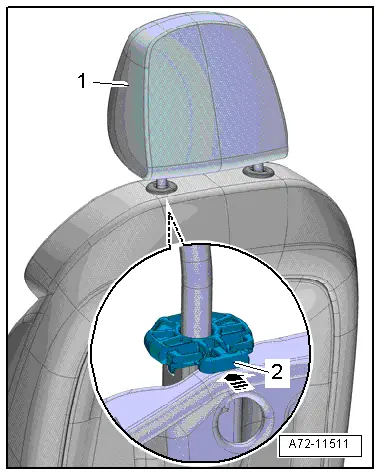
The headrests can be removed with the front seats installed.
Removing
- Move the front seat forward into the lowest position and tilt backrests approximately 45Âş.
 Note
Note
The release button is located on the outer left of the driver seat and inner left of the passenger seat.
- Search for release button pressure point -2- under the seat cover.
- The release button is approximately 35 mm below the upper edge of the backrest.
- Press release button -arrow- and simultaneously pull out headrest -1-.
Installing
Install in reverse order of removal. Note the following:
Installation notes, for example tightening specifications, replacing components. Refer to → Chapter "Overview - Headrest".
Headrest Guide, Removing and Installing
Removing
 WARNING
- Follow all safety precautions when working with pyrotechnic components. Refer to → Chapter "Pyrotechnic Components Safety Precautions".
- Before handling pyrotechnic components (for example, disconnecting the connector), the person handling it must "discharge static electricity". This can be done by touching the door striker, for example.
- Remove the front seat. Refer to → Chapter "Front Seat, Removing and Installing".
- Fasten the front seat on the Engine/Transmission Holder - Seat Repair Fixture -VAS6136-. Refer to → Chapter "Front Seat, Mounting on Fixture for Seat Repair".
- Remove the backrest cover with the backrest cushion. Refer to → Chapter "Backrest Cover and Cushion, Removing and Installing".
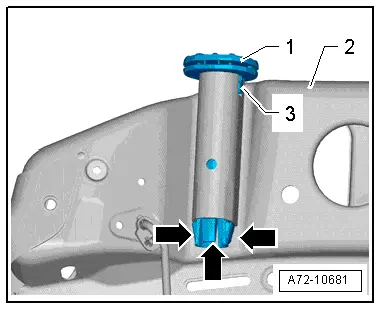
Right Headrest Guide:
- Press retaining tabs in -arrows- and simultaneously pull the headrest guide -1- out of the backrest frame -2-.
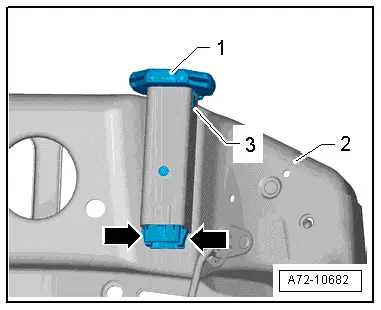
Left Headrest Guide:
- Press in retaining tab -arrows- and simultaneously pull headrest guide -1- out of the backrest frame -2-.
Installing
 Note
Note
- The headrest guide can only be inserted in one position.
- The guide tab -3- on the headrest guide must engage in cut-out of mount on the backrest frame.
- Make sure the retaining tab(s) engage(s) correctly in backrest frame.
 WARNING
- Follow all safety precautions when working with pyrotechnic components. Refer to → Chapter "Pyrotechnic Components Safety Precautions".
- Before handling pyrotechnic components (for example, connecting the connector), the person handling it must "discharge static electricity". This can be done by touching the door striker, for example.
- Observe all measures when installing the front seat. Refer to → Chapter "Front Seat, Removing and Installing".
Install in reverse order of removal.
Installation notes, for example tightening specifications, replacing components. Refer to → Chapter "Overview - Headrest".
READ NEXT:
 Modular Wiring Routing with Corrugated Tube
Opening the corrugated tube and removing the individual wire
WARNING
Follow all safety precautions when working with
pyrotechnic components. Refer to
→ Chapter "Pyrotechnic C
Seat Side Trim on the Tunnel Side, Removing and Installing
Removing
WARNING
Follow all safety precautions when working with
pyrotechnic components. Refer to
→ Chapter "Pyrotechnic Components Safety Precautions".
Before handling pyr
Seat Depth Adjuster, Removing and Installing
Special tools and workshop equipment
required
Trim Removal Wedge -3409-
Removing
WARNING
Follow all safety precautions when working with
pyrotechnic components. Refer to
â†SEE MORE:
Overview - Front Seat
Overview - Front Seat, Manual Standard Seat/Sport Seat
1 - Seat Angle Adjuster
Only for Sport seats
Overview. Refer to
→ Chapter "Overview - Seat Pan, Seat Angle Adjuster".
Removing and installing. Refer to
→ Chapter "Seat Angle Adjuster, Removing and Installin
Connector Assignments, Cell Phone Preparation Concert MOST, 9ZF
Information Electronics Control Module 1 -J794-
1 - Connector AM/FM1 from the Antenna Amplifier -R24- (Radio
Antenna 2 -R93-)
2 - DAB connection from Antenna Amplifier 4 -R113-, Digital
Radio Antenna -R183-
3 - Not installed
4 - Black connection block 