Audi Q3: Generator, Checking
Perform Generator Test
Vehicle Diagnostic Tester is attached.
- Select the Diagnostic mode and start the diagnostics.
- Select the tab Test Plan.
- Select Select Individual Tests and choose the following sequence.
- Body
- Electrical Equipment
- 27 - Starter, voltage supply
- Electrical Components
- C - Generator, Checking
The Vehicle Diagnostic Tester continues with the generator test from here on.
Overview - Generator, Bosch through MY 2000
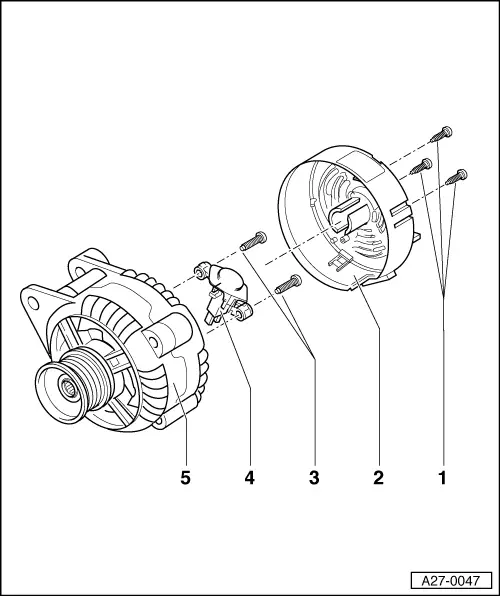
1 - Bolts
- 1 Nm
2 - Cover
- With three tabs
3 - Bolts
- 2 Nm
4 - Voltage Regulator
- Removing:
- Remove the bolts -1- and remove the protective cap -2-.
- Remove the bolts -3- and remove the voltage regulator.
- Carbon brushes wear limit: 5 mm
5 - Generator
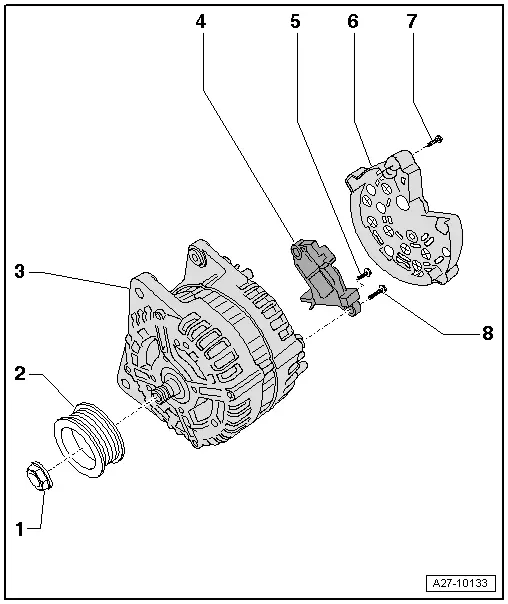
Overview - Bosch Generator from 2001
 Note
Note
The generators were implemented as a running change.
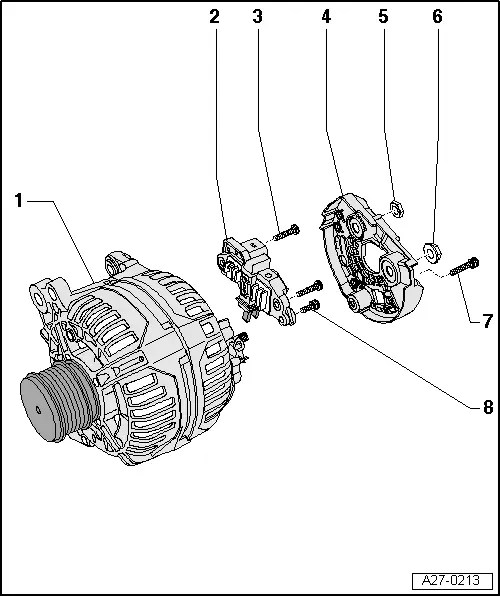
1 - Generator
2 - Voltage Regulator
- Removing and installing. Refer to → Chapter "Voltage Regulator, Bosch Generator from 2001, Removing and Installing".
- Carbon brushes, checking. Refer to → Chapter "Carbon Brushes, Checking, All Bosch Generators from 2001"
3 - Bolt
- 2.5 Nm
4 - Cover
5 - Nut
- 12 Nm
6 - Nut
- 30 Nm
7 - Bolt
- 3 Nm
8 - Bolt
- 1.5 Nm
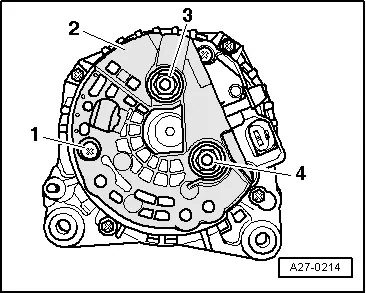
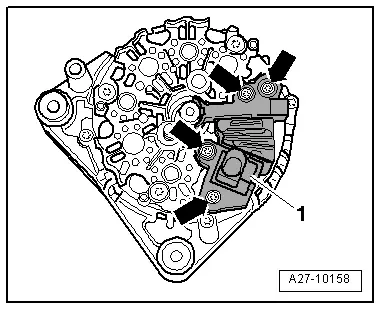
Voltage Regulator, Bosch Generator from 2001, Removing and Installing
Removing
- Remove the generator. Refer to → Electrical Equipment; Rep. Gr.27; Generator; Generator, Removing and Installing.
- Remove the bolt -1- and the nuts -3- and -4-.
- Remove the cover -2- on the rear side of the generator.
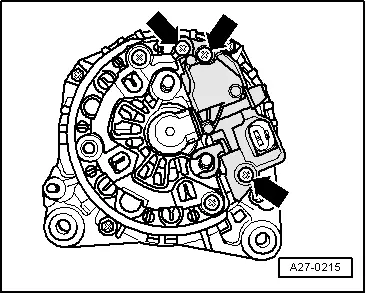
- Remove the bolts -arrows-.
- Remove voltage regulator.
Installing
- When installing the voltage regulator, make sure the carbon brushes rest correctly on the slip rings.
Install in reverse order of removal, observing the following:
- Install the generator. Refer to → Electrical Equipment; Rep. Gr.27; Generator; Generator, Removing and Installing.
Overview - Bosch Generator from 2007
 Note
Note
The new generators are installed as a running change.
1 - Nut
- 65 Nm
2 - Ribbed Belt Pulley
3 - Generator
4 - Voltage Regulator
- Removing and installing. Refer to → Chapter "Voltage Regulator, Removing and Installing, Bosch Generator from 2007".
- Carbon brushes, checking. Refer to → Chapter "Carbon Brushes, Checking, All Bosch Generators from 2001"
5 - Bolt
- 1.5 Nm
6 - Cover
7 - Bolt
- 3 Nm
8 - Bolt
- 2.5 Nm
Voltage Regulator, Removing and Installing, Bosch Generator from 2007
Removing
- Remove the generator. Refer to → Electrical Equipment; Rep. Gr.27; Generator; Generator, Removing and Installing.
- Remove the bolts -arrows-.
- Remove the cover -1- on the rear side of the generator.

- Remove the bolts -arrows-.
- Remove voltage regulator -1-.
Installing
- When installing the voltage regulator, make sure the carbon brushes rest correctly on the slip rings.
Install in reverse order of removal, observing the following:
- Install the generator. Refer to → Electrical Equipment; Rep. Gr.27; Generator; Generator, Removing and Installing.
Carbon Brushes, Checking, All Bosch Generators from 2001
Procedure
- Remove the voltage regulator: to 2007. Refer to → Chapter "Voltage Regulator, Bosch Generator from 2001, Removing and Installing", after 2007 → Chapter "Voltage Regulator, Removing and Installing, Bosch Generator from 2007".
- Check the length -a- of the carbon brushes.
- Wear limit: -a- = 5 mm.
- Install the voltage regulator: to 2007. Refer to → Chapter "Voltage Regulator, Bosch Generator from 2001, Removing and Installing", after 2007 → Chapter "Voltage Regulator, Removing and Installing, Bosch Generator from 2007".

READ NEXT:
 Overview - Generator, Valeo through MY 2000
1 - Generator
2 - Voltage Regulator
Removing:
Remove the nuts -5- and the cover
-4-.
Remove the bolt -6- and the nuts
-7- and remove the voltage regulator.
C
Voltage Regulator, Valeo Generator from 2001, Removing and Installing
Removing
- Remove the generator. Refer to
→ Electrical Equipment; Rep. Gr.27; Generator; Generator,
Removing and Installing.
- Press the cover on the rear side of the
Ribbed Belt Pulley without Freewheel, Removing and Installing
Special tools and workshop equipment
required
Generator Belt Socket -3310-
Inner hex socket 8 mm or TORX
T50
Removing
- Remove the generator if necessary. Refer to
→ ElectriSEE MORE:
Snow chains
Snow chains improve both driving and braking in
winter road conditions.
Only install snow chains on the front wheels.
Check and correct the seating of the snow
chains after driving a few feet, if necessary. Follow
the instructions from the manufacturer.
Note the maximum speed of 30 mph
(50 km
Luggage Compartment Side Trim Panel, Removing and Installing
Special tools and workshop equipment
required
Pry Lever -80-200-
Omega Clip Tool -T40280-
Removing
- If installed, remove the luggage compartment roller cover.
- Remove the rear seat backrest. Refer to
→ Chapter "Rear Seat Backrest, Removing and Installing".
- V