Audi Q3: Overview - Generator, Valeo through MY 2000
Electrical Equipment General Information / Electrical System / Audi Q3 (8U) 2011-2018 Service Manual / Overview - Generator, Valeo through MY 2000
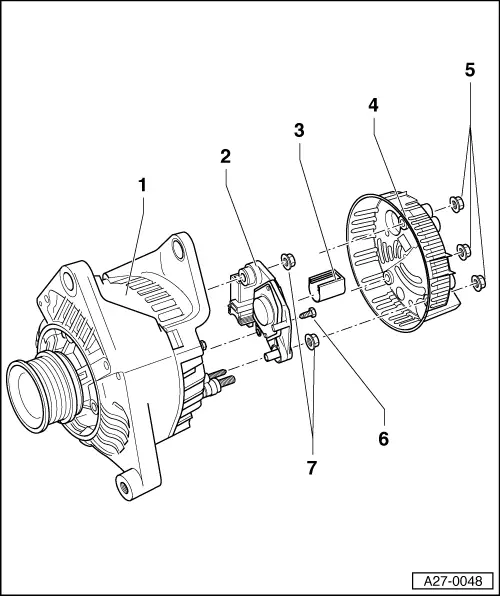
1 - Generator
2 - Voltage Regulator
- Removing:
- Remove the nuts -5- and the cover -4-.
- Remove the bolt -6- and the nuts -7- and remove the voltage regulator.
- Carbon brushes wear limit: 5 mm
3 - Protective Cap
4 - Cover
5 - Nut
- 2 Nm
6 - Bolt
- 2 Nm
7 - Nut
- 3.5 Nm
- Quantity: 2
Overview - Valeo Generator from 2001
 Note
Note
The generators were implemented as a running change.
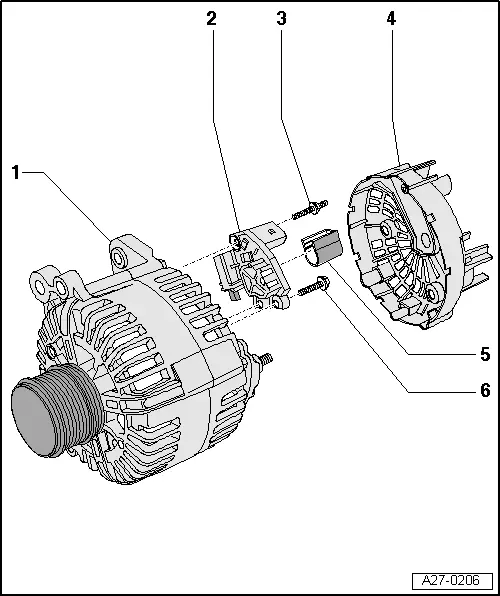
1 - Generator
2 - Voltage Regulator
- Removing and installing: to 2007. Refer to → Chapter "Voltage Regulator, Valeo Generator from 2001, Removing and Installing", after 2007 → Chapter "Voltage Regulator, Removing and Installing, Valeo Generator from 2007"
- Check the carbon brushes: to 2007. Refer to → Chapter "Carbon Brushes, Valeo Generator from 2001, Checking", after 2007 → Chapter "Carbon Brushes, Checking, Valeo Generator from 2007"
3 - Bolt
- 2 Nm
4 - Cover
5 - Protective Cap
6 - Bolt
- 2 Nm
READ NEXT:
 Voltage Regulator, Valeo Generator from 2001, Removing and Installing
Removing
- Remove the generator. Refer to
→ Electrical Equipment; Rep. Gr.27; Generator; Generator,
Removing and Installing.
- Press the cover on the rear side of the
Ribbed Belt Pulley without Freewheel, Removing and Installing
Special tools and workshop equipment
required
Generator Belt Socket -3310-
Inner hex socket 8 mm or TORX
T50
Removing
- Remove the generator if necessary. Refer to
→ Electri
Windshield Wiper/Washer System
Washer Fluid Hoses
Washer Fluid Line Hose Connections, Disconnecting and Connecting
Various hose couplings are used to connect the hoses to the
washer fluid pumps and spray jets or as coupling poiSEE MORE:
Glossary of tire and loading
terminology
Accessory weight
means the combined weight (in
excess of those standard items
which may be replaced) of automatic
transmission, power steering,
power brakes, power windows,
power seats, radio, and
heater, to the extent that these
items are available as factory-installed
equipment (whether installed
Sunroof Seals, Removing and Installing
Installing the Panel Seal
Note
Spray the seal with soapy solution to make the installation
easier.
- Align the seal in the center to the panel and push it into
the both front guides.
- Press the seal -1- into the
guides on the panel -2-.
- Only remove the seal -3
© 2019-2026 Copyright www.auq3.net | 0.0101
