Audi Q3: Front Brake Caliper Balance Weight
Audi Q3 (8U) 2011-2018 Service Manual / Chassis / Brake System / Mechanical Components / Front Brake Caliper Balance Weight
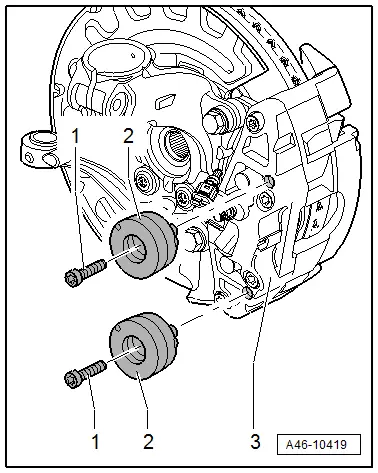
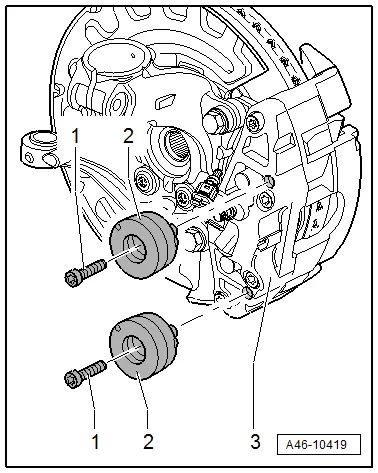
Depending on the model for each brake caliper two vibration dampers are installed.

1 - Bolt
- 10 Nm
- Replace after each removal.
2 - Vibration Damper
- Installed 2 on each brake caliper
- Removing and installing, refer to → Chapter "Damper, Removing and Installing"
3 - Brake Caliper
Damper, Removing and Installing
Installed 2 on Each Brake Caliper
Removing
- Remove the existing dust cap.
- Remove the bolt -1-.
- Remove the vibration damper -2- from the brake caliper -3-.
Installing
Installed 2 on Each Brake Caliper
- Clean the brake caliper around the balance weight.
- Install the damper -2- in the brake caliper.
- Install the new bolt and tighten -item 1-.
- Replace the existing dust cap.

READ NEXT:
 Front Brake Pads, Removing and Installing
Brake Pads, Removing and Installing, 1LJ, 1ZD Brakes
If old brake pads are being replaced with new ones, then it is necessary
to check the brake rotor thickness for wear. Pay attention to the wear
 Front Brake Caliper, Removing and Installing
Brake Caliper, Removing and Installing, 1LJ, 1ZD Brakes
Note
In the following description the brake caliper is removed
with the brake carrier and pads. The brake hose remains
connected.
 Front Brake Caliper, Replacing
Brake Caliper, Replacing,1LJ, 1 ZD Brakes
Note
In the following description the brake caliper is removed
and replaced. The brake hose is removed.
Special tools and workshop equipment
r
SEE MORE:
 Seat Pan Cover and Cushion, Removing and Installing
Seat Pan Cover and Padding, Removing and Installing, Standard/Folding
Seat
Special tools and workshop equipment
required
Backrest Panel Tool -3370-
Removing
WARNING
Follow all safety precautions when working with
pyrotechnic components. Refer to
→ Chapter "Pyrot
 RSQ3 Spoiler-Lower Section, Removing and Installing
Removing
- Remove the lower radiator grille. Refer to
→ Chapter "Radiator Grille, Removing and Installing, Audi RS Q3
through MY 2014".
- Remove the bolt -arrow-.
- Release the catches -1- and
remove the spoiler lower section -3-
forward from the bumper cover -2-.
© 2019-2026 Copyright www.auq3.net

