Audi Q3: Floor Heat Shield, Removing and Installing
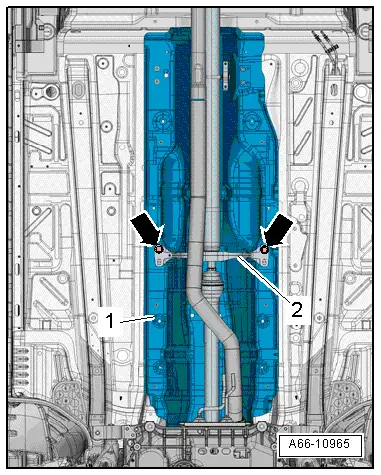
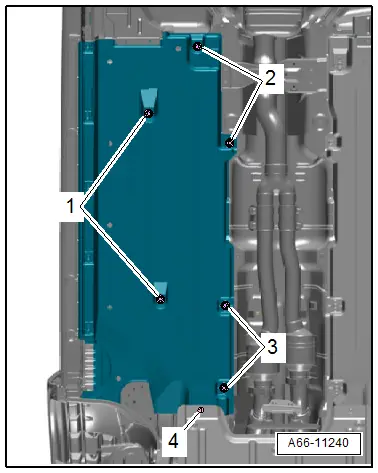
Center Tunnel Heat Shield, Removing and Installing
Removing
- Remove the left and right underbody cover. Refer to → Chapter "Underbody Panels, Removing and Installing".
- Remove the driveshaft heat shield. Refer to → Chapter "Driveshaft Heat Shield, Removing and Installing".
- Vehicles with a gasoline engine: Disconnect the connector -arrow- for the Oxygen Sensor after Three Way Catalytic Converter -G130- and the right Heater for Oxygen Sensor 1 after Catalytic Converter -Z29- on the underbody.
- Remove the connector from the bracket and free up the wiring harness from the heat shield.
- Remove the crossbrace. Refer to → Chapter "Tunnel Bridge, Removing and Installing".
- Removes the bolt -arrows- on the driveshaft center support -2-.
- Remove the driveshaft from the rear final drive. Refer to → Rear Final Drive; Rep. Gr.39; Propshaft; Propshaft, Removing and Installing.
- Remove the heat shield -1- toward the left rear.
Installing
Install in reverse order of removal. Note the following:
- Install the driveshaft. Refer to → Rear Final Drive; Rep. Gr.39; Propshaft; Propshaft, Removing and Installing.
- Install the driveshaft heat shield → Chapter "Driveshaft Heat Shield, Removing and Installing".

Center Tunnel Heat Shield, Removing and Installing, Audi RS Q3
Removing
- Remove the left and right underbody cover. Refer to → Chapter "Underbody Panels, Removing and Installing".
- Remove the driveshaft heat shield. Refer to → Chapter "Driveshaft Heat Shield, Removing and Installing".
- Remove the exhaust system. Refer to → Rep. Gr.26; Exhaust Pipes/Mufflers; Muffler, Removing and Installing.
- Remove the crossbrace. Refer to → Chapter "Tunnel Bridge, Removing and Installing".
- Removes the bolt -arrows- on the driveshaft center support -2-.
- Remove the driveshaft from the rear final drive. Refer to → Rear Final Drive; Rep. Gr.39; Propshaft; Propshaft, Removing and Installing.
- Remove the heat shield -1- to the rear.
Installing
Install in reverse order of removal. Note the following:
- Install the driveshaft. Refer to → Rear Final Drive; Rep. Gr.39; Propshaft; Propshaft, Removing and Installing.
- Install the exhaust system. Refer to → Rep. Gr.26; Exhaust Pipes/Mufflers; Muffler, Removing and Installing.
- Install the driveshaft heat shield. Refer to → Chapter "Driveshaft Heat Shield, Removing and Installing".
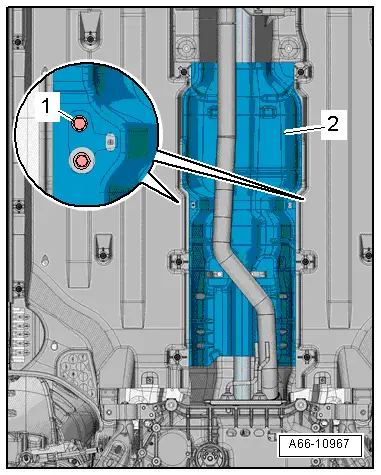
Driveshaft Heat Shield, Removing and Installing
Removing
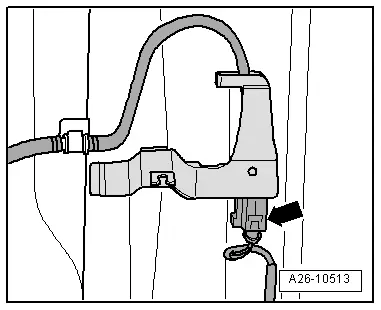
- Open the quick release -1-.
- Remove the nuts -2 and 3-.
 Caution
The decoupling elements in the front muffler could be damaged.
Do not bend decoupling element in front muffler more than 10º.
- Loosen the nuts -arrows-, push the clamping sleeve rearward and let the exhaust pipe hang.
- Remove the bolts -1-.
- Remove the heat shield -2- in rearward in the direction of travel.
Installing
Install in reverse order of removal. Note the following:
- Install the exhaust system. Refer to → Rep. Gr.26; Exhaust Pipes and Mufflers; Overview - Muffler.
- Install the underbody cover. Refer to → Chapter "Underbody Panels, Removing and Installing".

Driveshaft Heat Shield, Removing and Installing, Audi RS Q3
Removing
- Remove the left and right catalytic converter. Refer to → Rep. Gr.26; Emissions Control; Catalytic Converter, Removing and Installing.
- Loosen the quick-release fastener -4-.
- Remove the nuts -1, 2 and 3-.
- Remove the bolts -1-.
- Remove the heat shield -2- in forward in the direction of travel.
Installing
Install in reverse order of removal. Note the following:
- Install the catalytic converter. Refer to → Rep. Gr.26; Emissions Control; Catalytic Converter, Removing and Installing.
- Install the underbody cover. Refer to → Chapter "Underbody Panels, Removing and Installing".
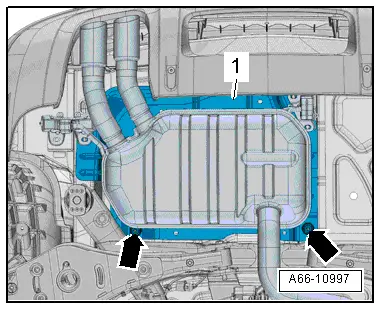
Rear Muffler Heat Shield, Removing and Installing
Removing
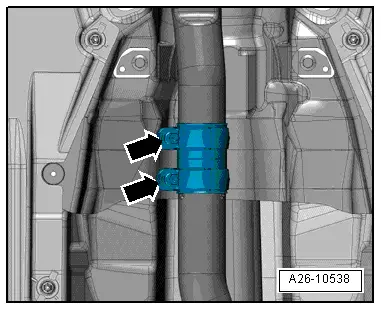
- Loosen the rear muffler mounts. Refer to → Rep. Gr.26; Exhaust Pipes/Mufflers; Overview - Muffler.
- Remove the nuts -arrows-.
- Remove the heat shield -1- to the right.
Installing
Install in reverse order of removal. Note the following:
- Install the rear muffler. Refer to → Rep. Gr.26; Exhaust Pipes/Mufflers; Overview - Muffler.
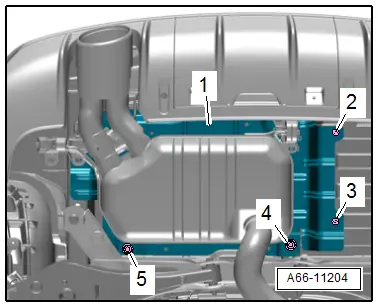
Rear Muffler Heat Shield, Removing and Installing, Audi RS Q3
Removing
- Loosen the rear muffler mounts. Refer to → Rep. Gr.26; Exhaust Pipes/Mufflers; Overview - Muffler.
- Remove the bolts -2 and 3- and nuts -4 and 5-.
- Remove the heat shield -1-.
Installing
Install in reverse order of removal. Note the following:
- Install the rear muffler. Refer to → Rep. Gr.26; Exhaust Pipes/Mufflers; Overview - Muffler.
READ NEXT:
 Noise Insulation
Overview - Noise Insulation
1 - Bolt
2.5 Nm
Quantity: 3
2 - Front Noise Insulation
For the engine
Removing and installing. Refer to
→ Chapter "Noise Insu
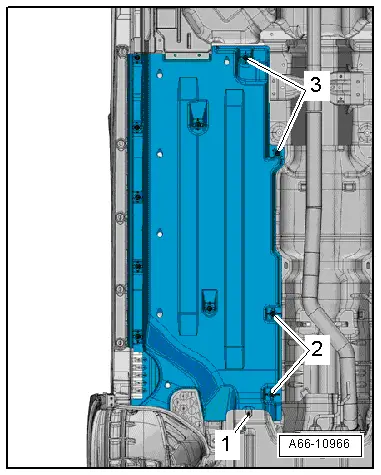
Underbody Panel
Overview - Underbody Panels
1 - Nut
2 Nm
Quantity: 11
2 - Spring Nut
For the quick release
3 - Underbody Panel
Removing and installing. Refer to
Roof Bars/Roof Rails
Overview - Roof Railing
1 - Nut
Quantity: 4
Install with locking compound. For the correct locking compound,
refer to the Parts Catalog.
Tightening sequence. Refer to
→ SEE MORE:
Windshield wipers
Switching the windshield wipers on
Fig. 44 Lever: windshield wipers
Fig. 45 Lever: rear window wiper
Move the lever to the
corresponding position:
0 - Windshield wipers off
1 - Rain sensor/intermittent mode. The windshield
wipers switch on once the vehicle speed
exceeds approximately 2 mph (4 km
Driver intervention request
Applies to: vehicles with adaptive cruise assist
Fig. 105 Instrument cluster: request for driver intervention
The request for driver intervention instructs you
to resume manual control of the vehicle if the
adaptive cruise assist braking function is not able
to maintain a sufficient distance to the