Audi Q3: Control Module/Digital Sound System Amplifier, Removing and Installing
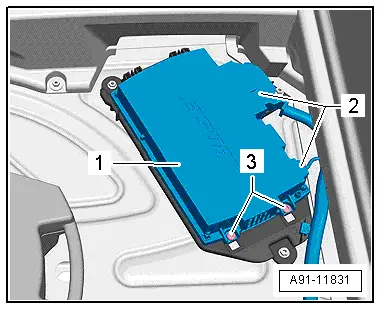
The Digital Sound System Control Module -J525- in the right rear of the luggage compartment under the luggage compartment floor covering.
 Note
Note
If replacing the control module, select the "Replace control module" function for the corresponding control module on the Vehicle Diagnostic Tester.
Special tools and workshop equipment required
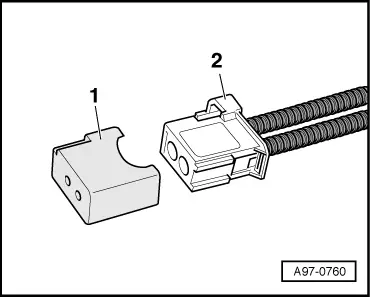
- Fiber-Optic Repair Set - Connector Protective Caps -VAS6223/9-.
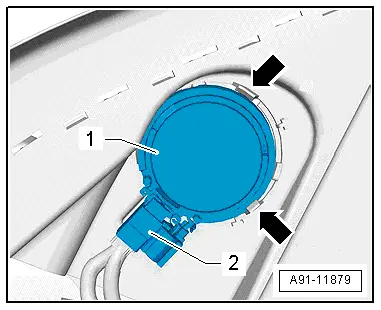
Removing
- Turn off the ignition and all electrical equipment and remove the ignition key.
- Remove the luggage compartment floor covering.
- Disconnect the connectors -2- from the Digital Sound System Control Module -J525--1-.

- Insert the Fiber-Optic Repair Set - Connector Protective Caps -VAS6223/9--1- onto the MOST bus connector -2-.
- Remove the screws -3- and pivot out the Digital Sound System Control Module -J525--1- from the bracket.
Installing
- Install in reverse order of removal.
Left/Right Rear Treble Speaker -R14-/-R16-, Removing and Installing
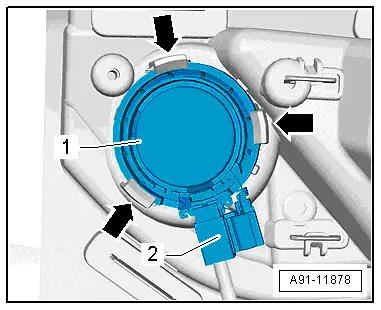
The Left Rear Treble Speaker -R14-/Right Rear Treble Speaker -R16--1- are inside the rear doors at the top.
Removing and installing is identical.
Removing
- Turn off the ignition and all electrical equipment and remove the ignition key.
- Remove the rear door trim panel. Refer to → Body Interior; Rep. Gr.70; Rear Door Trim Panels; Rear Door Trim Panel, Removing and Installing.
The Left Rear Treble Speaker -R14- is clipped into the door trim panel.

- Release and disconnect the connector -2- from the Left Rear Treble Speaker -R14--1-.
- Press the tabs in the direction of the -arrow- until the Left Rear Treble Speaker -R14--1- can be removed from the door trim panel.
Installing
- Install in reverse order of removal.
Left/Right Front Treble Speaker -R20-/-R22-, Removing and Installing
The Left Front Treble Speaker -R20-/Right Front Treble Speaker -R22--1- are located in the top of the front doors.
Removing and installing is identical.
Removing
- Turn off the ignition and all electrical equipment and remove the ignition key.
- Remove the front door trim panel. Refer to → Body Interior; Rep. Gr.70; Front Door Trim Panels; Front Door Trim Panel, Removing and Installing.
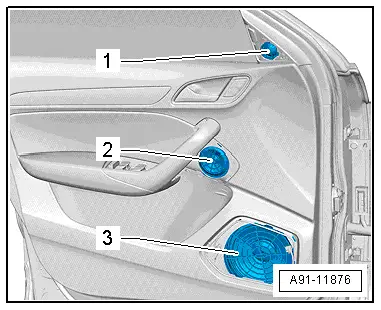
- Release and disconnect the connector -2- from the Left Front Treble Speaker -R20--1-.
- Press the tabs in the direction of the -arrow- until the Left Front Treble Speaker -R20--1- can be removed from the door trim panel.
Installing
- Install in reverse order of removal.
READ NEXT:
 Front Midrange Speaker, Removing and Installing
Mid Bass Speaker/Front Bass Speaker, Removing and Installing
The Left Front Mid-Bass Speaker -R101-/Right Front Mid-Bass
Speaker - R102-/Left Front Bass Speaker -R21-/Right Front Bass
Speaker -R2
Overview - Antenna Systems
The antenna system consists of the Roof Antenna -R216- and
the window antenna.
Roof Antenna -R216-
GPS Antenna -R50-, only on 7T2, 7T6 and 7Q4
Telephone Antenna -R65-, only on 9ZF and 9ZW
SSEE MORE:
Speed warning system
Description
Applies to: vehicles with speed warning system
The speed warning system helps the driver to
stay below a specified maximum speed. A warning
threshold can be set in the MMI for this purpose.
Once the speed slightly exceeds the stored
threshold, the speed warning system will alert
the dri
Refueling
Messages
The following messages may appear depending
on the vehicle equipment:
Messages
If the indicator light appears
with a corresponding
message, refuel the vehicle.
Tank system: malfunction!
Please contact
Service
There is a malfunction in the fuel tank system.
Drive to an authorized Audi d