Audi Q3: Component Location Overview - Seat Belts and Attaching Points
Body Interior / Body / Audi Q3 (8U) 2011-2018 Service Manual / Component Location Overview - Seat Belts and Attaching Points
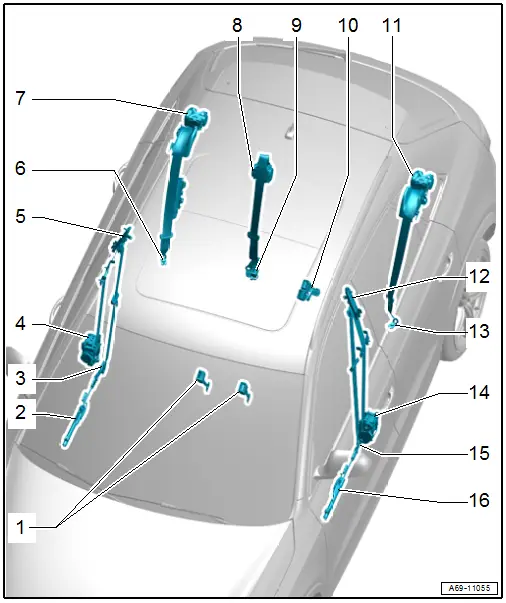
1 - Front Seat Belt Latch
- Overview. Refer to → Chapter "Overview - Front Seat Belt Latch".
2 - Front Passenger Seat Belt Tensioner Igniter 2 -N298-
- Only USA and Canada market
- Overview. Refer to → Chapter "Overview - Front Three-Point Seat Belt, USA and Canada Market".
3 - Front Belt End Fitting
- Overview. Refer to → Chapter "Overview - Front Three-Point Seat Belt".
4 - Automatic Belt Retractor
- For the front three-point seat belt
- With Front Passenger Seat Belt Tensioner Igniter 1 -N154-
- USA and Canada market-specific with Front Passenger Seat Belt Tensioner Igniter 1 -N154-, Front Passenger Belt Force Limiter -G552-
- Overview. Refer to → Chapter "Overview - Front Three-Point Seat Belt".
5 - Seat Belt Height Adjuster
- Overview. Refer to → Chapter "Overview - Front Three-Point Seat Belt".
6 - Outer rear belt end fitting
- Overview. Refer to → Chapter "Overview - Rear Outer Three-Point Seat Belt".
7 - Automatic Belt Retractor
- For rear outer three-point seat belt
- USA and Canada market-specific with Passenger Side Rear Seat Belt Tensioner Igniter -N197-
- Overview. Refer to → Chapter "Overview - Rear Outer Three-Point Seat Belt".
8 - Automatic Belt Retractor
- For the rear three-point seat belt in the center
- Overview. Refer to → Chapter "Overview - Rear Center Three-Point Seat Belt".
9 - Rear Seat Belt Latch/Rear Center Belt End Fitting:
- Overview. Refer to → Chapter "Overview - Rear Seat Belt Latch".
10 - Rear Seat Belt Latch
- Overview. Refer to → Chapter "Overview - Rear Seat Belt Latch".
11 - Automatic Belt Retractor
- For rear outer three-point seat belt
- USA and Canada market-specific with Driver Side Rear Seat Belt Tensioner Igniter -N196-
- Overview. Refer to → Chapter "Overview - Rear Outer Three-Point Seat Belt".
12 - Seat Belt Height Adjuster
- Overview. Refer to → Chapter "Overview - Front Three-Point Seat Belt".
13 - Outer Rear Belt End Fitting
- Overview. Refer to → Chapter "Overview - Rear Outer Three-Point Seat Belt".
14 - Automatic Belt Retractor
- For the front three-point seat belt
- With Driver Seat Belt Tensioner Igniter 1 -N153-
- USA and Canada market-specific with Driver Seat Belt Tensioner Igniter 1 -N153-, Driver Belt Force Limiter -G551-
- Overview. Refer to → Chapter "Overview - Front Three-Point Seat Belt".
15 - Front Belt End Fitting
- Overview. Refer to → Chapter "Overview - Front Three-Point Seat Belt".
16 - Driver Seat Belt Tensioner Igniter 2 -N297-
- Only USA and Canada market
- Overview. Refer to → Chapter "Overview - Front Three-Point Seat Belt, USA and Canada Market".
READ NEXT:
 Overview - Front Three-Point Seat Belt
Overview - Front Three-Point Seat Belt, USA and Canada Market
1 - Belt End Fitting Cover
Removing and installing. Refer to
→ Chapter "Front Belt End Fitting, Removing and Ins
Overview - Rear Outer Three-Point Seat Belt
1 - Belt Guide
Caution
Do not rotate bolts under any circumstances when removing
and installing belt guide. They are set by the manufacturer.
Replace the entire belt gui
Front Three-Point Seat Belt, Removing and Installing
Front Three-Point Seat Belt, Removing and Installing
Removing
WARNING
Follow all safety precautions when working with
pyrotechnic components. Refer to
→ Chapter "PyrotechnicSEE MORE:
Audi connect Infotainment services
Configuration
Applies to: vehicles with Audi connect Infotainment
Some Audi connect Infotainment services must
be configured through your personal myAudi account
at my.audi.com before using them for the first time.
Tips
A myAudi user must be logged in for some
Audi connect Infotainment services.
Options and settings
Options
Requirement: the playback view 1
fig. 138 must be displayed.
Press More 18, or
Requirement: a list with radio stations or podcasts
must be displayed fig. 136.
Press and hold an entry in the list until the Options
menu appears.
Depending on the selected source and vehicle
equipment,
© 2019-2026 Copyright www.auq3.net | 0.0105
