
Audi Q3: Battery Jump Start Terminal
Overview - Battery Jump Start Terminal
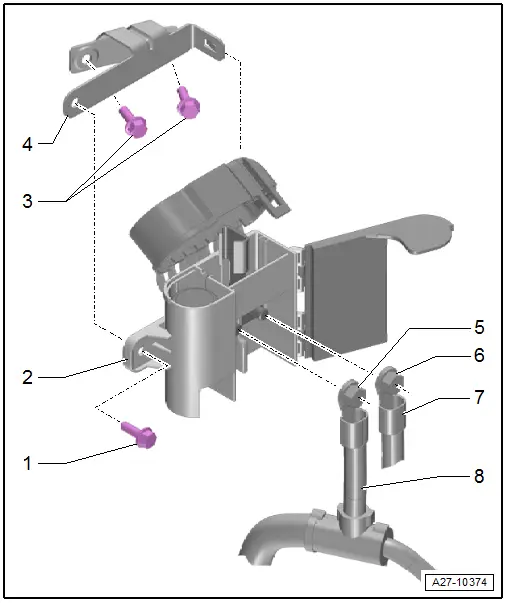
1 - Bolt
- 6 Nm
2 - Battery Jump Start Terminal -U6-
- With positive terminal grip
- Removing and installing. Refer to → Chapter "Jump Start Point, Removing and Installing".
3 - Bolts
- 8 Nm
4 - Mount
- For Battery Jump Start Terminal -U6-
5 - Nut
- 15 Nm
6 - Nut
- 15 Nm
7 - Positive Cable
- E-Box
8 - Positive Cable
- Battery
Jump Start Point, Removing and Installing
Removing
- With the ignition switched off, disconnect the ground cable from the battery. Refer to → Chapter "Battery in Luggage Compartment, Disconnecting and Connecting".
- Remove the air filter housing. Refer to → Rep. Gr.24; Air Filter; Air Filter Housing, Removing and Installing.
- Release the catch -5- and open the cover -4-.
- Unlock the door -3- and swivel it to the side in direction of -arrow-.
- Remove the nut -2- and set aside the wire -1-.
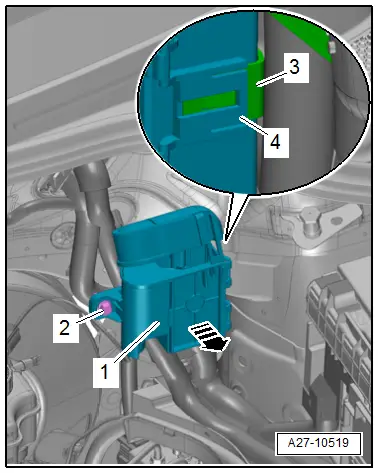
- Remove the bolt -2-.
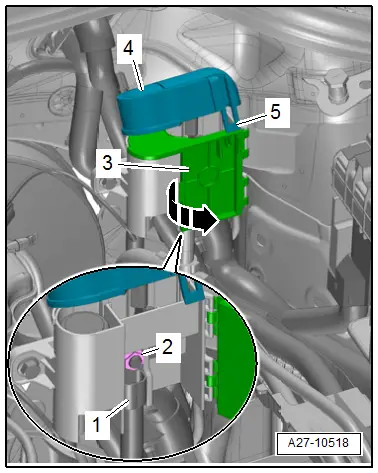
- Release the catch -4- and remove the battery jump start terminal -1- forward from the mount -3--arrow-.
Installing
Install in reverse order of removal.
READ NEXT:
 Start/Stop System
Component Location Overview - Start/Stop System
1 - Bracket
For the Voltage Stabilizer -J532-
2 - Connector
3 - Voltage Stabilizer -J532-
Removing and inst
Instrument Cluster
Overview - Instrument Cluster
1 - Outside Air Temperature Sensor -G17-
Removing and installing. Refer to
→ Chapter "Outside Air Temperature Sensor, Removing and Installing".
SEE MORE:
Tire wear and damage
Fig. 155 Tire profile: treadwear indicator
Tire wear
Check the tires regularly for wear.
Inflation pressure that is too low
or high can increase tire wear
considerably.
Driving quickly through curves,
rapid acceleration, and heavy
braking increase tire wear.
Have an authorized Audi dealer
Release Cable, Removing and Installing
Release Cable Coupling
- Remove clips -1- and lift the release
cables -8- and -9-
on both sides toward the hood latches.
- To remove the coupling -2-, release the
retainers -arrows- on the front of the lock
carrier -3- and push them to the rear out
of the bracket.
- Eng