Audi Q3: Wheel Bolt Tightening Specifications
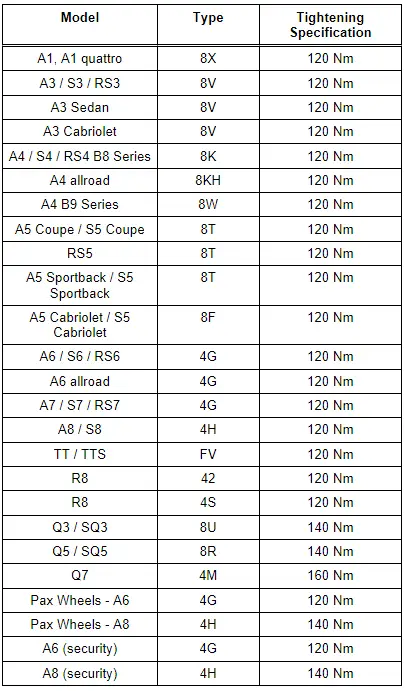
Wheel Bolt Tightening Specifications, Current Models
DANGER!
To ensure that the wheel bolts fit correctly, be sure to use the correct wheel bolts specified for the model. The wheel bolts for each model have different diameters on the surface of the ball running surface on the wheel rim and they have different lengths.
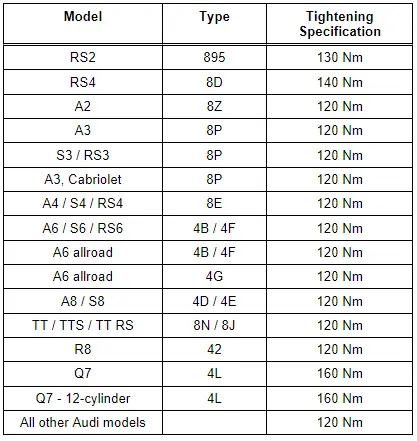
Wheel Bolt Tightening Specifications, Other Models
DANGER!
To ensure that the wheel bolts fit correctly, be sure to use the correct wheel bolts specified for the model. The wheel bolts for each model have different diameters on the surface of the ball running surface on the wheel rim and they have different lengths.
Wheel Bolts, Retightening
DANGER!
To ensure that the wheel bolts fit securely and correctly, be sure to use the correct wheel bolts specified for the model. Depending on the model, the wheel bolts have different diameters on the ball bearing surface for the rim and they have different lengths. Refer to Parts Catalog.
The correct wheel mounting procedure is described in this repair manual. Important notes for this are:
 Note
Note
Do "not" use an impact wrench to install the wheel bolts.
- Before mounting a wheel, carefully clean all rim contact surfaces for the wheel hub, the wheel hub and the surfaces for the wheel bolts on the rim.
- Before installing the wheel bolts, carefully clean the thread and the cap contact surfaces.
- Apply the Optimol Paste -G-052-109-A2-to the threads on the wheel bolts. Refer to Parts Catalog.
- Do "not" use an impact wrench to install the wheel bolts.
- Install all wheel bolts, until the wheel is securely fitted to the wheel hub. Only then can the vehicle be placed on the ground.
- Tighten all wheel bolts to the tightening specification for when the vehicle is stationary on the ground. Refer to → Chapter "Wheel Bolt Tightening Specifications"
- Retorque each individual wheel bolt to the required tightening specification at least one time. Refer to → Chapter "Wheel Bolt Tightening Specifications"
If all of the assembly steps were performed carefully and correctly, the wheel bolts do not need to be re-tightened after the vehicle has been driven a specific distance.
READ NEXT:
 Acceptable Tread Depth Variance
Model with Longitudinally Installed Engine
Tread variance for models with a longitudinally installed
engine, such as A4, A5, A6, A7, A8, Q5, Q7, ...
The variance between the front and rear axle in
Additional Wheel Housing Enlargement, FLAPS
On some vehicles with certain wheel/tire combinations, wheel
housing enlargements (FLAPS) must be attached on the fenders or
bumper for technical reasons -arrows-.
Please check whether FLAPS must
Wheel Bolts
Wheel Bolt Types
Note
Make sure the correct wheel bolts are installed. Refer to
the Parts Catalog.
Standard, One-Piece Wheel Bolt
Two-piece wheel bolt, short turnable spherical calottSEE MORE:
Installation Instructions, Run-Flat Tires
Warm up cold tires to the minimum mounting temperature
Note
This applies also to ultra high performance tires
(height-/width ration smaller/same 45% and speed rating symbol
larger than/same as V).
WARNING
The minimum mounting temperature for a tire may not
be below 21℃
Battery Test with Vehicle Diagnostic Tester
The Battery -A- can also be checked using the Vehicle
Diagnostic Tester when it is installed and without being
connected to a battery charger.
Special tools and workshop equipment
required
Vehicle Diagnostic Tester
Test Prerequisites
No battery charger connected
Battery -A- is co