
Audi Q3: Upper Transverse Link, Removing and Installing
Upper Transverse Link, Removing and Installing, FWD Vehicles
Special tools and workshop equipment required
- Torque Wrench 1332 40-200Nm -VAG1332-
Removing
- Measure dimension from center of wheel to lower edge of wheel housing. Refer to → Chapter "Wheel Bearing in Curb Weight, Lifting Vehicles with Coil Spring".
- Remove the coil spring. Refer to → Chapter "Spring, Removing and Installing".
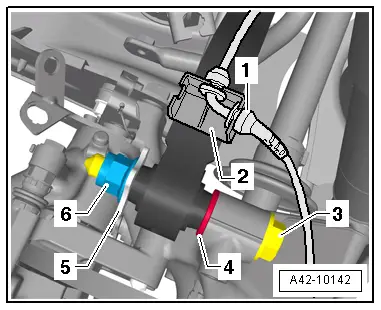
- Disengage the line -1- from the bracket -2-.
- Remove the nut -6- and the washer -5-.
- Remove the bolt -3- and washer -4-.
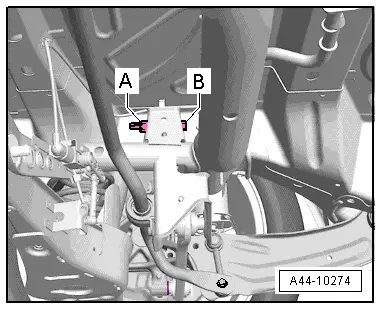
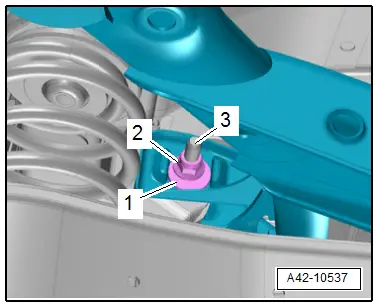
- Mark the position of eccentric screw -B- to the subframe using, for example, a felt-tip marker.
- Remove the nut -A- and the eccentric screw -B-.
- Remove upper transverse link.
Installing
Installation is reverse of removal, noting the following:
- The transverse link threaded connection may only be fastened if the dimension between the wheel hub center and the lower edge of the wheel housing that was measured before assembly is reached. Refer to → Chapter "Wheel Bearing in Curb Weight, Lifting Vehicles with Coil Spring".
- Note the applied marking of the eccentric screw -B- to the subframe.
 Note
Note
The washer -5- must be installed so that there is a gap between the washer and the brake shield.
- Install the coil spring. Refer to → Chapter "Spring, Removing and Installing".
- An axle alignment may be required. Refer to → Chapter "Evaluating Need for Axle Alignment".
Upper Transverse Link, Removing and Installing, AWD Vehicles
Special tools and workshop equipment required
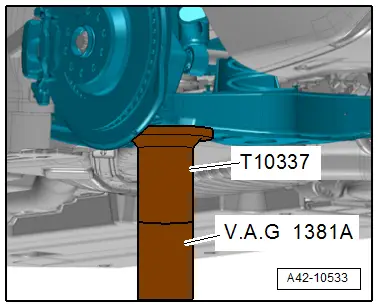
- Engine/Gearbox Jack - Gearbox Support -T10337-
- Torque Wrench 1332 40-200Nm -VAG1332-
- Engine and Gearbox Jack -VAS6931-
Removing
- Measure dimension from center of wheel to lower edge of wheel housing. Refer to → Chapter "Wheel Bearing in Curb Weight, Lifting Vehicles with Coil Spring".
- Remove the rear wheel. Refer to → Chapter "Wheels and Tires".
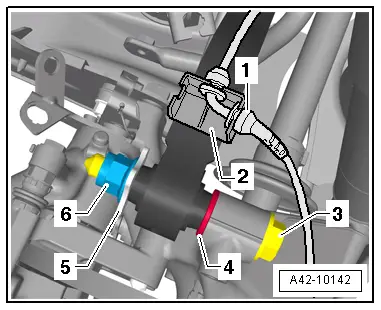
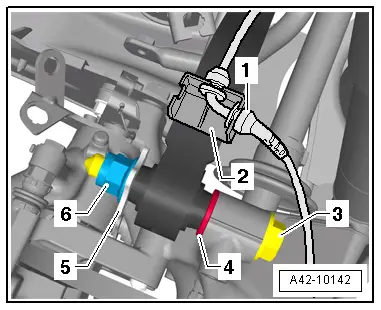
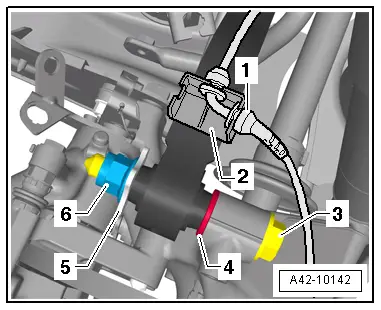
- Disengage the right and left wire -1- from the bracket -2-.
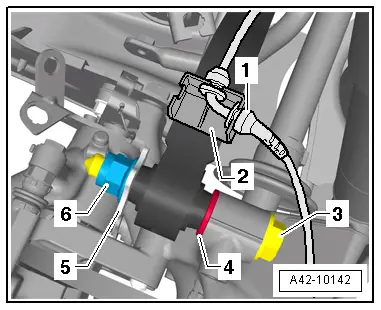
- Mount the Engine/Gearbox Jack - Gearbox Support -T10337- onto the Engine and Gearbox Jack -VAS6931- and attach to the lower control arm.
- Remove the nut -6- and then remove the bolt -3- with the washers -4 and 5- by lifting the stub axle carrier slightly using the Engine and Gearbox Jack -VAS6931-.
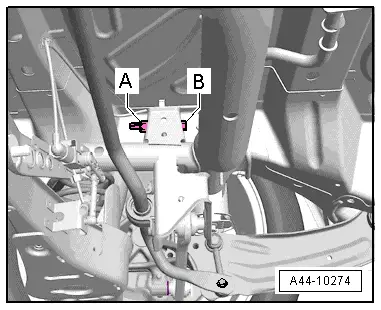
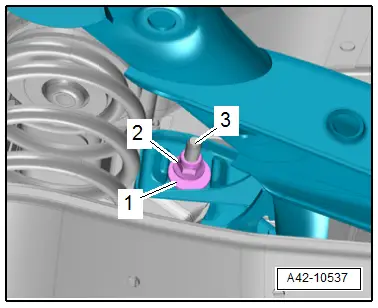
- Mark the position of eccentric washer -1- to subframe on both sides, using, for example, a felt-tip marker.
- Remove the nut -2- and the eccentric screw -3-.
- Remove upper transverse link.
Installing
Installation is reverse of removal, noting the following:
- The transverse link threaded connection may only be fastened if the dimension between the wheel hub center and the lower edge of the wheel housing that was measured before assembly is reached. Refer to → Chapter "Wheel Bearing in Curb Weight, Lifting Vehicles with Coil Spring".
- Note the applied marking of eccentric washer -1- to the subframe.
 Note
Note
The washer -5- must be installed so that there is a gap between the washer and the brake shield.
- An axle alignment may be required. Refer to → Chapter "Evaluating Need for Axle Alignment".
READ NEXT:
 Lower Transverse Link, Removing and Installing
Lower Transverse Link, Removing and Installing, FWD Vehicles
Special tools and workshop equipment
required
Torque Wrench 1332 40-200Nm -VAG1332-
Removing
- Measure dimension from cente
Tie Rod, Removing and Installing
Tie Rod, Removing and Installing, FWD Vehicles
Special tools and workshop equipment
required
Torque Wrench 1331 5-50Nm -VAG1331-
Torque Wrench 1332 40-200Nm -VAG1332-
Removing
- Meas
Suspension Strut/Shock Absorber, Spring
Overview - Suspension Strut, Shock Absorber and Spring
1 - Lower Spring Support
Spring end rotated up to stop
2 - Coil Spring
Removing and installing. Refer to
→&SEE MORE:
Steering Gear
Overview - Steering Gear
Part 1
1 - Bolt
6 Nm
For securing the wire
2 - Bolt
Tightening specification: -item 9-
Always replace if removed
Clean the threaded hole (for example, using a thread tap) before
installing the new bolt.
3 - Steering Sh
Steering Column Switch Module, Removing and Installing
Steering Column Switch Module, Removing and Installing, with Mechanical
Ignition Lock
Removing
- Adjust steering wheel downward and to rear as far as
possible, use entire adjustment range of steering column
adjustment for this.
- Remove the driver airbag. Refer to
→ Body 