Audi Q3: Foot Rest, Removing and Installing
Special tools and workshop equipment required
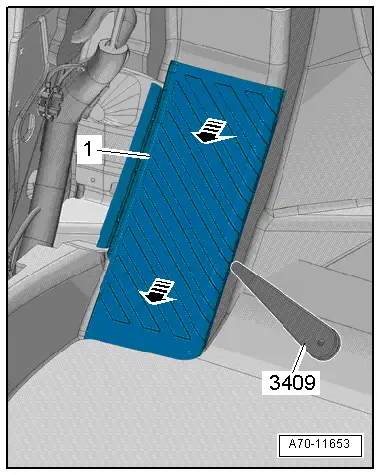
- Trim Removal Wedge -3409-
Removing
- Remove the front driver side sill panel trim. Refer to → Chapter "Front Sill Panel Strip, Removing and Installing".
- Unclip foot rest -1- using the Trim Removal Wedge -3409--arrow- and remove.
Installing
Install in reverse order of removal.
Installation notes, for example tightening specifications, replacing components. Refer to → Chapter "Overview - Foot Rest and Carpet".
Carpet, Removing and Installing
Steering Column Trim, Removing and Installing
Removing
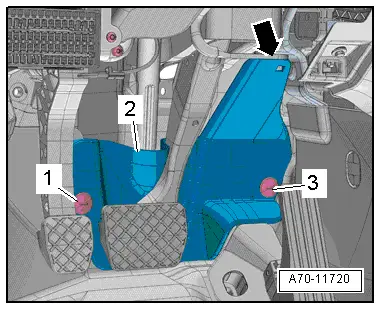
- Remove the press buttons -1- and -3- with a screwdriver.
- Unclip the upper steering column trim -2- from the air conditioner -arrow-.
Installing
Install in reverse order of removal.
Installation notes, for example tightening specifications, replacing components. Refer to → Chapter "Overview - Foot Rest and Carpet".
Carpet, Removing and Installing
Removing
- Remove the front seats. Refer to → Chapter "Front Seat, Removing and Installing".
- Remove the rear bench seat. Refer to → Chapter "Bench Seat/Single Seat, Removing and Installing".
- Remove the front sill panel strip. Refer to → Chapter "Front Sill Panel Strip, Removing and Installing".
- Remove the rear sill panel strip. Refer to → Chapter "Rear Sill Panel Strip, Removing and Installing".
- Remove the front belt end fitting. Refer to → Chapter "Front Belt End Fitting, Removing and Installing".
- Remove the B-pillar lower trim piece. Refer to → Chapter "Lower B-Pillar Trim Panel, Removing and Installing".
- Remove the center console. Refer to → Chapter "Center Console, Removing and Installing".
- Remove the footwell trim panel. Refer to → Chapter "Front Footwell Center Console Trim Panel, Removing and Installing".
- Remove the steering column trim. Refer to → Chapter "Steering Column Trim, Removing and Installing".
- Remove the accelerator Pedal Module from the accelerator Pedal Position Sensor. Refer to → Rep. Gr.20; Accelerator Pedal Module; Accelerator Pedal Position Sensor G79/G185 Removing and Installing.
- Remove the center console bracket and lower the shift mechanism. Refer to → Chapter "Center Console Bracket, Removing and Installing".
- Remove the rear air guide channel. Refer to → Heating, Ventilation, and Air Conditioning; Rep. Gr.87; Air Ducts; Air Distribution Channels, Removing and Installing.
USA and Canada market versions:
- Remove the nuts -arrows- for the carpet reinforcement.
- Disengage the carpet -1- with reinforcement from the sill panel.
- Repeat the procedure on the other side of the vehicle.
Continuation for all vehicles:
- Remove the floor mats.
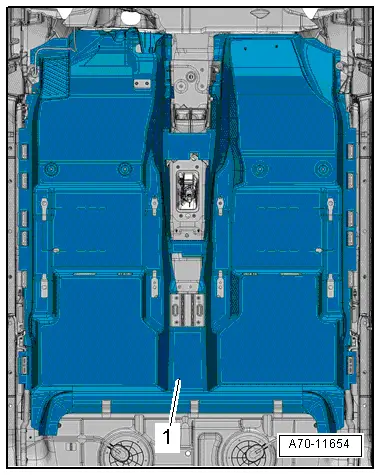
- Lift the rear carpet -1- and pull rearward.
 Note
Note
Make sure the floor covering does not tear at the openings.
- Fold floor covering and remove through the door.
Installing
- Fold floor covering and lay it in the vehicle.
- Push floor covering forward and align it so that the openings align.
Install in reverse order of removal.
Installation notes, for example tightening specifications, replacing components. Refer to → Chapter "Overview - Foot Rest and Carpet".
Rear Shelf, Removing and Installing
Front Rear Shelf, Removing and Installing
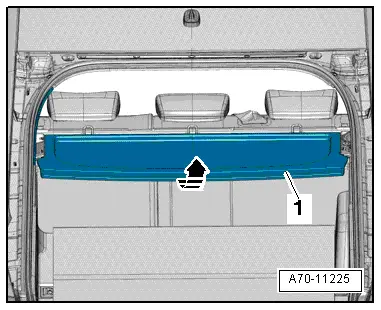
Removing
- Pull out the rear shelf -1- toward the rear -arrow- and remove.
Installing
Install in reverse order of removal.
Installation notes, for example tightening specifications, replacing components. Refer to → Chapter "Overview - Rear Shelf".
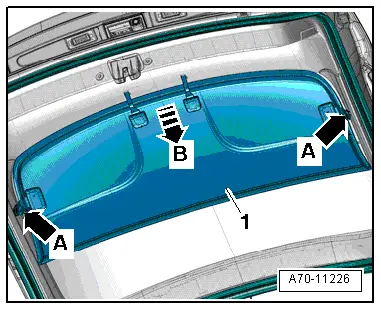
Rear Shelf Rear Section, Removing and Installing
Removing
- Disengage the rear shelf -1- from the rear lid trim panel -arrows A- and pull it out -arrow B-.
Installing
- Insert the rear shelf into the rear lid trim panel and engage it into the mounts on the left and right sides -arrows A-.
Installation notes, for example tightening specifications, replacing components. Refer to → Chapter "Overview - Rear Shelf".
READ NEXT:
 Component Location Overview - Luggage Compartment Trim Panels
1 - Lock Carrier Trim
Overview. Refer to
→ Chapter "Overview - Lock Carrier Trim".
2 - Luggage Compartment Floor Covering
Overview. Refer to
→ Chapte
Lower Rear Lid Trim Panel, Removing and Installing
Lower Rear Lid Trim Panel, Removing and Installing
Special tools and workshop equipment
required
Pry Lever -80-200-
Omega Clip Tool -T40280-
Removing
- If installed, remove the rear
Luggage Compartment Side Trim Panel, Removing and Installing
Special tools and workshop equipment
required
Pry Lever -80-200-
Omega Clip Tool -T40280-
Removing
- If installed, remove the luggage compartment roller cover.
- Remove the rearSEE MORE:
Map update
Introduction
Applies to: vehicles with navigation system
You can update the map data in the MMI with a
map update. The functions depend on the country
and vehicle equipment.
Map update through online map update.
Import a map update from the USB connection
to your MMI.
Online map update
Applies
General Information
ABS Repair Instructions
ABS malfunctions do not affect the brake system and the
booster. Conventional brake system stays operative even without
ABS. A change in braking behavior should be checked. When the
ABS warning lamp comes on the rear wheels can lock-up early when
braking!
